A Bag Patchwork – Pattern is more than just a functional item; it is a canvas where traditional craftsmanship meets modern utility, allowing you to carry a piece of art wherever you go. Finding the right Bag Patchwork – Pattern can transform a collection of fabric scraps into a durable, stylish accessory that tells a unique story through every stitch. In this guide, we explore how to master this creative process, ensuring that your handcrafted bags stand out for their quality and aesthetic appeal.
Many enthusiasts are drawn to the Bag Patchwork – Pattern because of its incredible versatility and the sustainable nature of the craft. By utilizing a quilting pattern for bags, you are not only engaging in a rewarding hobby but also reducing textile waste by repurposing high-quality cotton or linen offcuts. Whether you are a beginner looking for a simple tote bag design or an expert tackling a complex geometric patchwork, the foundation of a successful project always lies in the precision of the initial sewing pattern.
Understanding the nuances of a Bag Patchwork – Pattern requires a blend of patience and technical knowledge, from selecting the right color palette to mastering seam allowances. This article serves as a comprehensive resource to help you navigate the world of patchwork accessories, offering professional insights into construction techniques and design principles. By the end of this read, you will have the confidence to select your next Bag Patchwork – Pattern and execute it with a level of detail that rivals high-end boutique pieces.
1. Understanding the Core Concept of Bag Patchwork – Pattern
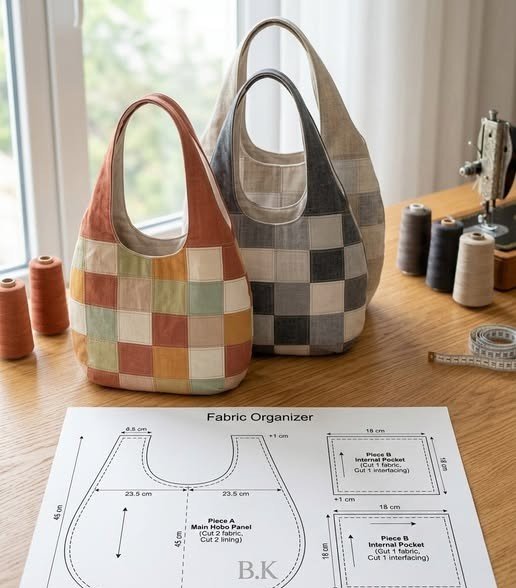
The term Bag Patchwork – Pattern refers to the specific blueprint used to create a bag composed of different fabric pieces joined together. Unlike a standard solid-fabric bag, a patchwork design requires a strategic layout of shapes—such as squares, triangles, or hexies—that must fit together perfectly before the final bag shape is cut. It is the essential guide that dictates how much fabric yardage you need and how to arrange your colors for maximum visual impact.
When we talk about a Bag Patchwork – Pattern, we are looking at the intersection of quilting techniques and bag making. The “patchwork” element involves the artistic arrangement of fabric, while the “pattern” provides the structural dimensions. Without a solid pattern template, even the most beautiful patchwork can result in a bag that is misshapen or lacks the necessary durability to carry daily essentials.
The Bag Patchwork – Pattern also includes instructions for interfacing and stabilizers, which are crucial for giving the bag its form. Since patchwork fabric is often thinner due to multiple seams, the pattern will guide you on using fusible fleece or foam stabilizers to ensure the bag doesn’t collapse. This structural integrity is what separates a homemade project from a professional-looking patchwork handbag.
Choosing a Bag Patchwork – Pattern involves considering the difficulty level of the piecing process. Some patterns utilize “foundation paper piecing” for intricate designs, while others rely on simple strip piecing for a faster result. Understanding these variations helps you select a project that matches your current skill level while still offering a creative challenge that improves your sewing proficiency.
Another vital aspect of the Bag Patchwork – Pattern is the cutting layout. Because you are working with multiple small units, the pattern instructions will often include a diagram on how to efficiently cut your fabric to minimize waste. This is particularly important when working with fat quarters or pre-cut fabric bundles like charm packs and jelly rolls, which are popular in the quilting community.
Finally, the Bag Patchwork – Pattern serves as a historical bridge, connecting us to traditional quilting heritage while allowing for modern customization. You can take a classic “Log Cabin” or “Grandmother’s Flower Garden” motif and apply it to a modern backpack or crossbody bag. This flexibility is why the patchwork pattern remains a staple in the DIY fashion world, offering endless possibilities for personalization.
2. Essential Tools and Materials for Your Patchwork Project
To successfully execute a Bag Patchwork – Pattern, having the right tools is just as important as the fabric itself. A rotary cutter, an acrylic ruler, and a self-healing cutting mat are non-negotiable for achieving the straight lines and precise angles required for patchwork piecing. When your cuts are accurate, the pieces of your Bag Patchwork – Pattern will align perfectly, preventing frustrating “puckers” or mismatched corners.
Fabric selection is the soul of any Bag Patchwork – Pattern. Most experts recommend 100% quilting cotton because of its stability and the vast array of prints available. However, you can also incorporate recycled denim, linen blends, or even canvas to add texture and strength to your handmade bag. Just ensure that the weight of the fabrics is relatively consistent so the seams remain flat and manageable.
Thread choice is an often overlooked but critical component of the Bag Patchwork – Pattern. A high-quality 50wt cotton thread is ideal for piecing because it is strong yet thin enough to not add bulk to your seam allowances. If you plan on doing topstitching or decorative quilting on the exterior of your bag, you might opt for a thicker 40wt or 30wt thread to make the stitches pop against the patchwork.
Structural components like magnetic snaps, zippers, and D-rings turn a simple fabric shell into a functional piece of gear. When following a Bag Patchwork – Pattern, pay close attention to the hardware requirements. High-quality metal hardware in finishes like antique brass or nickel can significantly elevate the finished look of your patchwork tote or messenger bag, giving it a professional “store-bought” finish.
Don’t forget the importance of a good steam iron and pressing mat. In the world of Bag Patchwork – Pattern construction, pressing is just as important as sewing. Pressing your seams open or to one side (as directed by the pattern) ensures that the bag’s surface stays smooth and that the bulky intersections of fabric don’t interfere with your machine’s needle during the final assembly.
Lastly, consider the lining fabric and interior pockets. While the exterior Bag Patchwork – Pattern gets all the glory, the inside needs to be just as durable. Using a contrasting solid color for the lining can help you find items more easily inside your bag. Many modern bag patterns include specialized pockets for smartphones or tablets, adding a layer of modern functionality to your traditional patchwork art.
3. Step-by-Step Techniques for Sewing a Patchwork Bag
The first step in bringing your Bag Patchwork – Pattern to life is the “prep work.” This involves washing and pressing your fabrics to prevent future shrinkage and then meticulously cutting each piece according to the pattern templates. Organization is key here; many makers use wonder clips or labeled trays to keep their various patchwork units sorted before they head to the sewing machine.
Once the pieces are cut, you begin the piecing phase. Following your Bag Patchwork – Pattern, you will sew the fabric scraps into larger panels. The golden rule here is the 1/4-inch seam allowance. Maintaining this exact distance is vital; even a slight deviation can cause the entire patchwork panel to be the wrong size for the bag’s side or bottom pieces, leading to assembly headaches later on.
After the panels are pieced, it is time to add the quilting layer. Most Bag Patchwork – Pattern designs look best when they are “quilted” to a layer of batting or stabilizer. You can use straight-line quilting, free-motion quilting, or “stitch-in-the-ditch” to secure the layers. This not only adds a beautiful texture to your handcrafted bag but also reinforces the many seams of the patchwork for long-term durability.
Next comes the assembly of the bag’s body. This is where your Bag Patchwork – Pattern starts looking like a 3D object. You will typically sew the front and back panels to the gusset (the sides and bottom). If your pattern includes boxed corners, this is the stage where you create that depth, allowing the bag to stand upright. Always backstitch at the beginning and end of these structural seams for extra strength.
The handle and strap attachment is a critical security point. Whether you are making fabric straps that match your patchwork or using leather handles, they must be anchored firmly. Your Bag Patchwork – Pattern will usually specify “X-box” stitching at the attachment points. This ensures that even if you carry heavy items, the straps won’t rip away from the patchwork exterior.
The final stage is the bag “turning” and finishing. Most bags are sewn “right sides together” and then turned through a gap in the lining. Once turned, you will blind stitch the lining closed and give the entire bag a final, professional press. Following the Bag Patchwork – Pattern instructions for topstitching around the top rim will give the bag a crisp, high-end edge and keep the lining from rolling outward.
4. Tips for Customizing and Designing Your Own Patterns
Once you are comfortable following a pre-made Bag Patchwork – Pattern, you might feel the itch to design your own. Customization starts with color theory. You can use a color wheel to choose complementary or analogous colors that make your patchwork blocks stand out. Mixing prints—like florals with geometric dots—can add a sophisticated, curated feel to your custom bag design.
Scaling is another way to modify a Bag Patchwork – Pattern. If you love a specific quilt block but it’s too large for a purse, you can use miniature quilting techniques to shrink the design. Conversely, you can take a small clutch pattern and add wider side panels or a larger bottom to turn it into a spacious patchwork market bag. Mathematics plays a role here, so always double-check your measurements.
Adding functional embellishments is a great way to put a personal spin on a standard Bag Patchwork – Pattern. Consider adding external zipper pockets, key fobs, or even embroidery over the patchwork. These details don’t just add beauty; they increase the utility of the bag, making it a perfect companion for your specific daily needs and lifestyle.
The choice of quilting motif can also drastically change the “vibe” of your Bag Patchwork – Pattern. A modern, minimalist patchwork looks incredible with tight, horizontal straight-line quilting. A more vintage or “shabby chic” floral patchwork might benefit from soft, swirling patterns or hand-quilted details. This “extra” layer of design is where your personality truly shines through.
Don’t be afraid to experiment with mixed media. You can integrate pieces of cork fabric, faux leather, or even upcycled clothing into your Bag Patchwork – Pattern. Mixing these sturdier materials with traditional cotton patchwork creates a high-contrast, contemporary look that is very popular in current indie craft trends and boutique fashion circles.
Finally, keep a sewing journal of your projects. Document which Bag Patchwork – Pattern worked best, which stabilizers provided the best “heft,” and any mistakes you made along the way. This record becomes an invaluable resource for your future self, allowing you to refine your technique and eventually produce professional-grade patchwork bags that are truly one-of-a-kind.
FAQ – Frequently Asked Questions
1. Is a Bag Patchwork – Pattern suitable for complete beginners?
Yes, many patterns are designed specifically for beginners. If you are new to sewing, look for a Bag Patchwork – Pattern that uses simple squares or strips (like a “rail fence” design) rather than complex curves or intricate points.
2. What is the best fabric for a patchwork bag?
Quilting cotton is the gold standard because it doesn’t stretch and comes in endless patterns. For a more “rugged” look, you can use canvas or denim, but ensure your sewing machine can handle the extra thickness of the layers.
3. Do I really need to use interfacing?
Absolutely. Without interfacing or a stabilizer, a patchwork bag will be floppy and lose its shape quickly. The Bag Patchwork – Pattern will usually specify which type of weight you need to support the structure of the bag.
4. Can I wash my patchwork bag?
If you use pre-washed cotton fabrics and high-quality stabilizers, most patchwork bags can be gently hand-washed or machine-washed on a delicate cycle. Always air dry to maintain the shape and integrity of the patchwork seams.
5. How long does it take to complete a Bag Patchwork – Pattern?
This depends on the complexity. A simple patchwork tote might take 3-5 hours, while a complex diaper bag or travel duffel with intricate piecing could take several days of dedicated work.
6. Where can I find a good Bag Patchwork – Pattern?
You can find them in quilting magazines, through indie pattern designers online, or at your local quilt shop. Many designers offer digital PDF versions that you can print at home.
Conclusion
Creating a Bag Patchwork – Pattern project is a journey of color, texture, and technical skill. Throughout this article, we have explored the importance of choosing the right sewing blueprint, the essential tools like rotary cutters and stabilizers, and the step-by-step techniques required to assemble a durable, beautiful piece.
We also touched on how to customize your patchwork bags to reflect your personal style, ensuring that your creations are as unique as you are. Whether you are looking to create a gift or a new favorite accessory for yourself, mastering the Bag Patchwork – Pattern is an incredibly fulfilling endeavor for any crafter.