If you’ve ever searched for a Bag Patchwork Tutorial – Pattern, you’re likely someone who loves creativity, sewing, or handmade crafts. Whether you’re a beginner wanting to learn a new skill or an experienced sewer looking for new ideas, this guide is designed just for you. The art of patchwork combines fabrics, colors, and designs to create truly unique and functional bags.
In this Bag Patchwork Tutorial – Pattern, we’ll walk you through everything from selecting your fabric to stitching it all together. You’ll learn how to create stunning patchwork designs and bring them to life in the form of a fashionable, reusable bag. The best part? You don’t need expensive tools or advanced sewing knowledge to get started.
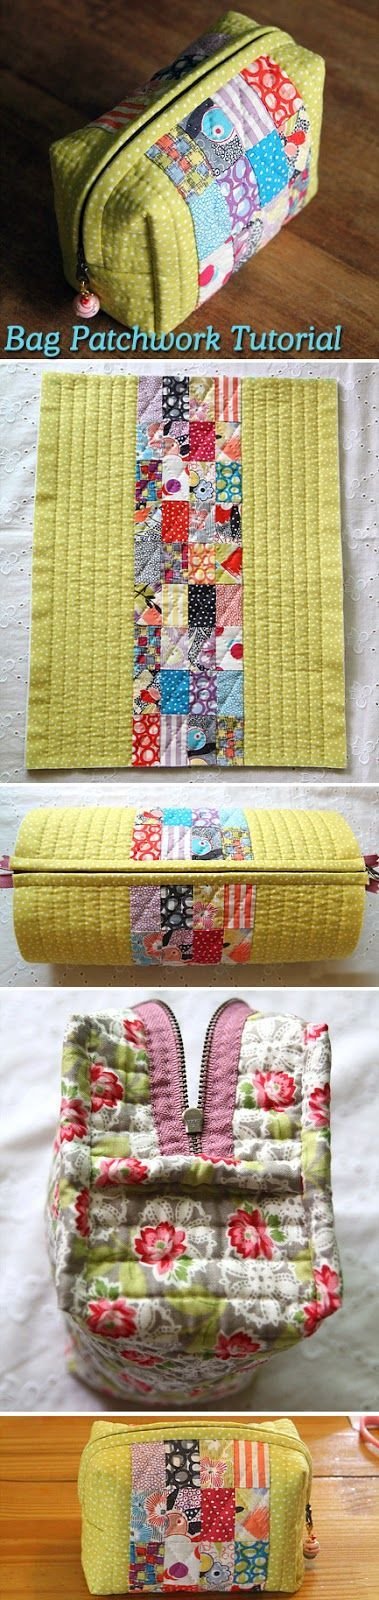
Patchwork is more than just sewing; it’s storytelling through fabric. Each piece of material you choose holds its own charm, and when combined with others, it can transform into something completely new. Let’s dive into the beauty and simplicity of bag patchwork and make something beautiful from fabric scraps and creativity.
1. Choosing the Right Materials for Your Patchwork Bag
Before starting your Bag Patchwork Tutorial – Pattern, it’s important to gather the right materials. Having the proper supplies can make your patchworking experience smoother and more enjoyable.
First, choose cotton fabric as your main material. It’s easy to work with, durable, and comes in endless colors and prints. Cotton fabrics are perfect for beginners because they don’t stretch much and hold their shape well during sewing.
Second, pick a quality sewing machine or prepare your hand-sewing kit. If you’re sewing by hand, invest in strong needles and polyester thread to ensure your patchwork bag is sturdy and long-lasting.
Third, select a cutting mat, rotary cutter, and quilting ruler. These tools help you cut your fabric into even pieces, which is essential for neat and symmetrical patchwork patterns.
Next, think about the lining and interfacing. A good lining will add strength and structure to your bag, while interfacing keeps the fabric from sagging. Choose medium-weight interfacing for best results.
Also, gather accessories such as zippers, buttons, straps, and magnetic snaps. These finishing touches can elevate your bag and make it not just practical, but also stylish.
Lastly, don’t forget your patchwork pattern template. Whether you’re using a printed pattern or creating your own, having a template will keep your design cohesive and organized.
2. How to Design Your Bag Patchwork Pattern
Designing a beautiful Bag Patchwork Tutorial – Pattern starts with creativity and planning. This step is where you decide how your bag will look and what story your patchwork tells.
Begin by choosing a color scheme. Use the color wheel to pick complementary or contrasting tones. You can go for a boho-chic look with earthy tones or a modern pop-art style with bold colors.
Sketch your design on paper before cutting any fabric. Even a rough sketch can guide your layout and prevent mistakes during assembly. This also helps with planning fabric sizes and placements.
Consider different patchwork techniques such as square blocks, strip piecing, or crazy quilting. Each method gives your bag a distinct look and texture. Choose a style that matches your skill level and design vision.
Keep your bag’s function in mind. Will it be a tote, clutch, or shoulder bag? The size and purpose will influence your pattern layout and fabric choices.
Use scraps or fat quarters for variety. Mixing fabric prints like florals, stripes, and solids adds character. Just ensure the fabrics are of similar weight and texture for easy sewing.
Finally, lay your fabric pieces out on a flat surface before sewing. This visual mock-up lets you rearrange patches and finalize your design, ensuring everything fits together perfectly.
3. Step-by-Step Sewing Process for Your Patchwork Bag
Now it’s time to bring your Bag Patchwork Tutorial – Pattern to life. Sewing your patchwork bag is easier than it looks with the right steps.
Start by cutting your fabric pieces according to the pattern. Double-check each measurement and ensure the pieces align well. Accuracy here will save time during sewing.
Next, sew your patches together using a 1/4 inch seam allowance. This is the standard for quilting and patchwork. Press the seams flat with an iron after sewing each row or block.
Once the main patchwork panel is complete, attach interfacing to the back of the fabric. This step adds stiffness and helps your bag hold its shape better.
Now, sew the lining fabric in the same size as your patchwork panels. Include interior pockets if desired. The lining is what gives your bag a finished, professional look.
Assemble the bag by sewing the front and back panels together, then attach the base and sides. Make sure your seams are even and reinforced for strength.
Finally, add finishing touches like handles, zippers, buttons, or decorative stitching. These elements not only make your bag functional but also express your personal style.
4. Tips for Maintaining and Personalizing Your Patchwork Bag
Creating a bag using a Bag Patchwork Tutorial – Pattern is just the beginning. With a few tips, you can keep your bag in great condition and make it truly your own.
To clean your patchwork bag, spot clean with a damp cloth or use gentle hand washing. Avoid harsh detergents that can fade or damage the fabric patches.
Store your bag properly when not in use. Keep it in a cool, dry place away from direct sunlight to prevent colors from fading or fabric from weakening.
Reinforce any loose seams periodically. Regular use can cause stitching to come undone over time, especially near handles or zippers. A quick fix now prevents major repairs later.
Use fabric paint or embroidery to personalize your bag. Add your initials, patterns, or symbols to give it a signature look that reflects your identity.
Don’t be afraid to mix textures like denim, corduroy, or even leather patches. Adding different materials gives a rich, tactile quality to your bag and enhances its durability.
Lastly, consider making more than one! Once you master the basic Bag Patchwork Tutorial – Pattern, you can create custom bags for gifts, craft fairs, or even your own small business.
Frequently Asked Questions (FAQ)
Q1: What is the best fabric to use for a patchwork bag?
A: Cotton is the most popular choice for patchwork bags due to its ease of use and variety. For added durability, you can combine it with canvas or denim.
Q2: Do I need a sewing machine for this tutorial?
A: While a sewing machine speeds up the process, you can also sew a patchwork bag by hand using strong needles and polyester thread.
Q3: Can I use recycled fabric for patchwork bags?
A: Absolutely! Old clothes, tablecloths, or fabric scraps work wonderfully in patchwork and add unique character to your bag.
Q4: What size should my patches be?
A: Patch size depends on your bag dimensions and design. Common sizes are 4×4 inches or 5×5 inches, but you can adjust based on your pattern.
Q5: How long does it take to complete a patchwork bag?
A: For beginners, it may take 4–6 hours from cutting to final stitch. With practice, you’ll be able to finish quicker.
Q6: Can I sell the bags I make from this pattern?
A: Yes, handmade patchwork bags are great for selling online or at local markets. Just make sure your designs are original or modified if using someone else’s pattern.
Conclusion
This Bag Patchwork Tutorial – Pattern has walked you through the full journey of creating a beautiful, durable, and personalized bag from start to finish. From selecting the right materials to sewing and customizing your final piece, the joy of patchwork lies in the freedom to create something truly one-of-a-kind.
We hope this guide inspired you to start your own patchwork bag project, whether for yourself, a loved one, or as part of a creative business. Don’t forget to share your results and help inspire others to start sewing!
Please leave your honest opinion about this tutorial in the comments, and feel free to share any suggestions or questions you might have. Happy sewing!