Bear Paw Quilt Block – Pattern is a timeless classic among quilt designers and makers, beloved for its geometric charm and rich heritage. Bringing together crisp triangles and squares, the Bear Paw Quilt Block – Pattern offers both visual appeal and a nod to traditional quilting techniques. Whether you’re an experienced quilter or a newcomer seeking a meaningful project, this pattern promises creativity, structure, and a warm, cozy finish.
The Bear Paw Quilt Block – Pattern often serves as a centerpiece in quilts, as its repeating paw motif creates movement and depth. It’s a versatile design that works equally well in large throws, wall hangings, or intricate miniature quilt blocks. By selecting contrasting fabrics—light and dark—you can make the paw “print” stand out with bold clarity or a subtle fade effect.
This article will explore the Bear Paw Quilt Block – Pattern in a comprehensive, SEO‑friendly way, keeping your interest front and center while delivering practical guidance. With clear steps, helpful tips, and thoughtful explanations of essential quilting concepts, you’ll not only understand the Bear Paw Quilt Block – Pattern, but also appreciate its charm and method.
1. Understanding the Bear Paw Quilt Block – Pattern
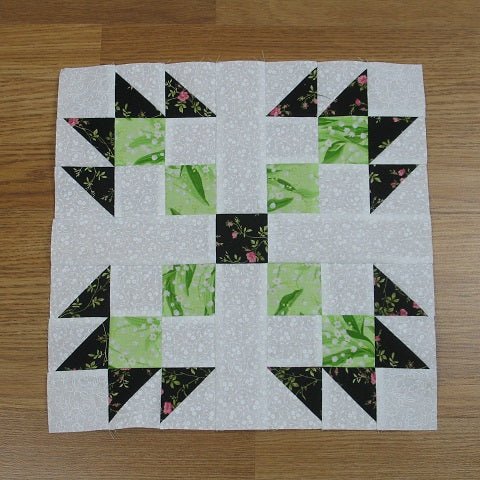
The Bear Paw Quilt Block – Pattern is constructed from multiple units of half‑square triangles and full squares, forming a paw shape that radiates outward. This design relies on precise cutting and piecing, making seam accuracy a key focus.
Traditionally, each “paw” is composed of four smaller blocks: one center square (for the “pad”) and three triangle‑square combinations for the “toes.” The Bear Paw Quilt Block – Pattern is often set in a grid with four paws per block or multiple blocks per quilt, depending on the layout.
Fabric selection is vital. Use high‑contrast fabrics—typically a darker tone for the “paw” and a lighter background—for sharp visual contrast. But you can also experiment with tone‑on‑tone or scrappy combinations to create subtle, modern variations.
One advantage of the Bear Paw Quilt Block – Pattern lies in its symmetry: flipping and rotating units can yield alternate patterns, like “Bear’s Claw” or “Bear Tracks.” This flexibility allows you to personalize your quilt design based on your creative vision.
Finally, mastering accurate seam allowances (typically ¼‑inch) ensures that all blocks align properly when sewn together. The Bear Paw Quilt Block – Pattern rewards quilters who take care with small details, resulting in a polished and cohesive quilt top.
2. Preparing Materials and Cutting Fabric
Begin by selecting your fabrics: a darker fabric for the “paws” and a contrasting lighter fabric for the background. For a standard 12‑inch finished block, you’ll need squares and half‑square triangles at specific dimensions, accounting for seam allowance.
First, cut one 6‑inch square of the darker fabric for the pad, plus three 3½‑inch squares of darker fabric for the toes. From the lighter fabric, cut three 3½‑inch squares and three more for background pieces. Total pieces: one 6‑inch dark square, three 3½‑inch dark squares, and six 3½‑inch light squares.
To make half‑square triangles for the toes, pair each dark 3½‑inch square with a light one. Draw a diagonal line on the back of one square, sew ¼‑inch on each side of the line, then cut on the line and press open to yield two half‑square triangles. Trim to 3‑inch finished if needed.
Remember to square up your half‑square units before assembling the block to maintain accuracy. The Bear Paw Quilt Block – Pattern depends on clean, crisp points—especially at the paw tips.
Label your pieces: “pad,” “toe triangles,” and “background.” A simple layout step—arranging the pieces before stitching—can eliminate confusion and help you visualize the final block.
Keeping fabric grain alignment and pressing seams consistently (usually press toward the darker fabric) will help ensure flat blocks and accurate nesting during assembly of the Bear Paw Quilt Block – Pattern.
3. Assembling the Bear Paw Quilt Block – Pattern
Start by stitching the toe units together: each toe consists of two half‑square triangles and a background square. Sew the two triangles into a unit, then add the background square to complete a toe cluster.
Once all three toe clusters are assembled, you’ll have three small rectangular units plus the central pad. Lay them out so that the toe points extend outward from the pad—forming the “paw” shape.
Sew the toe clusters to matching sides of the pad square. Typically, you attach one cluster to each of three sides—left, top, and right—leaving the bottom open if you’re creating a directional block. For a symmetric block, mirror the layout.
Press your seams carefully, ensuring that stitches nest. Matching seams at the pad ensures the paw looks sharp and centered. Precise piecing here is what makes the Bear Paw Quilt Block – Pattern shine.
Check the final block for square: the block should measure the intended size (e.g. 12 inches finished). Trim gently if necessary, but aim for accurate piecing to limit the need for trimming.
The Bear Paw Quilt Block – Pattern is now complete! You can repeat, rotate, and align multiple blocks to form a quilt top. The clean geometry of the bear paw design lends itself beautifully to both classic and modern layouts.
4. Variations, Layout Ideas, and Finishing Tips
Play with rotations: by rotating every other Bear Paw Quilt Block – Pattern, you create interesting secondary patterns—like a lattice or diamond effect—across your quilt. Variations include alternating light and dark pads for a checkerboard feel.
Try scrappy fabrics: instead of uniform dark and light, mix prints for the paws and backgrounds. This gives a lively, improvisational appearance while still maintaining the Bear Paw Quilt Block – Pattern recognition.
Borders can enhance your design: a simple straight‑grain border complements the geometric block, while a sawtooth or flying geese border echoes the triangular elements in the pattern.
When quilting, diagonal or cross‑hatch quilting echoes the design; stitching along the seams emphasizes the pieced structure. Alternatively, free‑motion quilting can soften the block’s geometry.
If you’re making a queen‑size quilt, calculate how many blocks you need—a typical layout might be 6 × 8 blocks—and consider sashings in between for visual separation.
Finally, choose binding and backing fabrics that harmonize but let the Bear Paw Quilt Block – Pattern take center stage. A neutral binding unifies the quilt, while a bold binding can frame the Bear Paw Quilt Block – Pattern with added flair.
FAQ – Frequently Asked Questions about Bear Paw Quilt Block – Pattern
Q1: What is the finished size of a Bear Paw Quilt Block – Pattern?
A1: It varies—but common sizes are 6″, 9″, or 12″ finished. Ensure your cutting dimensions account for the ¼‑inch seam.
Q2: Can I use fat quarters for the Bear Paw Quilt Block – Pattern?
A2: Yes, if your fat quarters yield the required cut pieces. Fat quarters are versatile, especially for scrappy versions.
Q3: How do I prevent stretch when making half‑square triangles?
A3: Use minimal handling, stitch at slower speed, starch lightly if needed—this preserves sharp points in the half‑square triangles for the Bear Paw Quilt Block – Pattern.
Q4: What pressing direction is best?
A4: Press seams toward the darker fabric or open—pressing toward the dark helps reduce shadowing in the final quilt.
Q5: How many blocks will I need for a throw-size quilt?
A5: For a 60 × 72 inch throw with 12 inch blocks, you’d need 30 blocks (5 columns × 6 rows). Adjust according to your block size and desired quilt dimensions.
Q6: Can I combine Bear Paw Quilt Block – Pattern with other quilt blocks?
A6: Absolutely—you can sash between blocks, alternating Bear Paw with plain blocks or complementary designs like Nine‑Patch or Flying Geese.
Conclusion
In this article, you learned how to create the Bear Paw Quilt Block – Pattern from selecting fabrics, precise cutting, making half‑square triangles, through to assembly and finishing. We explored layout variations, scrappy and rotation ideas, and quilting strategies—all structured and SEO‑optimized for clarity and discovery.
If you found this guide helpful, please share your honest thoughts and suggestions. Your feedback not only helps others exploring the Bear Paw Quilt Block – Pattern, but also guides future articles to be even more useful and engaging. Happy quilting!