Bitsy Box fabric sewing – Pattern projects have become increasingly popular among sewing enthusiasts who enjoy creating small, functional, and adorable storage solutions. Right from the opening line, the charm of the Bitsy Box fabric sewing – Pattern stands out because it offers an easy, customizable, and practical craft suitable for beginners and seasoned sewists. This pattern is ideal for organizing small items, gifting handmade creations, or adding decorative touches to your craft room or home décor. Its compact shape and versatile design make it a must-try project for anyone who enjoys fabric crafts.
One of the reasons the Bitsy Box fabric sewing – Pattern is so beloved is its simplicity paired with its endless customization options. You can experiment with various fabrics, prints, textures, and embellishments to create a truly unique box that suits your personal style. The project is also quick to sew, making it a fun weekend or even an hour-long craft session. Whether you want a coordinating set of boxes or a single statement piece, this pattern can adapt to your needs effortlessly.
Another advantage of this pattern is its practicality. The Bitsy Box fabric sewing – Pattern offers a structured yet flexible form, allowing you to store jewelry, sewing notions, desk accessories, or small keepsakes. It’s an excellent way to use fabric scraps and leftover materials, which makes it both budget-friendly and environmentally conscious. Before diving into the steps and techniques, let’s look more deeply at the features that make this pattern so enjoyable and rewarding to work with.
1. Understanding the Structure of the Bitsy Box Fabric Sewing – Pattern
The Bitsy Box fabric sewing – Pattern is designed to be small, sturdy, and functional. Its construction typically includes outer fabric, lining fabric, and stabilizers such as interfacing or batting to help the box maintain its shape. Because of its compact size, the pattern is easy to handle, even for beginners who may feel intimidated by larger sewing projects.
The basic structure consists of a cube-like or rectangular form with reinforced sides. These sides are sewn together carefully to create a crisp, defined shape. The pattern usually includes fold-over edges or clean seams that contribute to the box’s neat appearance. Even though the design is simple, it offers many opportunities for precision and personalization.
Most versions of the pattern rely on straight stitching, which is ideal for beginners. More advanced sewists can experiment with decorative seams or edge stitching to elevate the final look. The simplicity of the stitches does not diminish the beauty of the box; rather, it enhances its minimalist charm.
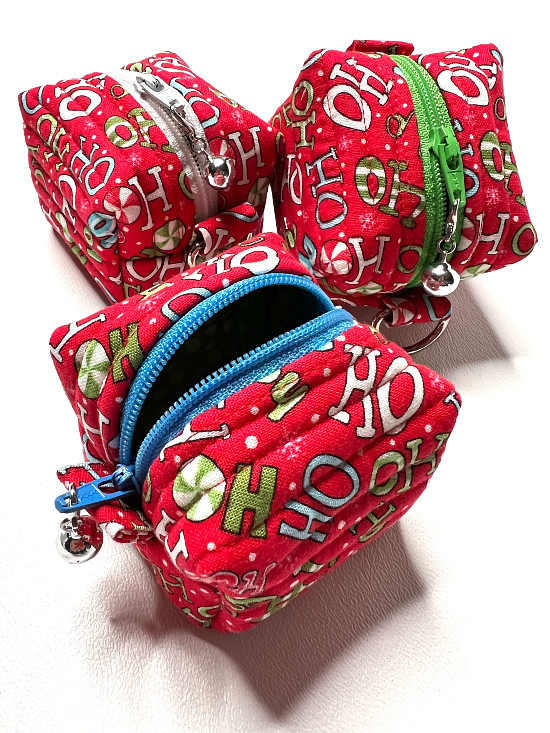
Another important structural element is the closure, which may vary depending on the creator’s preference. Some crafters leave the box open like a small basket, while others add buttons, snaps, Velcro, or fabric ties. This flexibility allows each maker to adapt the design to its intended use.
Because the pattern is small, it’s also very portable. You can easily cut and sew the pieces on a small table or sewing station, making it ideal for apartment living or shared crafting spaces. The Bitsy Box fabric sewing – Pattern remains a favorite because it fits into almost any creative environment.
Finally, the pattern’s structure encourages repetition. Many sewists find themselves making multiple boxes because the process becomes so enjoyable and intuitive. Whether for personal use, gifting, or selling at craft fairs, the pattern’s structure makes it consistently reliable and satisfying.
2. Choosing Fabrics and Supplies for a Perfect Bitsy Box Fabric Sewing – Pattern
Choosing the right materials is essential for creating a polished and durable Bitsy Box fabric sewing – Pattern project. The outer fabric should be sturdy enough to hold its shape, so cotton, canvas, linen, and quilting cotton are excellent choices. These materials offer structure while remaining easy to sew.
For the lining, softer fabrics such as cotton or lightweight linen are ideal. They provide a clean interior finish without adding unnecessary bulk. Coordinating colors or contrasting prints can add visual interest and personality to the design, making each box unique.
Interfacing or stabilizer is crucial for giving the box its structure. Fusible interfacing is commonly used because it adheres easily and helps the fabric become more rigid. For sewists who want a more padded look, using felt or foam stabilizers can provide extra thickness and a plush finish.
Thread quality also matters. Using a strong polyester or cotton thread ensures seams stay tight and secure, especially at stress points like corners. A matching thread color creates a seamless look, while contrasting thread can add a bold decorative element.
Basic sewing tools such as scissors, rotary cutters, cutting mats, and fabric clips are helpful for preparing the fabric pieces. Clips are particularly useful because they avoid leaving pinholes in thick fabric layers. A sewing machine with a straight stitch function is typically all you need for this project.
Lastly, consider embellishments. Buttons, bows, appliqués, embroidery, or decorative stitching can make your Bitsy Box fabric sewing – Pattern creation one-of-a-kind. The overall style is completely customizable, so feel free to experiment with details that reflect your personal taste.
3. Step-by-Step Guide to Creating Your Bitsy Box Fabric Sewing – Pattern
To begin crafting your Bitsy Box fabric sewing – Pattern, start by preparing all fabric pieces according to the template or measurements provided in your chosen design. Precision in cutting ensures that the box fits together neatly and the edges align correctly during sewing.
Next, apply interfacing to the outer fabric pieces. This step strengthens the structure and helps the box maintain its shape over time. Press the interfacing carefully to avoid bubbles or wrinkles that could affect the final appearance of your project.
Once the pieces are prepared, begin sewing the outer panels together. This usually involves stitching the sides to the base first, then securing the corners. Take your time to ensure that seams remain straight and corners align cleanly. A well-constructed base sets the foundation for the entire box.
After assembling the exterior, move on to the lining fabric. Follow the same method used for the outer panels to ensure the lining fits perfectly inside the box. The lining should mirror the shape of the exterior but remain slightly smaller for a smooth fit.
When both the outer box and the lining are complete, place them together with right sides facing each other. Sew around the top edge, leaving a small opening to turn the box right side out. After turning, press the edges neatly and topstitch for added durability and a clean finish.
The last step involves adding any closures or decorative elements you wish to include. Whether you prefer an open-topped box, a button closure, or a tie, this is your opportunity to personalize the project and enhance its functionality.
4. Creative Uses for the Bitsy Box Fabric Sewing – Pattern
The Bitsy Box fabric sewing – Pattern is incredibly versatile. One popular use is organizing sewing supplies such as pins, measuring tapes, bobbins, and small fabric scraps. These boxes help keep crafting spaces tidy and visually appealing.
Another great use is for home décor. Bitsy Boxes can hold keys, jewelry, remote controls, or other small everyday items. Their cute and compact design makes them perfect for desks, coffee tables, and bathroom counters.
Crafters often create these boxes as gifts for birthdays, holidays, or special celebrations. Because the pattern allows so much customization, each box can be tailored to suit the recipient’s personality, favorite colors, or hobbies.
The pattern is also ideal for children’s rooms. Kids can use the boxes for crayons, small toys, hair accessories, or school supplies. Soft fabrics make these boxes safe for little hands and easy to handle.
Many sewists enjoy creating themed sets of Bitsy Boxes. Matching boxes can be displayed together as decorative collections or used to sort items by category. These sets add beauty and organization to any space.
Lastly, the pattern is perfect for craft fairs or small business entrepreneurs. Its fast construction time and low material cost make it a profitable handmade item that customers love to buy.
FAQ About the Bitsy Box Fabric Sewing – Pattern
Is the Bitsy Box fabric sewing – Pattern beginner-friendly?
Yes. Its simple structure and straight seams make it ideal for beginners.
What types of fabrics work best?
Cotton, canvas, quilting cotton, and lightweight linen work beautifully for this project.
Do I need interfacing?
Yes, interfacing helps the box maintain its shape and stay durable.
Can I sew the box by hand?
It is possible, but using a sewing machine provides stronger seams and cleaner edges.
How big can I make the box?
The size is completely adjustable. You can scale the template up or down to suit your needs.
Can I sell Bitsy Boxes made from this pattern?
Yes, as long as the pattern allows it. Many sewists create and sell these charming boxes at craft fairs.
Conclusion
The Bitsy Box fabric sewing – Pattern offers a delightful combination of simplicity, creativity, and practicality. From understanding its structure to choosing materials and exploring fun ways to use it, this guide has walked you through everything you need to begin your own project.
Whether you are sewing for organization, gifting, or starting a small business, this pattern is a wonderful choice. If this article helped or inspired you, please leave your honest opinion and share suggestions for future topics.