The Block Feathered Star – Pattern stands as one of the most prestigious and visually captivating designs in the world of traditional quilting, representing a true “rite of passage” for dedicated sewists. This intricate geometric marvel combines the classic eight-pointed star with delicate, saw-tooth accents that mimic the ethereal appearance of feathers, creating a sense of movement and radiating elegance from the center outward. When you commit to a Block Feathered Star – Pattern, you are embarking on a journey that celebrates precision, patience, and the rich history of American folk art, resulting in a textile masterpiece that often becomes a cherished family heirloom.
Mastering the Block Feathered Star – Pattern requires a shift in mindset from simple patchwork to high-precision engineering, as the sheer number of small triangles can be intimidating for the uninitiated. The “feathered” effect is achieved through a series of tiny half-square triangles or specialized “feather” units that must align perfectly to maintain the star’s structural integrity. By using a high-quality Block Feathered Star – Pattern, quilters gain access to specialized cutting charts and assembly diagrams that simplify this complex process, breaking down the grand design into manageable quadrants that eventually merge into a breathtaking whole.
In this comprehensive exploration of the Block Feathered Star – Pattern, we will delve into the essential techniques and modern tools that make this challenging project accessible to intermediate and advanced quilters alike. We will focus on the two core pillars of this craft: the Block Feathered Star, which is the physical fabric square known for its sharp points and feathered borders, and the Pattern, which acts as the mathematical blueprint and instructional guide. Whether you are aiming to create a single statement pillow or a full-sized matrimonial quilt, understanding the nuances of this pattern will elevate your technical skills and expand your creative horizons in the quilting arts.
1. Preparing for Precision with the Block Feathered Star – Pattern
Before you make your first cut for the Block Feathered Star – Pattern, selecting the right fabric is the most crucial decision you will face. Because this design relies on high-contrast edges to define the “feathers,” most experts recommend choosing a solid or a very subtle tonal print for the star itself, contrasted against a crisp background. The Block Feathered Star – Pattern thrives on clarity; busy prints can often “muddy” the intricate points, causing the beautiful feathered effect to disappear into a chaotic sea of color and pattern.
Accuracy starts with the preparation of the fabric itself, a step often emphasized in a professional Block Feathered Star – Pattern. Starching your fabric heavily before cutting is a “secret weapon” that prevents the bias edges of the tiny triangles from stretching. Since a Block Feathered Star involves dozens of diagonal seams, keeping the fabric stiff and stable ensures that your points remain sharp and your blocks stay perfectly square, rather than becoming distorted during the intense pressing and sewing process.
The tools you choose to execute your Block Feathered Star – Pattern can make or break the final result. A high-quality rotary cutter with a fresh blade and a specialized quilting ruler are non-negotiable for this project. Many modern versions of the Block Feathered Star – Pattern are now designed for use with “foundation paper piecing” (FPP), a technique where you sew directly onto paper templates. This method is highly recommended for the feathered sections, as it guarantees microscopic precision that is difficult to achieve with traditional piecing.
Thread selection is another detail that seasoned quilters pay close attention to when starting a Block Feathered Star – Pattern. Using a fine, 50-weight or 80-weight cotton thread is ideal because it takes up less space in the seam allowance. In a block as dense as the Block Feathered Star, the bulk from standard thread can actually change the final dimensions of the block. A thinner thread allows the seams to lay flatter, which is essential when you have multiple points meeting at a single center junction.
Organization is paramount when dealing with the many pieces required by a Block Feathered Star – Pattern. It is helpful to use labeled trays or “design boards” to keep your various triangles and squares separated by size and color. As you follow the pattern, having your units pre-sorted prevents the common mistake of grabbing the wrong-sized feathered unit, which could throw off the entire symmetry of the Block Feathered Star and lead to hours of tedious unpicking and re-sewing.
Lastly, always perform a “test block” using scrap fabric before cutting into your precious “fancies.” This allows you to calibrate your sewing machine’s 1/4-inch seam allowance, which is the “golden rule” of the Block Feathered Star – Pattern. Even a hair’s breadth of difference in your seam can multiply across the many joins of the star, resulting in a Block Feathered Star that is either too small or unpleasantly “bubbly.” Testing the pattern first ensures your final project is a triumph of mathematical and artistic harmony.
2. Technical Assembly and the Mathematics of the Pattern
The construction of a Block Feathered Star – Pattern is typically broken down into several distinct units: the center square, the star points, the feathered “branches,” and the corner units. Understanding how these pieces interact is the key to mastering the pattern. Most designs use a “center-out” approach, where you build the heart of the star first and then attach the more complex feathered borders. This logical progression in the Block Feathered Star – Pattern helps keep the quilter focused and prevents the overwhelm that comes with such a high piece count.
Piecing the “feathers” is the most time-consuming aspect of the Block Feathered Star – Pattern. These are usually composed of very small half-square triangles (HSTs) that must be identical in size. If your pattern doesn’t use paper piecing, you might use the “two-at-a-time” or “eight-at-a-time” HST method to speed up the process. Regardless of the method, the Block Feathered Star demands that each of these feathers be trimmed to perfection before they are joined into the long strips that frame the central star.
Pressing is a technical skill that is just as important as sewing when following a Block Feathered Star – Pattern. You must decide whether to press your seams “to the dark side” or “open.” While pressing to the side is traditional and makes the seams stronger, pressing open can reduce the bulk at the intersections where many points meet in the Block Feathered Star. A high-quality pattern will often include a “pressing map” to show you which direction to push your seams to ensure they nest together perfectly for a flat finish.
The “points” of the star are where the Block Feathered Star – Pattern shows its true difficulty. To avoid “chopping off” the tips of your star during assembly, you must sew exactly a 1/4 inch away from the intersection of the previous seams. Looking for the “X” created by the previous stitches is a pro tip often found in Block Feathered Star – Pattern tutorials. This ensures that when the Block Feathered Star is opened up, the points are sharp, crisp, and sit perfectly against the background fabric.
Symmetry is the soul of the Block Feathered Star – Pattern. Because the design is radial, any error in one quadrant will be mirrored and magnified in the others. Using a “design wall”—even if it’s just a piece of flannel pinned to a door—allows you to step back and view your Block Feathered Star from a distance. This perspective helps you spot any inverted “feathers” or misplaced colors early in the process, ensuring the final pattern remains a flawless representation of the feathered star tradition.
The final “squaring up” of the Block Feathered Star – Pattern is the moment of truth. Even with perfect sewing, the fabric can shift slightly. Using a large square ruler to trim the final Block Feathered Star to its intended size (often 12, 18, or 24 inches) ensures that it will fit perfectly with other blocks in your quilt top. This final step in the pattern workflow provides the professional polish that distinguishes a master-level quilt from a beginner project, leaving you with a perfectly flat and square piece of art.
3. Creative Variations of the Block Feathered Star
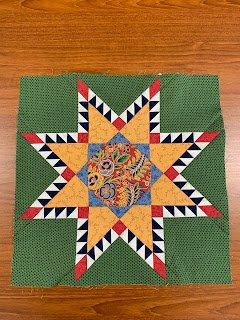
While the traditional Block Feathered Star – Pattern often features a two-color “Amish” style or a classic red-and-white palette, modern quilters are finding innovative ways to update the design. Using “fussy cutting”—where you center a specific motif from a fabric print in the middle of the star—can give the pattern a contemporary and personalized feel. This technique adds an extra layer of planning to the Block Feathered Star – Pattern, but the result is a unique focal point that tells a specific visual story.
Another exciting variation involves playing with the “transparency” trend in quilting. By selecting shades of the same color family (e.g., three shades of blue), you can make the Block Feathered Star – Pattern look like it is glowing or layered behind glass. This “ombre” effect in the Block Feathered Star creates a sophisticated, modern aesthetic that works beautifully in minimalist homes, showing that a century-old pattern can still feel fresh and relevant in the current design landscape.
Scrappy versions of the Block Feathered Star – Pattern are also a wonderful way to use up your precious fabric leftovers. Instead of using a single fabric for all the “feathers,” you can use a different scrap for each one. This creates a “controlled chaos” look that is vibrant and full of life. However, to keep the Block Feathered Star from becoming too overwhelming, it is best to keep the background fabric a consistent, solid neutral so the pattern structure remains visible.
The scale of the Block Feathered Star – Pattern can also be manipulated for different effects. A “Giant Feathered Star” that takes up the entire surface of a quilt is a bold design choice that simplifies the piecing somewhat by making the units larger. Conversely, a “Miniature Feathered Star” is an extreme challenge for those who love micro-quilting. No matter the size, the Block Feathered Star maintains its iconic status, but varying the scale allows you to fit the pattern to your specific patience level and decorative needs.
You can also modify the Block Feathered Star – Pattern by changing the center motif. Instead of a solid square, some quilters insert a “LeMoyne Star” or a “Pinwheel” into the heart of the feathered star. This “star-within-a-star” approach adds even more complexity to the Block Feathered Star, but it creates a stunning depth that draws the eye inward. When experimenting with these hybrids, always ensure your math for the pattern remains consistent so the outer feathers still fit the inner core.
Finally, consider the quilting itself—the actual stitching that holds the layers together—as a way to enhance the Block Feathered Star – Pattern. Many quilters choose to “quilt in the ditch” to emphasize the points, or use “echo quilting” to mimic the radiating lines of the star. Adding these secondary designs over the Block Feathered Star adds a layer of texture that brings the fabric to life, ensuring that the pattern is appreciated not just for its color, but for its three-dimensional tactile beauty.
4. Troubleshooting Common Issues in the Star Pattern
One of the most frequent frustrations when working on a Block Feathered Star – Pattern is the “blunt point” syndrome, where the tips of the star are lost in the seam. This usually happens because the seam allowance was slightly wider than 1/4 inch. To fix this, you must be diligent about measuring your seams. If you find your Block Feathered Star is losing points, try adjusting your needle position or using a specialized “quarter-inch foot” on your sewing machine to maintain the exact distance required by the pattern.
Another common issue is the “wavy border” on the Block Feathered Star – Pattern. This occurs when the strips of feathers are slightly longer than the central star unit they are being attached to. To prevent this, never “stretch” your fabric to make it fit. Instead, pin the centers and ends of the feather strip to the star and ease the fabric in between. If the Block Feathered Star still waves, a good steam ironing (without sliding the iron) can often shrink the fibers back into place and flatten the pattern out.
Fabric fraying can be a nightmare in a Block Feathered Star – Pattern, especially with the tiny triangles. If you find your fabric is shredding at the corners, it might be due to a dull needle or over-handling of the pieces. Using a “leader” (a small scrap of fabric to start your stitching) prevents the machine from “eating” the sharp points of the Block Feathered Star. This simple trick keeps the delicate edges of your pattern intact and prevents unsightly thread nests at the beginning of your seams.
If your Block Feathered Star – Pattern results in a block that isn’t square, it is often a pressing error rather than a sewing error. Pushing the iron back and forth can distort the bias edges of the star. Always lift the iron and “press” down firmly rather than “ironing” with a sliding motion. This vertical pressure sets the seams of the Block Feathered Star without stretching the fabric, preserving the mathematical perfection of the pattern and ensuring all four corners remain at a 90-degree angle.
Sometimes, the center of the Block Feathered Star – Pattern becomes too bulky, creating a “lump” that a quilting needle cannot pass through. To solve this, you can “swirl” the seams at the center. This involves unpicking a few stitches in the seam allowance at the very center junction to allow the seams to lay in a circular, fanned-out fashion. This professional technique makes the Block Feathered Star lay as flat as possible, which is essential for both the look of the quilt and the ease of the final quilting process.
Finally, if you find the Block Feathered Star – Pattern simply too difficult, don’t give up! Many quilters find success by switching to the “Paper Piecing” version of the design. This removes the need for manual cutting and allows you to sew directly on a line, guaranteeing 100% accuracy. The Block Feathered Star is a challenging masterwork, but by choosing the method that best suits your style, you can conquer this pattern and join the ranks of quilters who have successfully tackled this legendary design.
Frequently Asked Questions (FAQ)
Is the Block Feathered Star – Pattern suitable for beginners?
Generally, no. This is considered an intermediate to advanced pattern due to the high number of small pieces and the precision required for the points. However, a patient beginner who is comfortable with foundation paper piecing could potentially succeed with a very detailed Block Feathered Star guide.
How long does it take to finish one Block Feathered Star?
A single 18-inch Block Feathered Star can take anywhere from 6 to 12 hours to complete, depending on the method used and the quilter’s experience level. It is a slow-sewing project that prizes accuracy over speed, so following the pattern meticulously is more important than finishing quickly.
Can I use flannel fabric for a Block Feathered Star – Pattern?
While possible, flannel is much more prone to stretching and fraying than high-quality quilting cotton. For a Block Feathered Star, which relies on sharp points and small triangles, cotton is the superior choice to ensure the pattern maintains its crisp geometric shape.
What size is a typical Block Feathered Star?
Most Block Feathered Star – Pattern designs are for 12-inch, 18-inch, or 24-inch blocks. Because of the complexity of the feathers, anything smaller than 12 inches becomes extremely difficult to piece, as the triangles become microscopic.
Do I need a special ruler for this pattern?
While a standard square ruler will work, many quilters prefer using a “Point Trimmer” ruler. This helps cut off the tiny “dog ears” (the overhanging fabric at the corners of triangles) which reduces bulk and makes aligning the Block Feathered Star units much easier.
How do I clean a quilt made with the Block Feathered Star – Pattern?
Because of the many seams in a Block Feathered Star, it is best to wash the finished quilt on a gentle cycle in cold water and air dry it or tumble dry on low. Using a “color catcher” sheet is highly recommended to prevent any of the high-contrast fabrics in the pattern from bleeding.
Conclusion
The Block Feathered Star – Pattern is an extraordinary testament to the beauty of precision and the enduring legacy of quilting craftsmanship. In this article, we have journeyed through the vital preparation steps of starching and cutting, the technical demands of 1/4-inch seam accuracy, and the creative ways you can modernize this classic pattern.
We also addressed the common pitfalls like blunt points and bulky centers to help you achieve a professional-grade Block Feathered Star. While this design is undoubtedly a challenge, the satisfaction of seeing those sharp feathered points radiate from the center of your quilt is a reward unlike any other in the sewing world.