The Block Stars Diamonds – Pattern is one of the most visually captivating designs in the modern quilting and textile world, offering a geometric feast for the eyes that balances traditional craftsmanship with a contemporary edge. When you first encounter a Block Stars Diamonds – Pattern, you are immediately struck by how the interplay of light and shadow creates a three-dimensional illusion, making the flat fabric appear as though it is popping right off the surface. This specific design is a favorite among quilters who want to challenge their precision while producing a centerpiece that looks far more complex than it actually is to assemble.
Mastering the Block Stars Diamonds – Pattern requires a blend of careful fabric selection and methodical cutting, as the “stars” and “diamonds” are formed through the strategic placement of contrasting colors. Whether you are using bold, vibrant solids or subtle, monochromatic prints, the Block Stars Diamonds – Pattern serves as a versatile foundation for any home decor project, from large bedspreads to intricate wall hangings. The magic lies in the “block” structure, which allows you to work in manageable sections, ensuring that every point of every diamond aligns perfectly with the next.
As we dive into the specifics of the Block Stars Diamonds – Pattern, it is important to understand that this is more than just a set of instructions; it is an exploration of symmetry and color theory. By following a well-structured Block Stars Diamonds – Pattern, you are engaging in a meditative process that rewards patience and attention to detail with a professional-grade finished product. In the following sections, we will break down the essential components, technical requirements, and creative variations that make the Block Stars Diamonds – Pattern a must-have in every crafter’s library of designs.
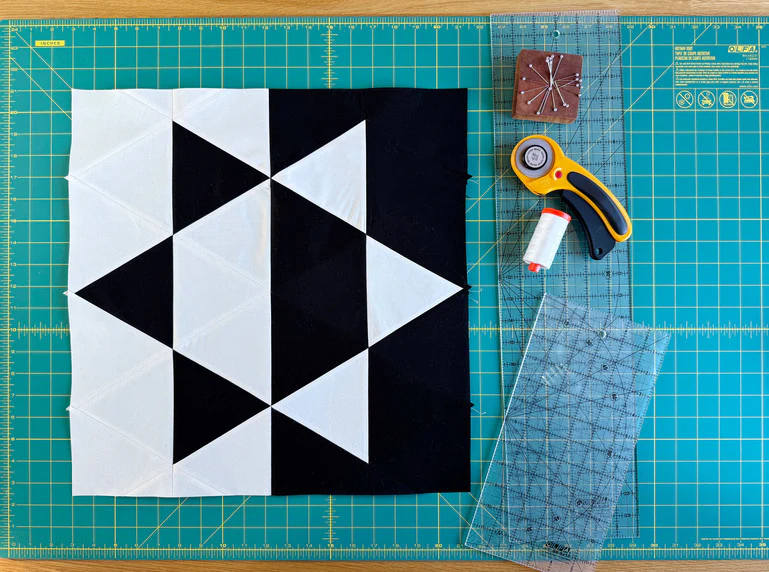
1. Essential Tools and Fabric Selection for the Block Stars Diamonds – Pattern
The success of your Block Stars Diamonds – Pattern begins long before you touch your sewing machine, starting instead at the cutting table with high-quality materials. For a project involving sharp angles like those found in the Block Stars Diamonds – Pattern, choosing a 100% cotton quilting fabric is highly recommended because it holds a crisp crease and doesn’t shift during the piecing process. You will need a variety of shades—typically a light, medium, and dark—to ensure the “star” and “diamond” shapes are clearly defined against the background.
Precision is the hallmark of a great Block Stars Diamonds – Pattern, which means your cutting tools must be in top condition. A sharp rotary cutter and a high-quality self-healing mat are non-negotiable for achieving the straight edges required for these geometric blocks. Additionally, using an acrylic quilting ruler with clear 45-degree and 60-degree markings will help you navigate the diamond shapes within the Block Stars Diamonds – Pattern without the frustration of mismatched corners or uneven seams.
Thread choice might seem secondary, but for the Block Stars Diamonds – Pattern, a fine, strong 50-weight cotton thread is ideal. Because this pattern involves many intersecting seams, using a thicker thread can add unnecessary bulk, making it difficult to get your blocks to lay flat. A neutral gray or tan thread usually blends well with most color palettes, ensuring that the focus remains on the stunning geometry of your Block Stars Diamonds – Pattern rather than the stitching itself.
When organizing your workspace for the Block Stars Diamonds – Pattern, consider using a design wall or a large flat surface to lay out your pieces as you cut them. This allows you to visualize how the colors interact before you commit to sewing. Since the Block Stars Diamonds – Pattern relies heavily on the “star” effect created by the diamond points meeting, seeing the layout in advance helps you catch any misplaced fabrics that might break the visual flow of the design.
Ironing is another “tool” that is vital for the Block Stars Diamonds – Pattern. A good steam iron and a firm pressing mat will help you flatten those bulky intersections where multiple diamond points meet. Pressing your seams to the side (or open, depending on the specific Block Stars Diamonds – Pattern instructions) ensures that the finished quilt top is smooth and ready for the quilting stage. Skipping this step is often why geometric patterns lose their “pop.”
Lastly, don’t forget the importance of specialty rulers designed specifically for 60-degree diamonds. While a standard ruler works, these specialized tools often feature “blunted” corners that help you align pieces perfectly without the guesswork of “dog ears.” Utilizing these aids when working on your Block Stars Diamonds – Pattern significantly reduces the margin for error and speeds up the construction process, making the experience much more enjoyable for quilters of all levels.
2. Technical Precision and Piecing the Block Stars Diamonds – Pattern
The core of the Block Stars Diamonds – Pattern is the assembly of the diamond units into a cohesive star shape, a process known as “piecing.” To achieve the perfect point, you must maintain a consistent 1/4-inch seam allowance throughout the entire project. In a Block Stars Diamonds – Pattern, even a hair’s breadth of deviation in your seam can lead to “blunted” stars or a quilt top that ripples, so taking your time during the sewing phase is the best investment you can make.
One of the most common techniques used in a Block Stars Diamonds – Pattern is fussy cutting. This involves cutting your fabric in a way that centers a specific motif within the diamond shape. While it uses more fabric, fussy cutting can add an extra layer of “wow factor” to your Block Stars Diamonds – Pattern, making each star look like a unique kaleidoscope. This technique is particularly effective if you are using fabrics with large floral prints or intricate geometric patterns.
As you join the diamonds to form the “stars” in your Block Stars Diamonds – Pattern, you will encounter Y-seams. While Y-seams have a reputation for being difficult, they are actually quite manageable if you mark your pivot points accurately. Many modern versions of the Block Stars Diamonds – Pattern offer “no-Y-seam” construction methods, which use clever row-based piecing to achieve the same look with less stress. Check your specific pattern to see which method it recommends for your skill level.
Chain piecing is a fantastic way to stay organized and efficient when working on a large Block Stars Diamonds – Pattern. By sewing pairs of diamonds together in a long “chain” without cutting the thread between them, you maintain a rhythm and ensure that your tension remains consistent. This method also helps prevent the small diamond pieces of the Block Stars Diamonds – Pattern from being “swallowed” by the feed dogs of your sewing machine at the start of a seam.
The “block” aspect of the Block Stars Diamonds – Pattern means that you are essentially creating a grid. Each block must be “squared up” after assembly to ensure that when the blocks are joined together, the overall quilt remains rectangular and flat. Using a square-up ruler to trim away any excess fabric from your completed Block Stars Diamonds – Pattern units is a professional secret that makes the final assembly of the rows much easier and more precise.
If you find that your points are still not matching perfectly in your Block Stars Diamonds – Pattern, try using fine glass-head pins. These pins are thin enough to stay in place as you sew close to them, allowing you to secure the exact intersection where the diamond points meet. Precision pinning is often the difference between a Block Stars Diamonds – Pattern that looks “home-made” and one that looks like it belongs in a gallery or a high-end design magazine.
3. Creative Colorways and Layout Variations for the Block Stars Diamonds – Pattern
The Block Stars Diamonds – Pattern is a blank canvas for color experimentation. If you want a classic look, consider a “Scrappy” approach, using dozens of different fabric scraps to create a vibrant, eclectic Block Stars Diamonds – Pattern. This approach works best if you maintain a consistent background color, such as white or navy, to provide a “landing spot” for the eye amidst the chaos of the colorful diamond stars.
For a more modern aesthetic, try a monochromatic gradient within your Block Stars Diamonds – Pattern. Using various shades of a single color—from the palest ice blue to the deepest navy—creates a sense of depth and movement. In this variation of the Block Stars Diamonds – Pattern, the diamonds appear to shimmer and shift as if they are reflecting light, making it a sophisticated choice for minimalist home interiors or modern nurseries.
You can also play with the scale of the Block Stars Diamonds – Pattern. Instead of making dozens of small stars, you could create a “Giant Star” version where the entire quilt top is comprised of just one or two massive Block Stars Diamonds – Pattern units. This high-impact approach is much faster to sew and highlights the beauty of the fabric prints, making it an excellent choice for a weekend project or a quick, impressive gift.
The background of your Block Stars Diamonds – Pattern doesn’t have to be a solid color. Using a “low volume” print—a fabric with a very light, subtle pattern—adds texture and interest to the negative space around the stars. This subtle change can make your Block Stars Diamonds – Pattern feel softer and more inviting, moving away from the starkness of a plain background while still allowing the diamonds to be the primary focus of the piece.
Secondary patterns are a fascinating result of how you arrange your Block Stars Diamonds – Pattern units. Depending on where you place your dark and light fabrics, you might notice that “tumbling blocks” or “hexagons” emerge in the spaces between the stars. A clever Block Stars Diamonds – Pattern designer will use these secondary shapes to guide the viewer’s eye across the quilt, creating a dynamic visual experience that reveals new details the longer you look at it.
Finally, consider adding a border to frame your Block Stars Diamonds – Pattern. A simple solid border can contain the energy of the geometric stars, while a pieced border using leftover diamond scraps can extend the design all the way to the edge of the binding. Choosing the right border for your Block Stars Diamonds – Pattern is like choosing the right frame for a painting; it completes the vision and gives the finished work a polished, intentional look.
4. Finishing Touches and Quilting the Block Stars Diamonds – Pattern
Once your quilt top is complete, the “quilting” process—sewing the three layers together—brings the Block Stars Diamonds – Pattern to life. For a geometric design like this, straight-line quilting or “matchstick quilting” is very popular. Following the lines of the diamonds within the Block Stars Diamonds – Pattern reinforces the geometric theme and adds a modern, architectural feel to the finished product without distracting from the piecing.
If you prefer a softer look, free-motion quilting can provide a beautiful contrast to the sharp angles of the Block Stars Diamonds – Pattern. Swirls, feathers, or “pebble” designs in the background areas create a sense of movement that balances the rigidity of the stars. Many quilters choose to “stitch in the ditch” around the main shapes of the Block Stars Diamonds – Pattern first to stabilize the quilt before adding more decorative stitching in the open spaces.
The choice of batting will affect how your Block Stars Diamonds – Pattern drapes and feels. A 100% cotton batting is thin and traditional, giving the quilt a vintage “crinkle” after it is washed. If you want the stars of your Block Stars Diamonds – Pattern to have more “loft” and stand out, a wool or polyester-blend batting might be a better choice, as it provides more thickness and defines the quilted lines more prominently.
Backing fabric is another opportunity for creativity in your Block Stars Diamonds – Pattern. You can use a wide-back fabric for a seamless finish or piece together your remaining scraps to create a “hidden” design on the reverse side. Since the front of the Block Stars Diamonds – Pattern is so detailed, a simple, calming print on the back can offer a nice visual break, making the quilt truly reversible and functional.
Binding is the final “frame” of your Block Stars Diamonds – Pattern. A biased binding is often best if you have chosen a curved edge, but for the straight edges of a standard Block Stars Diamonds – Pattern, a straight-grain binding works perfectly. Choosing a contrasting color for the binding can provide a sharp “pop” at the edge, while a matching color allows the Block Stars Diamonds – Pattern design to flow right off the quilt without interruption.
Lastly, always add a quilt label to your finished Block Stars Diamonds – Pattern. Include the date, your name, and the name of the pattern. Because the Block Stars Diamonds – Pattern is such a timeless design, your creation could easily become a family heirloom passed down through generations. Documenting the story behind your Block Stars Diamonds – Pattern ensures that its history and the effort you put into every diamond and star are preserved for years to come.
FAQ – Frequently Asked Questions
Is the Block Stars Diamonds – Pattern suitable for beginners?
While it looks complex, a beginner with good basic skills and a focus on precision can successfully complete a Block Stars Diamonds – Pattern. It is recommended to start with a version that avoids Y-seams to make the process more approachable.
How much fabric do I need for a standard Block Stars Diamonds – Pattern?
This depends on the size of the quilt, but generally, for a throw-sized Block Stars Diamonds – Pattern, you will need approximately 3 to 4 yards of background fabric and 1 to 2 yards of total fabric for the diamonds, divided among your different colors.
Can I use pre-cut fabrics like Jelly Rolls for this pattern?
Yes! Many Block Stars Diamonds – Pattern designs are “pre-cut friendly.” Using 2.5-inch strips (Jelly Rolls) can save you a significant amount of cutting time and provides a coordinated palette of colors right out of the gate.
How do I prevent my points from being cut off in the seam?
The key is to sew exactly 1/4 inch from the edge. When you are sewing your units together, look for the “X” where the previous seams intersect. If you sew directly through that “X,” your points in the Block Stars Diamonds – Pattern will be perfect.
Is this pattern only for quilts?
Not at all! You can use the Block Stars Diamonds – Pattern to create decorative pillows, table runners, or even trendy “quilt coats.” The geometric design is highly adaptable to various textile projects.
How do I wash a quilt made with the Block Stars Diamonds – Pattern?
Wash it on a gentle cycle with cold water and use a “color catcher” sheet to prevent any dark colors from bleeding into the lighter diamonds of your Block Stars Diamonds – Pattern. Air drying or low-heat tumble drying is best.
Conclusion
In this article, we have explored the intricate beauty and technical depth of the Block Stars Diamonds – Pattern. From the initial stages of selecting the right cotton fabrics and precision tools to the advanced techniques of piecing star units and managing seam allowances, we have covered the roadmap to creating a stunning geometric masterpiece.
We also touched on the creative freedom the Block Stars Diamonds – Pattern offers, allowing for endless color variations and modern quilting finishes that can turn a simple blanket into a work of art. By focusing on precision and patience, any crafter can master the symmetry of this design and produce a project that radiates professional quality.