The Bucket hat – Pattern has made a major comeback in the fashion world—and for good reason. This trendy, laid-back accessory is both functional and stylish, making it the perfect addition to any wardrobe.
Whether you’re protecting yourself from the sun, finishing off a festival outfit, or just want a fun weekend sewing project, a bucket hat is a fantastic piece to create on your own.Crafting your own hat using a Bucket hat – Pattern gives you endless options for customization.
From fabric choice to brim width, lining, and even reversible styles, you can make a hat that suits your personal taste or seasonal needs. And thanks to the growing availability of beginner-friendly tutorials and printable patterns, you don’t need to be a professional to get professional-looking results.
In this article, we’ll cover why using a reliable pattern matters, what tools and materials you’ll need, a step-by-step guide to making your own bucket hat, and how to customize it to fit your unique style. Whether you’re sewing for yourself, for gifts, or even thinking of selling your handmade hats, this guide is here to help.
1. Why Use a Bucket Hat – Pattern for Your Next Project
Using a Bucket hat – Pattern gives your project structure, clarity, and consistency. It takes the guesswork out of measurements and cutting, allowing you to focus on the fun part—choosing fabrics and sewing it together.
A well-made pattern ensures that your hat will actually fit. Sizing is essential in a bucket hat; too loose and it flies off, too tight and it’s uncomfortable. A reliable pattern comes with multiple sizes or clear instructions for adjusting the fit.
Patterns also teach proper construction techniques. From adding interfacing to lining the inside for comfort, these steps help the hat hold its shape and last longer. Following a tested pattern gives you a professional-looking result even if you’re still learning.
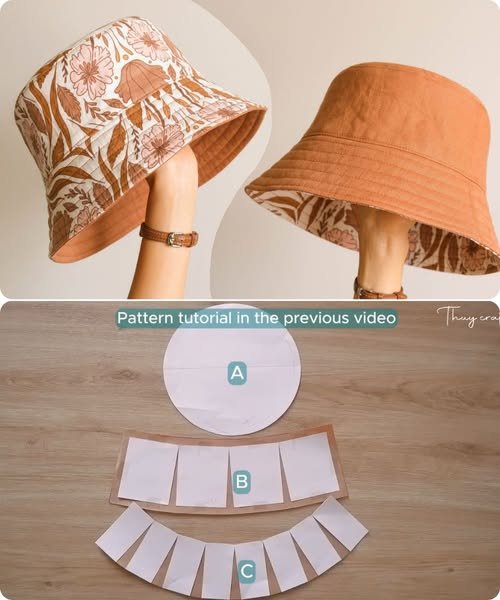
Another advantage is that many patterns include visual guides or tutorials. These are especially helpful for beginners who benefit from seeing how each piece comes together. Step-by-step illustrations or videos make the process smoother.
Patterns save time, especially if you plan to make more than one hat. Once you’ve made one using the Bucket hat – Pattern, creating a second becomes faster and easier. The pieces are already cut, and you’ll be familiar with the steps.
Finally, using a pattern opens the door to creativity. Once you’ve made one basic bucket hat, you can tweak the pattern to add extra features—like a wider brim, embroidery, or a chin strap. Patterns are a foundation for experimentation.
2. Tools and Materials Needed to Make a Bucket Hat
Before you begin working on your Bucket hat – Pattern, gather the tools and materials you’ll need to make your sewing experience enjoyable and efficient.
Start with fabric. Cotton canvas, denim, linen, or even old jeans are great for the outer layer. These materials hold their shape well and offer durability. For a softer, more relaxed hat, quilting cotton also works wonderfully.
You’ll need lining fabric too. Choose a lightweight cotton or even satin for a smoother, cooler feel against the skin. Reversible hats require two different outer fabrics that complement each other.
Interfacing is essential for giving your bucket hat structure—especially in the brim. Fusible interfacing works best, and mid-weight or heavy interfacing helps the brim stay stiff and flat instead of floppy.
A sewing machine is the main tool you’ll use, but don’t forget scissors or a rotary cutter, pins or clips, an iron, and a ruler or measuring tape. A fabric marking pen or tailor’s chalk will help you follow the pattern precisely.
Make sure to print your Bucket hat – Pattern on proper paper and check for scale accuracy if the file includes a test square. Having the printed pieces on hand keeps the process organized.
You might also want some extras for personalization—like bias tape for binding, labels, patches, or decorative stitching thread. These little touches can elevate your final result from handmade to truly high-end.
3. Step-by-Step: How to Sew a Bucket Hat Using a Pattern
Using a Bucket hat – Pattern simplifies the process of turning fabric into a wearable item. Below is a general step-by-step guide that most patterns will follow.
Start by cutting out your fabric according to the pattern. You’ll typically need to cut out the crown (top of the hat), side band, and brim—two of each if the hat is reversible. Don’t forget to also cut the interfacing pieces if your pattern includes them.
Next, apply fusible interfacing to the wrong side of your outer brim and side band pieces. This gives the hat structure and ensures the brim stays crisp and shaped even after multiple wears.
Now, sew the side band into a loop by stitching the short ends together. Then attach the band to the crown, easing the fabric around the curve. Repeat the same with the lining fabric. This creates the basic dome of the hat.
Assemble the brim by sewing the brim pieces together along the short ends to create a loop. Then, stitch the outer brim to the base of the side band. Do the same for the lining if your pattern calls for a lined or reversible design.
Once the outer and lining pieces are complete, sew them together around the edge of the brim, right sides facing. Leave a small opening for turning the hat right-side out. After turning, press everything flat and topstitch around the brim to close the opening and add a professional finish.
Finally, give the hat a final press with a hot iron. At this stage, you can also add extra decorative stitching around the brim or reinforce seams if needed. Congratulations—you’ve completed your Bucket hat – Pattern project!
4. Customizing Your Bucket Hat for Unique Style
One of the best things about the Bucket hat – Pattern is how customizable it is. With just a few tweaks, you can create a completely unique hat that suits your personal style or makes a one-of-a-kind gift.
Start with fabric choice. Using bold prints, tie-dye, or even recycled fabric gives your bucket hat personality. Floral prints are great for spring, while corduroy or wool blends are ideal for a cozy winter look.
Try making your hat reversible. All it takes is two outer fabrics and careful construction. This gives you two style options in one hat—perfect for traveling or switching up your look without packing extra accessories.
Consider adding pockets to the inner brim or tags for branding if you plan to sell your creations. Little sewn-in details give a boutique feel and make your product more appealing to potential buyers.
Adjust the brim size. Want more sun coverage? Make the brim wider. Prefer something more subtle? Trim it down for a sportier look. Patterns can be modified easily once you understand the basic structure.
Embellishments like embroidery, iron-on patches, or applique designs add character. You can personalize hats with names, themes, or designs that reflect your hobbies or interests.
Lastly, don’t be afraid to experiment with textures. Combine denim with lace for contrast, or use faux leather on the brim for an edgy look. The Bucket hat – Pattern is flexible enough to support endless creative choices.
FAQ – Bucket Hat – Pattern
Q1: Is the bucket hat a beginner-friendly sewing project?
Yes! Most Bucket hat – Pattern tutorials are designed with beginners in mind. The steps involve simple curved seams and basic construction. It’s a great confidence-building project.
Q2: How long does it take to make a bucket hat?
Depending on your experience level, making a bucket hat can take between 1–3 hours. Reversible designs or those with custom features may take longer.
Q3: Can I make a bucket hat without a sewing machine?
It’s possible, but time-consuming. Hand stitching can work for smaller hats or doll-sized projects, but a sewing machine gives the cleanest and strongest finish for wearable hats.
Q4: What kind of interfacing should I use?
Fusible mid-weight or heavy interfacing is best for the brim to keep its shape. For a softer hat, use lightweight interfacing just on the side band.
Q5: Can I sell hats made using a printed pattern?
Check the licensing terms of the pattern. Some allow for small-scale selling with credit, while others are for personal use only. Always read the designer’s guidelines.
Q6: Are there bucket hat patterns for kids or babies?
Yes! Many designers offer the Bucket hat – Pattern in multiple sizes, including baby, toddler, child, and adult. Make sure to measure the head circumference before cutting.
Conclusion
Creating your own hat using a Bucket hat – Pattern is a rewarding, creative, and practical project for crafters of all levels. With the right pattern and materials, you can sew a stylish, durable, and personalized accessory that fits perfectly and adds flair to your wardrobe. From sunny beach days to cool city strolls, a handmade bucket hat is always in season.
We hope this guide has inspired you to pick up your fabric and scissors and give it a try! If you’ve made your own bucket hat or have tips to share, we’d love to hear from you. Please leave your honest opinion and suggestions in the comments—your feedback helps us improve and encourages others in the sewing community.