The timeless bucket hat pattern has made a strong comeback in the world of fashion and DIY accessories. This classic piece is not only stylish and versatile but also incredibly fun to create, especially if you love crafting your own wardrobe. Whether you want something casual for summer days, a trendy statement piece, or a functional hat for outdoor wear, a custom-made bucket hat pattern gives you total creative freedom.
What makes the bucket hat pattern so appealing is its simplicity. With just a few materials, some basic sewing or crocheting knowledge (depending on the style), and a bit of creativity, you can design a hat that fits perfectly and complements your style. From solid colors to bold prints, the pattern can be adjusted for kids, adults, or even made reversible for twice the flair.
In this guide, we’ll break down everything you need to know about making your own bucket hat pattern. Whether you’re sewing with fabric or crocheting with yarn, you’ll learn about materials, techniques, sizing tips, style options, and answers to frequently asked questions to help you craft your ideal hat with confidence.
1. Choosing the Right Materials for Your Bucket Hat Pattern
Before you start crafting your bucket hat pattern, it’s essential to choose the right materials. The texture, structure, and appearance of your final product depend heavily on the quality and type of fabric or yarn you select.
For a fabric bucket hat, cotton canvas or twill is a top choice. These materials are breathable, easy to work with, and offer the necessary sturdiness to maintain the shape of the hat. Linen is another popular choice, especially for summer, due to its lightweight and moisture-wicking properties.
If you’re going for a crocheted bucket hat pattern, use worsted weight cotton yarn. It provides a sturdy yet flexible structure and is suitable for all seasons. Acrylic yarn is another option, although it may feel warmer and might stretch more over time compared to cotton.
You’ll also need interfacing if you want your hat to have a stiffer brim. Fusible interfacing can be ironed onto the fabric and helps the hat maintain its silhouette. For crocheted hats, using tighter stitches will naturally provide more structure without extra reinforcement.
Don’t forget about thread or a good yarn needle, depending on your method. A sewing machine speeds up the fabric version significantly, but it’s completely possible to hand-sew the hat with patience and care.
Lining fabric can also enhance comfort and style. A contrasting or coordinating lining not only adds a professional touch but makes your bucket hat reversible if designed thoughtfully.
2. Step-by-Step Instructions to Create the Bucket Hat Pattern
Now that your materials are ready, it’s time to begin crafting your bucket hat pattern. Whether sewing or crocheting, the process follows a similar structural logic: crown, side panels, and brim.
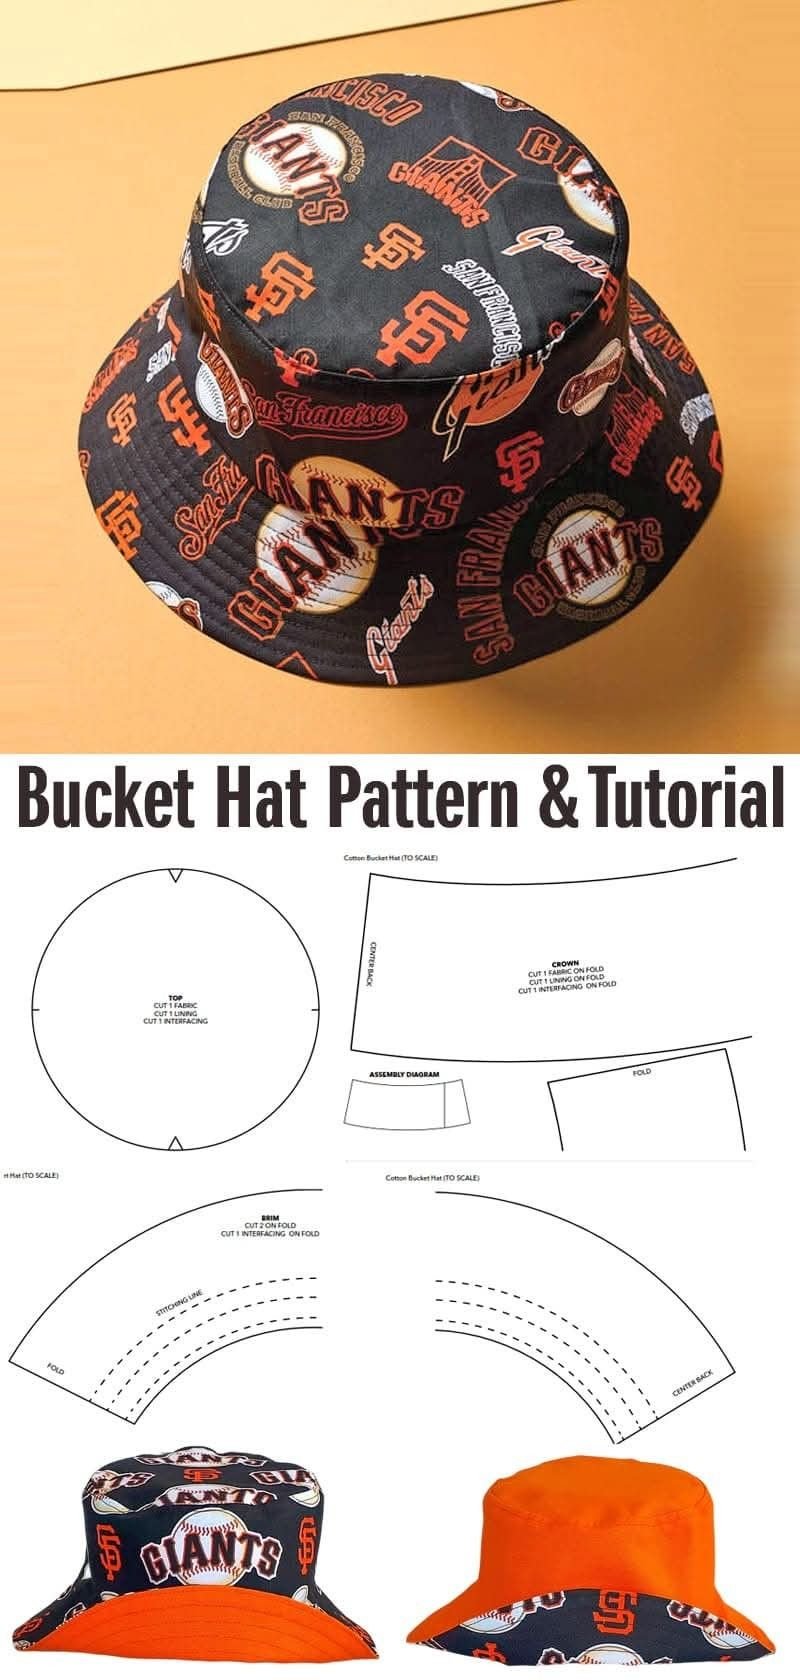
For a fabric version, start by cutting three basic pieces: a circular crown for the top, a rectangular band for the sides (which wraps around the head), and a wide circular brim. Be sure to add seam allowances—usually 1/4 to 1/2 inch—to each piece.
Sew the side panel ends together to form a loop, then attach it to the crown by aligning the edges and stitching carefully. This creates the body of your hat. Iron the seams flat for a clean finish and increased durability.
The brim can be cut as two donut-shaped pieces—outer and inner circles. Sew them right sides together, turn them out, and press. You can then stitch rows around the brim for that signature bucket hat look and added stiffness.
Attach the brim to the bottom of the side panel, aligning seams evenly. Be sure everything is right sides together before stitching. Turn the entire hat right side out and press all the edges neatly.
For a crocheted bucket hat pattern, start at the crown using a magic ring or a chain circle. Work in increasing rounds, usually using single or double crochet stitches, until the crown reaches the desired diameter.
Once the crown is wide enough, work even rounds without increasing to form the sides. The height of this section depends on your style preference. Continue with gradual increases to flare out and form the brim.
3. Customizing Your Bucket Hat Pattern for Style and Fit
A major benefit of using your own bucket hat pattern is the ability to customize every aspect to suit your personality, comfort, and seasonal needs. Let’s look at ways to make your hat unique.
Adjust the size by measuring your head circumference accurately and altering the pattern accordingly. Add or reduce rows in the crown or side sections to get the right fit. Remember, a good bucket hat sits snugly on the head without being tight.
Add inner lining for extra comfort and structure. In summer, use lightweight cotton or mesh fabric. In colder months, try fleece or flannel lining to keep your head warm while still looking stylish.
Experiment with prints and textures. From florals and polka dots to denim and tie-dye, the fabric version of the bucket hat pattern lends itself to endless creative possibilities. You can even upcycle old clothing like jeans or shirts to create a sustainable hat.
For crocheted versions, you can alternate colors for stripes, use bobble stitches for texture, or even add a shell or scalloped edge to the brim for a more decorative look. Don’t be afraid to combine different stitch patterns.
Add functional features like a chin strap for windy days or a small sewn-in loop for hanging your hat. You could even add hidden pockets or embroidered initials for an extra-personal touch.
Making the hat reversible is another fun option. Sew two hats, place them wrong sides together, and stitch the edges so you can flip it depending on your outfit or mood. This makes your bucket hat pattern twice as useful.
4. Practical Uses and Gifting Ideas for Bucket Hat Pattern
Beyond being a stylish accessory, the bucket hat pattern has many practical and creative uses. It’s a fun project to make for yourself, a thoughtful gift idea, and even a profitable product to sell.
Bucket hats offer sun protection and are perfect for gardening, beach outings, festivals, hiking, or even daily wear. Customize them with breathable fabrics or water-resistant finishes depending on the activity.
These hats also make great gifts. Create a personalized hat for a friend or family member using their favorite colors or patterns. Add a label with their name or a small note tucked inside for a heartfelt surprise.
If you’re selling handmade items, bucket hats are popular at markets and online shops. With a bucket hat pattern, you can easily create items in bulk with slight variations, offering your customers more options.
They’re also excellent beginner projects for sewing or crochet classes. The steps are straightforward, and students can finish their own hat in a few sessions, learning valuable skills along the way.
Bucket hats can also serve as promotional items or party favors. Use branded fabric, embroidery, or screen printing to create custom designs for company events or special occasions.
Lastly, making a matching set—such as parent and child hats, or coordinating hats for friends—is a fun way to bring people together through handmade fashion.
FAQ – Frequently Asked Questions
Q1: What’s the best material for a bucket hat?
A: For fabric hats, cotton canvas, denim, or linen are ideal. For crochet, use cotton or acrylic yarn with medium weight for structure and comfort.
Q2: Is the bucket hat pattern suitable for beginners?
A: Yes, both the sewing and crochet versions of the bucket hat pattern are beginner-friendly with basic stitches and construction steps.
Q3: How long does it take to make a bucket hat?
A: Depending on your skill level and method, it can take 1 to 3 hours to complete a hat from start to finish.
Q4: Can I wash my handmade bucket hat?
A: Yes, but it depends on the material. Fabric hats are usually machine washable. Crocheted ones should be hand-washed and air-dried to maintain shape.
Q5: How do I make the brim stiffer?
A: Use interfacing for fabric brims or tighter stitches and additional rows in crocheted brims. Sewing parallel lines around the brim also helps stiffen it.
Q6: Can I sell items made with this pattern?
A: Yes, handmade bucket hats are popular to sell. Just be sure you’re not using a copyrighted or commercial-restricted pattern.
Conclusion
Creating your own bucket hat pattern opens up a world of creative possibilities. Whether you’re crafting with fabric or yarn, the process is enjoyable, rewarding, and highly customizable. These hats are practical, stylish, and offer the perfect opportunity to express your personality through your craft.
In this article, we’ve covered how to choose the right materials, follow step-by-step instructions, customize your design, and make your bucket hat pattern useful in real life. You now have all the tools to start creating your own unique collection of handmade hats.
If you’ve tried this project or have tips to share, we’d love to hear from you. Please leave a sincere opinion or suggestion in the comments below. Your insights could inspire fellow crafters and help improve future designs.
Happy crafting—and may your next bucket hat be your best yet!