Creating a Bucket Peg Bag- Pattern is a fantastic way to combine household utility with your passion for sewing and organizational DIY projects. If you have ever struggled with flimsy plastic peg baskets that break in the sun or small bags that spill their contents every time you reach for a clothespin, this project is the ultimate solution for your laundry day woes. A Bucket Peg Bag- Pattern allows you to construct a sturdy, high-capacity carrier that stands upright, mimicking the shape of a bucket while maintaining the soft, portable convenience of a fabric bag.
Designing your own Bucket Peg Bag- Pattern is not just about functionality; it is also an opportunity to use up your favorite heavy-duty fabric scraps, such as denim or canvas. Unlike a standard flat peg bag, the “bucket” style features a reinforced circular base that provides structural integrity, ensuring it won’t collapse when filled to the brim with hundreds of pegs. This guide is designed to help you navigate the nuances of the Bucket Peg Bag- Pattern, ensuring that your finished product is both a durable workhorse and a beautiful accessory for your clothesline.
Throughout this detailed article, we will delve into the technicalities of the Bucket Peg Bag- Pattern to ensure you achieve a professional result that stands the test of time and weather. We will focus on the two core components: the Bucket Peg Bag, which is the physical three-dimensional container designed for heavy use, and the Pattern, which represents the geometric templates and instructional steps required to cut and sew the fabric correctly. By following these expert tips and structural recommendations, you will be able to master the Bucket Peg Bag- Pattern and perhaps even create a few extra to give as thoughtful, handmade gifts to friends and family.
1. Selecting Durable Fabrics for Your Bucket Peg Bag- Pattern
When you begin your Bucket Peg Bag- Pattern, the choice of fabric is the most critical decision you will make regarding the longevity of the item. Since a peg bag is frequently exposed to the elements—including harsh sunlight, wind, and occasional moisture—you should opt for outdoor-grade fabrics like duck canvas, treated upholstery fabric, or heavy denim. These materials provide the necessary “body” to keep the Bucket Peg Bag upright and open, making it much easier to grab a peg with one hand while holding a wet piece of laundry with the other.
Inner lining selection is another vital step in the Bucket Peg Bag- Pattern process that many beginners overlook. Using a contrasting light-colored cotton fabric for the interior not only makes the bag look more professional but also helps you see the pegs more clearly inside the bag. Additionally, adding a layer of heavyweight fusible interfacing between the outer fabric and the lining will give your Bucket Peg Bag that crisp, bucket-like structure that defines this specific pattern style.
Hardware and notions are the “bones” of your Bucket Peg Bag- Pattern. To make the bag truly functional, you will need a sturdy hanging mechanism, such as a large metal carabiner, a swivel snap hook, or a heavy-duty fabric loop. Because the weight of several dozen wooden pegs can be surprisingly heavy, your Bucket Peg Bag- Pattern must include reinforced stitching at the attachment points to prevent the fabric from tearing away from the hook over time.
Don’t forget the importance of UV-resistant thread when sewing your Bucket Peg Bag- Pattern. Regular polyester thread can eventually become brittle and snap after months of exposure to the sun on a clothesline. Investing in a high-quality, bonded nylon or outdoor thread ensures that the seams of your Bucket Peg Bag remain tight and secure, even if you accidentally leave it outside during a summer heatwave or a sudden rain shower.
If you want to add a touch of personality to your Bucket Peg Bag- Pattern, consider using webbing or trim for the top rim. Applying a thick polyester webbing not only adds a pop of color but also acts as a rigid “hoop” that keeps the mouth of the Bucket Peg Bag wide open. This design feature is a hallmark of a well-executed Bucket Peg Bag- Pattern, transforming a simple sack into a highly efficient tool that stays accessible throughout the entire hanging process.
Finally, consider adding a mesh bottom or a few metal eyelets to your Bucket Peg Bag- Pattern. This allows any trapped dust, spiderwebs, or moisture to fall through or evaporate, keeping your pegs clean and dry. A clean peg means clean laundry, and by incorporating these small drainage features into your Bucket Peg Bag, you are following the best practices of functional textile design that separate a basic project from a truly superior pattern.
2. Drafting the Geometric Shapes of the Bucket Peg Bag- Pattern
The secret to a successful Bucket Peg Bag- Pattern lies in the math used to create the circular base and the cylindrical body. To draft your own pattern, you first need to decide on the diameter of the base; a standard size is usually around 6 to 8 inches. Using a compass or a large dinner plate, you can trace this circle onto your pattern paper, ensuring you add a 1/2-inch seam allowance all the way around the perimeter for a perfect fit during assembly.
Calculating the body of the Bucket Peg Bag- Pattern requires a simple formula: the circumference of your base circle. To find this, multiply the diameter by 3.14 (Pi). This measurement will be the width of your main rectangular fabric piece. Including this technical step in your Bucket Peg Bag- Pattern drafting ensures that the side panel wraps perfectly around the base without any awkward bunching or gaps, resulting in a sleek and professional-looking Bucket Peg Bag.
The height of your Bucket Peg Bag- Pattern is entirely up to your preference, but a height of 10 to 12 inches is usually ideal for preventing pegs from falling out. When marking this on your pattern paper, remember to include a generous hem allowance at the top (about 1 to 2 inches). A thick, folded hem at the top of the Bucket Peg Bag provides extra stiffness, which helps the bag maintain its open “bucket” shape even when it is hanging at an angle.
If your Bucket Peg Bag- Pattern includes a front opening—sometimes called a “letterbox” style—you will need to draft a specific cutout on the front panel. This opening should be high enough that the pegs stay safely inside the “bucket” portion but wide enough for a hand to enter comfortably. Adding this feature to your Bucket Peg Bag makes it even more convenient, as you don’t have to reach over the top rim to access your supplies.
For those who prefer a more portable version, the Bucket Peg Bag- Pattern can be modified to include a drawstring closure. In this case, your pattern should include a casing at the top edge. This is particularly useful if you store your pegs in a shed or garage between uses, as it keeps out dust and pests. The versatility of the Bucket Peg Bag- Pattern allows you to adapt the design to your specific storage environment and laundry habits.
Always create a “test” or “muslin” version of your Bucket Peg Bag- Pattern using cheap scrap fabric before cutting into your expensive outdoor canvas. This allows you to check the proportions and ensure that the handle or hook placement is balanced. A balanced Bucket Peg Bag will hang straight on the line, whereas one with poorly placed attachment points might tilt and spill. Refining your pattern at this stage is the mark of a truly dedicated crafter.
3. Assembly Techniques for a Professional Bucket Peg Bag
Once your fabric is cut according to the Bucket Peg Bag- Pattern, the first step is to prepare the side panel. If you are adding a pocket or decorative embroidery, do it now while the fabric is still flat. Sewing your name or a fun laundry-themed motif onto the Bucket Peg Bag adds a wonderful personalized touch. After any embellishments are finished, you will sew the short ends of the rectangle together to create the “tube” that forms the body of the bag.
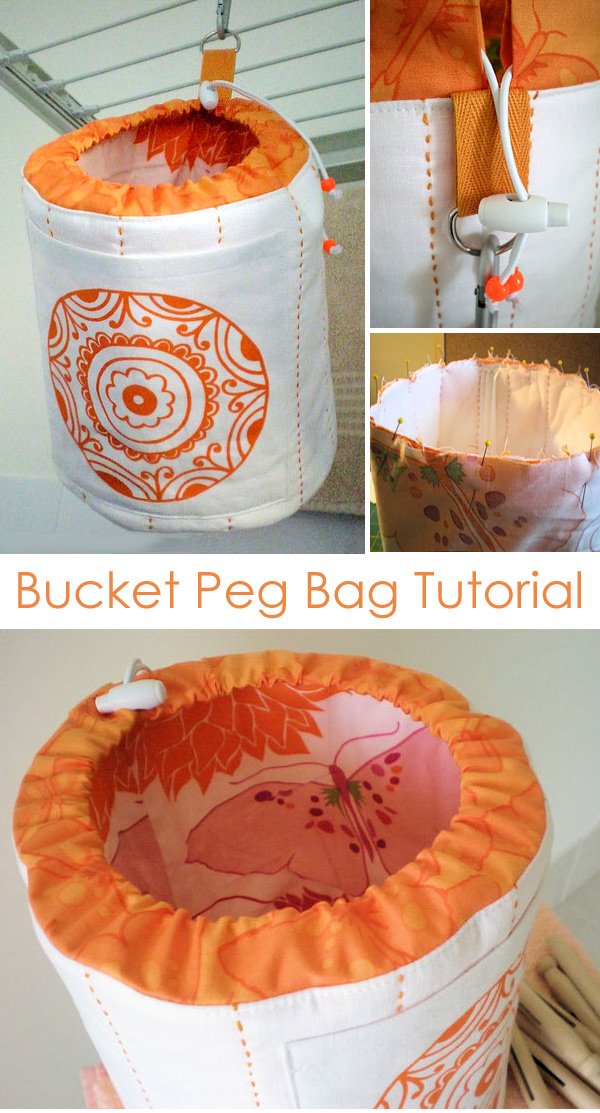
The most challenging part of the Bucket Peg Bag- Pattern is attaching the circular base to the cylindrical body. To make this easier, divide both the circle and the bottom of the tube into four equal quarters and mark them with pins or fabric chalk. By matching these four points together, you can distribute the fabric evenly. This “pinning and easing” technique is essential for a smooth Bucket Peg Bag bottom that doesn’t have unsightly puckers or pleats.
After sewing the base, it is highly recommended to finish the interior seams with a zigzag stitch or a serger. Because a Bucket Peg Bag handles a lot of weight and friction from the pegs moving around inside, the internal seams are under constant stress. Finishing the edges properly ensures that your Bucket Peg Bag- Pattern results in a garment-quality interior that won’t fray or fall apart after just one season of use.
The top hem of the Bucket Peg Bag should be sewn with a heavy-duty needle to accommodate the multiple layers of fabric and interfacing. If your Bucket Peg Bag- Pattern calls for a handle, you should “X-stitch” the ends of the handle to the body of the bag. An X-stitch (a square with an X inside) is the strongest way to attach straps to any bag, providing the durability needed for a high-capacity Bucket Peg Bag that might hold over a hundred pegs.
If you are using a metal carabiner or hook, you can sew a small D-ring into the top seam of your Bucket Peg Bag. Following the placement guides in your Bucket Peg Bag- Pattern, secure the D-ring with a short piece of reinforced webbing. This allows you to easily clip the Bucket Peg Bag onto the clothesline or even your belt loop if you prefer to carry the pegs with you as you walk along the line.
The final step in the assembly of your Bucket Peg Bag- Pattern is a thorough “topstitch” around the upper rim. This serves two purposes: it gives the bag a finished, store-bought look and it helps lock the lining and outer fabric together. Once this is complete, your Bucket Peg Bag is ready for its first load of laundry, standing as a testament to your sewing skills and the effectiveness of a well-designed pattern.
4. Maintenance and Customization Tips for Peg Bags
To keep your Bucket Peg Bag looking new, it is important to perform occasional maintenance. Even though you used durable fabric in your Bucket Peg Bag- Pattern, dirt and pollen can accumulate on the surface. Most canvas or denim bags can be spot-cleaned with a damp cloth and mild detergent. Avoid machine washing too frequently, as the agitation can break down the stiff interfacing that gives the Bucket Peg Bag its iconic bucket shape.
If you find that your Bucket Peg Bag is beginning to lose its structure after a year of heavy use, you can “re-stiffen” it using a spray starch or a fabric stiffener. This is a great way to breathe new life into a project made from a Bucket Peg Bag- Pattern without having to sew a brand-new one. A quick press with a hot iron after applying the stiffener will make the Bucket Peg Bag look as crisp as the day you finished the last stitch.
Customizing the Bucket Peg Bag- Pattern for different seasons can be a fun way to liven up your chores. You might choose a bright, floral print for spring or a sturdy, dark-toned corduroy for autumn. Since the pattern is so versatile, you can easily swap out the fabrics while keeping the same dimensions. Having a few different versions of the Bucket Peg Bag allows you to rotate them, which further extends the life of each individual bag.
For those living in very rainy climates, you can modify the Bucket Peg Bag- Pattern by using oilcloth or laminated cotton. These waterproof materials will keep your pegs bone-dry even during a downpour. When working with these fabrics, remember not to use pins, as they leave permanent holes; use “wonder clips” instead to hold your Bucket Peg Bag pieces together during the sewing process as specified in your updated pattern instructions.
Another great customization is adding an exterior pocket to your Bucket Peg Bag- Pattern. This pocket is perfect for holding small items you find in pockets while doing laundry, such as loose change, buttons, or hair ties. By adding this feature to your Bucket Peg Bag, you turn it into a multi-functional laundry assistant, proving that a well-thought-out pattern can solve more than just one organizational problem.
Finally, consider the environmental impact of your project. By using a Bucket Peg Bag- Pattern to create a long-lasting, repairable item, you are moving away from the “disposable” culture of cheap plastic goods. A handmade Bucket Peg Bag can last for a decade or more if cared for properly. Sharing your pattern with others or teaching a friend how to make one is a wonderful way to spread the joy of sustainable, practical crafting throughout your community.
Frequently Asked Questions (FAQ)
What is the best size for a Bucket Peg Bag- Pattern?
A standard, comfortable size for a Bucket Peg Bag is approximately 7 inches in diameter and 10 inches tall. This size is large enough to hold around 100-150 standard-sized wooden pegs without being too heavy to hang on a standard wire clothesline.
Can I use a regular sewing machine for heavy canvas?
Yes, most domestic sewing machines can handle canvas if you use the correct needle. For a Bucket Peg Bag- Pattern, use a Denim or Jeans needle (size 100/16) and sew at a slower speed to ensure the machine penetrates the thick layers of the Bucket Peg Bag without skipping stitches.
How do I stop the bag from swinging too much in the wind?
If you find your Bucket Peg Bag is swinging excessively, you can add a small weight (like a large washer or a flat stone) into a secret pocket in the base of the Bucket Peg Bag- Pattern. This lowers the center of gravity and keeps the bag more stable on the line.
Is it better to have an open top or a drawstring?
It depends on your storage! An open-top Bucket Peg Bag- Pattern is faster to use during laundry, but a drawstring is better for keeping the pegs clean if you store the bag in an area prone to dust or insects. Many people choose a hybrid design for their Bucket Peg Bag.
What if I don’t have a carabiner for the hook?
You can sew a sturdy fabric loop or use a strong “S-hook” from a hardware store. Just ensure that whatever you choose is integrated into the Bucket Peg Bag- Pattern with extra reinforcement, as the hook bears the entire weight of the pegs.
How many pegs can a typical Bucket Peg Bag hold?
When constructed using the standard Bucket Peg Bag- Pattern dimensions (7×10 inches), the bag can easily hold two full large packs of clothespins, which is usually enough for three to four large loads of laundry.
Conclusion
In conclusion, crafting a Bucket Peg Bag- Pattern is a rewarding project that elevates a simple household chore into an organized and stylish experience. We have explored the importance of choosing heavy-duty fabrics like canvas and denim, the geometric precision required to draft a circular pattern, and the reinforced sewing techniques needed to ensure your Bucket Peg Bag lasts for years.
By following this guide, you have learned how to create a durable, upright container that outperforms any store-bought plastic alternative. We hope this tutorial empowers you to create a laundry accessory that is as beautiful as it is functional.