The Butterfly Block with – pattern is one of the most charming and elegant quilt blocks available to makers today. Inspired by the delicate symmetry of butterflies in flight, this design adds movement, texture, and beauty to any quilt project.
Whether you’re making a baby quilt, a spring wall hanging, or a full-sized patchwork masterpiece, the butterfly motif brings a joyful, nature-inspired element to your work.Crafters and quilters love the Butterfly Block with – pattern not just for its aesthetics, but also for its versatility.
The block can be adapted to modern, traditional, or whimsical styles, and it works beautifully with both solid and patterned fabrics. With many variations available, it allows you to express your creativity while maintaining a classic and recognizable shape.
In this article, you’ll learn everything you need to create your own Butterfly Block with – pattern, including the materials required, piecing techniques, customization tips, and construction advice. Whether you’re an experienced quilter or a beginner eager to take on a new challenge, this guide will help you every step of the way.
1. Materials and Tools for Making a Butterfly Block
To get started on your Butterfly Block with – pattern, having the right materials is essential. Proper preparation will ensure your sewing process is smooth and enjoyable, and that the end result is a block you’ll be proud of.
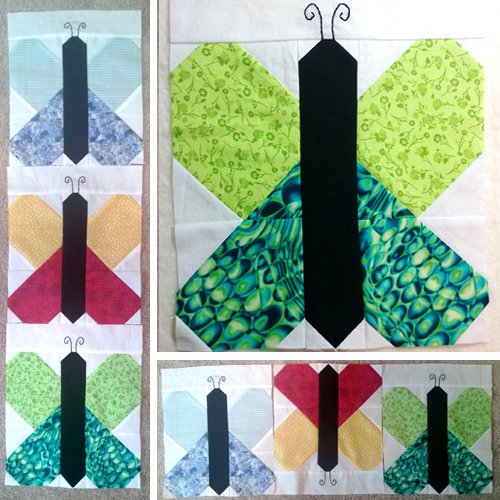
First, you’ll want to gather your fabric. Most butterfly blocks use a mix of at least three fabric types: one for the butterfly wings, one for the body, and one for the background. Choose high-contrast colors for maximum impact, or go with soft pastels for a more subtle, vintage effect.
A quality quilting cotton is the ideal choice due to its durability and ease of use. Solids and prints both work well, but be mindful of how print scale affects the visibility of the butterfly design. Smaller prints typically work best for the block’s small pieces.
You’ll need a rotary cutter, self-healing cutting mat, and a clear quilting ruler to cut your pieces precisely. Accuracy is key, especially for a block that includes smaller segments and pieced elements.
Your sewing machine should be set up with a ¼-inch presser foot, which is standard for piecing quilt blocks. Use high-quality thread, preferably cotton, that matches or blends with your fabric for neat, nearly invisible seams.
Pins or clips, a steam iron, and a pressing surface are also must-haves. Pressing as you go will help maintain the block’s crisp shape and ensure all seams lie flat, preventing bulky areas in your finished quilt.
Finally, consider having fabric marking tools on hand, especially if you’re working from a printed pattern or designing your own variation. Marking seam allowances and points for alignment will make your piecing cleaner and easier.
2. Constructing the Butterfly Block – Step by Step
Now that you’re equipped with materials, let’s dive into constructing your Butterfly Block with – pattern. This block typically includes pieced triangles, squares, and rectangles to form the butterfly’s wings and body, giving the block its recognizable shape and movement.
Begin by cutting all your pieces. Refer to your pattern for dimensions, and be sure to double-check measurements before cutting. Most butterfly blocks require mirror image pieces for the wings, so precision here matters a lot.
Next, assemble the wings. These often include half-square triangles (HSTs), which create the pointed wing tips. Stitch the HSTs together using a ¼-inch seam allowance, and press your seams toward the darker fabric to reduce bulk.
Then, piece the wing sections together, attaching the inner wing portions to the outer ones. This creates a cohesive wing shape for each side of the butterfly. You’ll typically need to make two wings, one for each side of the butterfly’s body.
Now it’s time to create the butterfly’s body. This part is usually a narrow rectangle or a series of small squares. The body may be simple or stylized, depending on the pattern you’re following. It connects the two wing pieces in the middle of the block.
Once the wings and body are complete, join the units together to form the finished butterfly shape. Pay special attention to aligning seams at the body and wing intersections. A clean join here enhances the realism of the butterfly motif.
Finally, attach the background squares or rectangles around the butterfly block to bring it to the desired size. Trim the block to ensure it’s perfectly square and ready to be used in a larger quilt project.
3. Variations and Creative Possibilities
The beauty of the Butterfly Block with – pattern lies in its versatility. Once you’ve mastered the basic construction, there are many creative directions you can take your design. Each variation allows for personal expression and unique storytelling through fabric.
Try creating scrappy wings using leftover fabric pieces. This not only adds charm and personality but also helps reduce fabric waste. Just make sure the scrappy pieces contrast enough from the background to maintain the butterfly shape.
For a more modern look, experiment with monochromatic palettes or use bold, graphic prints. High-contrast designs can make your butterfly block stand out in a quilt that’s meant to be more contemporary or artistic.
You can also play with block orientation. Rotating the butterfly blocks in different directions creates a lively, fluttering effect when arranged in a quilt. This dynamic layout mimics butterflies in motion and adds visual interest.
Incorporate appliqué techniques to embellish your butterfly blocks. Adding embroidered antennae or appliqué accents can give your butterflies personality and depth. This is especially effective for quilts intended for children or seasonal décor.
Use your Butterfly Block with – pattern for projects beyond quilts. These blocks work wonderfully in decorative pillows, tote bags, wall art, table runners, and even framed fabric art pieces. Their standalone beauty makes them perfect for gifts.
Finally, consider scaling your butterfly block up or down. A larger block makes a bold statement and is easier for beginners, while smaller versions can be used in intricate borders or mini quilts for more advanced quilters.
4. Tips for Success with the Butterfly Block
Success with the Butterfly Block with – pattern depends on a few simple habits and tips. Whether it’s your first butterfly block or your fiftieth, these insights will help make the process smoother and more enjoyable.
Accurate cutting is essential. Always double-check your pattern measurements and use a sharp rotary cutter for crisp lines. A small mistake in cutting can throw off the symmetry of the butterfly.
Use chain piecing techniques to speed up construction when making multiple blocks. This helps save time and thread while also keeping your sewing rhythm consistent.
Press seams carefully at every step. Pressing, rather than ironing, will help prevent stretching or warping of fabric. Be mindful of the direction your seams are pressed—nested seams make intersections neater.
Square up your units before joining them together. This ensures all your pieces fit together precisely, which is particularly important for the butterfly wings and body alignment.
If your block has small or intricate parts, consider using starch spray on your fabric before cutting. This will give the fabric more body and reduce fraying or distortion during sewing.
Lastly, have patience and enjoy the process. Butterfly blocks can be detailed, but that’s what makes them so beautiful. Embrace the challenge, and remember that each one adds a unique flutter to your quilt.
FAQ – Frequently Asked Questions
Q1: What size is a typical Butterfly Block?
A: Most standard Butterfly Blocks measure 12” x 12”, but they can easily be resized depending on your project.
Q2: Is the Butterfly Block beginner-friendly?
A: Yes! The basic block is manageable for beginners, especially if you’re already familiar with HSTs and simple piecing techniques.
Q3: Can I use scraps for the Butterfly Block wings?
A: Absolutely! Scrappy wings add charm and are a great way to use up leftover fabric in a cohesive way.
Q4: Should I use solids or prints for the Butterfly Block?
A: Both work well. Solids highlight the shape more clearly, while prints can add texture and visual interest.
Q5: Can I make this block using appliqué instead of piecing?
A: Yes. Appliqué is a great alternative and works especially well for creating stylized or whimsical butterfly designs.
Q6: How do I keep my butterfly symmetrical?
A: Carefully cut mirrored pieces for the wings and double-check alignment when assembling. A square ruler helps maintain balance.
Conclusion
The Butterfly Block with – pattern offers a delightful way to bring nature’s beauty into your quilting. With graceful lines, rich symbolism, and endless creative possibilities, it’s a design that never goes out of style. Whether you’re crafting a single block for a pillow or building a full quilt with fluttering butterflies across every row, this pattern is a satisfying and meaningful addition to your quilting journey.
In this guide, you’ve learned what materials you’ll need, how to construct the block, tips for perfect piecing, and how to customize your project. The FAQ section answered key questions that many quilters encounter when trying this block for the first time.
Now it
’s your turn! We’d love to hear your experiences with the Butterfly Block with – pattern. Leave a comment with your thoughts, share a photo of your creation, or suggest your favorite variations. Happy quilting, and may your stitches always fly straight!