If you’re looking to combine style and practicality in your next sewing or quilting project, a Butterfly pot holder – pattern might be the perfect choice. This charming kitchen accessory not only protects your hands and countertops from hot dishes but also brings a whimsical touch of nature-inspired beauty to your space.
Whether you’re a seasoned crafter or a beginner with a sewing machine and a few scraps of fabric, this project offers a fulfilling and creative experience.What makes the Butterfly pot holder – pattern so appealing is its ability to balance form and function.
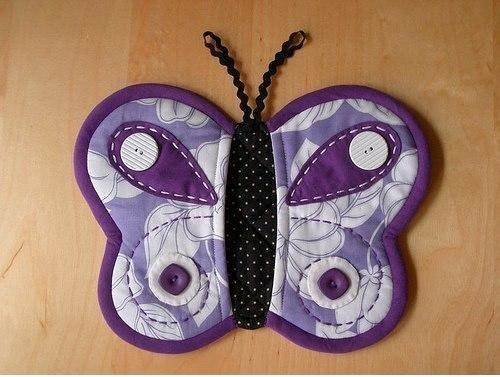
Designed in the shape of a butterfly, the pattern typically includes layered wings, quilted textures, and bright, contrasting fabrics. It’s a great opportunity to use leftover fabric, practice precision stitching, and experiment with color combinations that brighten your kitchen.
In this article, you’ll learn how to choose materials, follow the butterfly pot holder pattern step-by-step, and add personalized finishing touches. We’ll also explore tips for making the project safer and more durable, and answer the most common questions from crafters who want to bring this lovely item to life.
1. Choosing Materials for the Butterfly Pot Holder – Pattern
Before starting your project, it’s important to gather the right materials to ensure your Butterfly pot holder – pattern turns out both attractive and safe to use. Pot holders are exposed to high heat, so quality, heat-resistant materials are key.
Start with 100% cotton fabric for both the front and back of the butterfly. Cotton is breathable, easy to work with, and won’t melt under heat like synthetic fabrics. Choose a variety of colorful prints for the wings to give the butterfly a vibrant, lifelike look.
You’ll also need a layer of insulating batting, like Insul-Bright, to protect hands and surfaces from heat. This material contains a reflective metal layer sandwiched between polyester fibers and is essential for kitchen safety. For extra thickness, consider adding a layer of cotton batting along with the insulating material.
Thread choice matters too. Use cotton or polyester thread that’s strong and durable. You want your stitches to hold up through repeated use and washing. Pick a thread color that complements your fabric, or use contrasting thread to highlight your quilting details.
Don’t forget essential tools like fabric scissors, pins, quilting clips, a rotary cutter, cutting mat, and an iron. A sewing machine with a walking foot or quilting foot is especially helpful when working with layered fabrics and batting.
Optional but helpful additions include bias tape for binding the edges and a hanging loop so the pot holder can be displayed when not in use. These small details add both function and a finished look to your butterfly pot holder.
2. Cutting and Assembling the Butterfly Wings
The wings are the heart of the Butterfly pot holder – pattern, so careful cutting and assembly will go a long way in making your project successful. Start by printing or tracing your butterfly pattern onto paper or template plastic for reuse.
Most Butterfly pot holder – patterns include four separate wing pieces (two upper and two lower) that come together at the center. Fold your fabric in half and trace your template onto the wrong side, ensuring symmetrical wing pieces for both sides of the butterfly.
Cut out each wing piece from both your top fabric and lining fabric, and do the same for the batting and insulating layers. You should now have a full set of components: four sets of layered wing shapes ready to be sewn.
Layer each wing with the fabric right sides together, batting underneath, and the insulating layer at the back. Pin or clip them in place. Sew around the edges of each wing, leaving a small gap for turning right side out. Trim excess seam allowance, clip curves, and turn the wings right side out.
Press the wings flat with a warm iron, making sure seams are crisp. Use a chopstick or turning tool to push out the tips of the wings fully. Once flat, topstitch around each wing about 1/8″ from the edge. This adds durability and gives a professional finish.
Quilt each wing individually with decorative stitching or echo quilting. This step is not just aesthetic—it helps keep the batting in place and adds texture and dimension to your butterfly design.
Repeat the process for all four wings. Once complete, you’ll be ready to attach them together at the center to form the complete butterfly shape.
3. Constructing the Body and Final Assembly
The center of the Butterfly pot holder – pattern typically includes a body piece that connects the wings and gives the illusion of a real butterfly. This central body also reinforces the structure and gives your pot holder a polished appearance.
Cut the body shape from a coordinating or contrasting fabric. This can be a simple oval, a curved rectangle, or a stylized butterfly thorax. Cut two pieces: one for the front and one for the back. Add a small piece of batting in between for shape and durability.
Layer the body pieces, sew around the edges (leaving a gap), turn right side out, press, and topstitch. Add antennae using embroidery, fabric cord, or decorative ribbon stitched in place before attaching the body to the wings.
Arrange the wings so they overlap slightly at the center. Use clips to hold them in position, then center the body on top. Carefully sew the body onto the wings through all layers, securing them in place and hiding any raw edges or seams.
At this point, you can add a hanging loop to the top of the butterfly. This can be a piece of bias tape folded into a loop and sewn securely between the wings and body. It’s a functional touch that lets you display your butterfly pot holder in your kitchen.
Finally, inspect all seams and quilting lines. Reinforce any weak areas and give the entire piece one last press. Your beautiful, functional Butterfly pot holder – pattern project is now ready for use or gifting!
4. Personalization and Creative Variations
One of the joys of working with a Butterfly pot holder – pattern is the ability to make it your own. With some imagination, you can adapt the basic pattern to suit your personality, match your kitchen decor, or create thoughtful handmade gifts.
Start by experimenting with fabric combinations. Choose batiks, florals, or geometric prints for the wings, or go bold with metallics and solids. Try using different colors for the upper and lower wings to mimic real butterfly species like monarchs or swallowtails.
You can also add embroidery to the wings, either by machine or by hand. Think about decorative stitches, monograms, or even small quotes along the wing edges. These details elevate your pot holder into a unique keepsake.
Another variation is to add patchwork or pieced quilting to each wing. Tiny squares, half-square triangles, or flying geese can make the wings look like intricate stained glass. This is a great way to use up fabric scraps while making something beautiful and useful.
For a rustic or modern twist, try using linen, denim, or canvas instead of quilting cotton. These fabrics offer different textures and tones that give your butterfly a contemporary, farmhouse, or vintage look.
You can also adjust the size of the pattern to create matching sets. Make mini butterfly coasters, medium-sized pot holders, and large hot pads using the same template scaled up or down. This makes a lovely coordinated set for gift-giving or selling at craft fairs.
Don’t be afraid to use your creativity. The Butterfly pot holder – pattern is flexible and fun, and each variation is a chance to explore your own artistic vision while making something practical and charming.
FAQ: Butterfly Pot Holder – Pattern
Q1: Is the butterfly pot holder pattern beginner-friendly?
Yes, it’s a great project for beginners. The shapes are simple to cut and sew, and it offers great practice with quilting, layering, and finishing techniques.
Q2: What’s the best batting for a pot holder?
Use heat-resistant batting like Insul-Bright or cotton batting. Avoid polyester-only batting, as it may melt or fail to insulate properly.
Q3: Can I make the pot holder without a sewing machine?
It’s possible to hand-sew it, but it will take more time and may be less durable. A sewing machine gives cleaner, stronger results.
Q4: How do I wash the butterfly pot holder?
Machine wash in cold water on a gentle cycle and air dry or tumble dry low. Avoid bleach, which can degrade fabrics and batting.
Q5: What size should the finished butterfly pot holder be?
Most finished pot holders are about 8–10 inches across, but you can adjust the template size depending on your needs.
Q6: Can I sell butterfly pot holders made from this pattern?
Yes, as long as you’re not violating any copyright restrictions from the original pattern designer. Always check usage rights first.
Conclusion
The Butterfly pot holder – pattern is a delightful project that combines functionality, beauty, and creativity. Whether you’re making one for yourself, for a gift, or to sell at a local market, this pattern offers endless possibilities for customization and personal expression.
We’ve explored how to choose the right materials, cut and assemble your butterfly wings, construct the body, and personalize your final creation. Along the way, you’ve also gained skills in quilting, appliqué, and decorative stitching.
If you’ve enjoyed making this project or have ideas for creative variations, please leave a sincere opinion or suggestion in the comments. Your experience can inspire others and help the crafting community grow. Happy sewing!