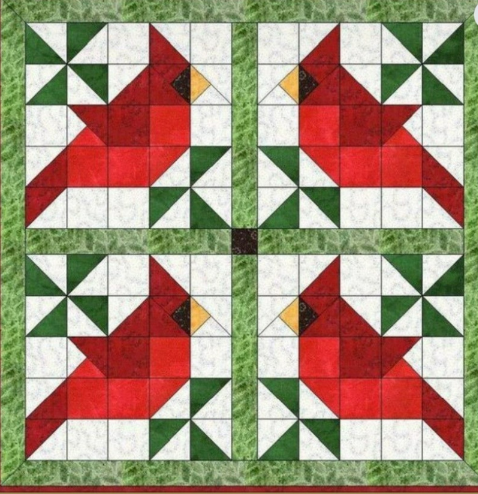
The Cardinal Quilt Block – Pattern is a timeless favorite for quilters who wish to bring a touch of nature’s winter beauty into their home through the art of fabric piecing. Representing hope, joy, and the vibrant spirit of the winter season, the cardinal is a symbolic bird that stands out strikingly against any background. Whether you are an experienced quilter or a beginner looking for a rewarding challenge, creating this specific block allows you to master precision piecing while working with bold, contrasting colors that celebrate the great outdoors.
Choosing to work with a Cardinal Quilt Block – Pattern provides a wonderful opportunity to experiment with various quilting techniques, such as half-square triangles and fussy cutting. These blocks can be used individually to create charming coasters and potholders, or they can be combined into a large-scale masterpiece that serves as a stunning wall hanging or bedspread. The versatility of the design means you can adapt it to modern or traditional styles simply by varying your choice of prints and background textures.
In this detailed guide, we will explore everything you need to know about executing a perfect Cardinal Quilt Block – Pattern. From selecting the most vibrant red fabrics to ensuring your points are sharp and professional, we will cover the technical aspects of construction and the creative possibilities of the design. By the end of this article, you will feel inspired to start your own project, transforming simple scraps of fabric into a soulful representation of one of nature’s most beloved winged visitors.
1. Selecting Fabrics and Tools for Your Cardinal Quilt Block – Pattern
The most iconic feature of any Cardinal Quilt Block – Pattern is the deep, rich red of the bird’s plumage. When selecting your fabrics, look for varying shades of crimson, scarlet, and burgundy to add depth and “feathery” texture to the design. Using a solid red alongside a subtle tone-on-tone print can make the bird look more three-dimensional. Don’t forget a small scrap of black for the bird’s mask and a bright orange or yellow for the beak to ensure your quilt block is anatomically recognizable.
Background fabric choice is equally important when working on your Cardinal Quilt Block – Pattern. Most quilters prefer a crisp white or a light grey to simulate a snowy winter sky, which makes the red fabric pop. However, if you want a more rustic look, a tan “grunge” fabric or a light blue “sky” print can give the cardinal design a completely different atmosphere. Ensure the background has enough contrast so that the delicate points of the bird’s crest and tail remain clearly visible.
Precision cutting is the secret to a successful Cardinal Quilt Block – Pattern. You will need a high-quality rotary cutter with a fresh blade and a non-slip quilting ruler. Because this pattern often involves small geometric shapes, even a 1/8-inch error can cause the block to become skewed. Taking the time to square up your fabric before you begin cutting will save you a significant amount of frustration during the assembly phase of your handmade quilt.
A high-quality 100% cotton thread in a neutral color, like light grey or tan, is ideal for piecing the Cardinal Quilt Block – Pattern. While you might be tempted to use red thread, a neutral color blends better with the light background fabrics, preventing the dark thread from “shadowing” through the white seams. Using a fine 50-weight thread will also reduce bulk in the seam allowances, which is essential when multiple points meet at a single intersection.
Pins or fabric clips are indispensable when aligning the various segments of the Cardinal Quilt Block – Pattern. Specifically, when you are joining the black mask section to the red head section, you want to ensure the seams line up perfectly. Using the “pinning in the ditch” technique will help keep the fabric from shifting as it passes under the presser foot, resulting in a quilted bird that looks professionally tailored rather than amateurish.
Lastly, a reliable steam iron is your best friend when executing a Cardinal Quilt Block – Pattern. Pressing each seam as you go—rather than waiting until the end—is what gives the block its flat, crisp appearance. For this pattern, it is often recommended to press seams toward the darker fabric to prevent them from showing through the lighter background. Proper pressing transforms a bunch of sewn scraps into a cohesive and beautiful textile art piece.
2. Master the Piecing Techniques for a Perfect Cardinal Result
Most versions of the Cardinal Quilt Block – Pattern rely heavily on Half-Square Triangles (HSTs). To make these efficiently, you can use the “two-at-a-time” method, where you sew two squares together and cut them diagonally. This technique is perfect for creating the slope of the cardinal’s back and the sharp point of its crest. Mastering HSTs is a fundamental skill that will make the bird quilt pattern much easier to manage.
The “Stitch and Flip” method is another technique frequently found in a Cardinal Quilt Block – Pattern. This is often used for the smaller details like the beak or the tips of the wings. By placing a small square on the corner of a larger rectangle, sewing diagonally, and flipping the triangle up, you create complex angles without the need for difficult “Y-seams.” This makes the cardinal block accessible even to those who are still developing their quilting confidence.
When assembling the head of the Cardinal Quilt Block – Pattern, pay close attention to the black “mask” area. This usually involves very small pieces of fabric that can be easily chewed up by your sewing machine’s feed dogs. To prevent this, use a “leader” scrap of fabric to start your stitches, or consider using a straight-stitch needle plate. Keeping these small sections accurate is what gives your quilted cardinal its personality and sharp gaze.
The body of the bird in a Cardinal Quilt Block – Pattern is typically assembled in rows or units. It is helpful to lay out all your cut pieces on a design board before you start sewing. This allows you to check the orientation of your triangles and ensure the bird is “flying” or “perching” in the direction you intended. Seeing the quilt layout visually before committing to the seams prevents the dreaded visit from the “seam ripper” later on.
Consistency in your 1/4-inch seam allowance is the “holy grail” of the Cardinal Quilt Block – Pattern. If your seams are too wide, the bird will look squashed; if they are too narrow, the block will be too large and won’t fit with others. Use a specialized 1/4-inch quilting foot on your machine to maintain a steady distance. This precision ensures that the beak, crest, and tail all align perfectly with the quilt’s geometric grid.
Once the main units are sewn together, you will perform the final assembly of the Cardinal Quilt Block – Pattern. This involves joining the top, middle, and bottom sections. “Nesting” your seams—where the seam of the top row points left and the seam of the bottom row points right—will help you achieve perfectly matched intersections. This tiny detail is what distinguishes a high-quality handcrafted quilt from a basic DIY project.
3. Creative Layouts and Project Ideas for Your Cardinal Pattern
One of the most popular ways to use a Cardinal Quilt Block – Pattern is in a “seasonal” wall hanging. By surrounding the cardinal block with “Holly Leaf” blocks or simple “Flying Geese” borders, you can create a festive piece of decor that stays relevant all winter long. Adding a few embroidered details, like a pine branch for the bird to sit on, can further enhance the storytelling aspect of your winter quilt.
For those who enjoy a modern aesthetic, try using the Cardinal Quilt Block – Pattern in a minimalist “on-point” layout. By rotating the blocks 45 degrees and surrounding them with large expanses of negative space (solid white or grey), you create a high-contrast, sophisticated look. This approach turns the traditional bird block into a contemporary piece of art that fits perfectly in a modern home or gallery setting.
You can also use a single Cardinal Quilt Block – Pattern to create a stunning focal point for a quilted tote bag. Because the cardinal is so recognizable, it serves as a beautiful “medallion” for the center of a bag. Pair it with dark forest green handles or a black-and-white buffalo check fabric to give the project a trendy, farmhouse-style finish that makes your sewing hobby both functional and stylish.
If you are feeling ambitious, a full-sized bed quilt made entirely of the Cardinal Quilt Block – Pattern is a breathtaking sight. You can alternate the direction of the birds so they appear to be interacting with each other across the bed. Using a variety of red fabrics from your “scrap stash” can give the quilt a charming, scrappy look that tells a story of all your previous quilting projects and memories.
The Cardinal Quilt Block – Pattern also works wonderfully for holiday gifts. A set of four cardinal blocks can be turned into a beautiful table runner in just one weekend. Since many people view the cardinal as a messenger from lost loved ones, a gift featuring this symbolic bird can carry deep emotional significance, making it much more than just a piece of home decor.
Don’t be afraid to experiment with the size of your Cardinal Quilt Block – Pattern. While a standard 12-inch block is common, you can shrink the pattern to make 6-inch blocks for delicate holiday ornaments. Conversely, enlarging the pattern to an 18-inch or 24-inch block allows you to make a quick and easy “baby quilt” or a bold floor pillow that showcases the artistic beauty of the cardinal in a large format.
4. Tips for Quilting and Finishing Your Cardinal Masterpiece
After your Cardinal Quilt Block – Pattern is pieced, the “quilting” process (sewing the layers together) begins. For a bird-themed block, “echo quilting” is a fantastic choice. By sewing lines that follow the silhouette of the cardinal, you create a ripple effect that emphasizes the bird’s shape. This technique adds movement to the quilt top, making the bird look as though it is the center of a beautiful winter breeze.
If you prefer machine quilting, “free-motion” feathers or swirls can add a soft, organic contrast to the sharp geometric lines of the Cardinal Quilt Block – Pattern. Use a thread color that matches the background to let the texture do the talking, or use a variegated red thread on the bird itself to simulate the look of real feathers. The quilting stage is where you can truly “draw” on your fabric canvas.
For those who love hand-quilting, the Cardinal Quilt Block – Pattern provides plenty of opportunities for “big stitch” quilting with embroidery floss. A few bold stitches around the beak or crest can add a rustic, folk-art charm to the project. Hand-quilting is a slower, more meditative process that honors the history of the quilting craft while adding a unique, tactile quality to your cardinal.
The binding is the final frame for your Cardinal Quilt Block – Pattern. A striped binding—often called “candy cane” binding—in red and white is a classic choice for cardinal-themed items. Alternatively, a solid black binding can provide a strong, modern frame that makes the colors inside the block appear even more vivid. The binding protects the edges and ensures your cardinal quilt survives for generations.
Before you consider your Cardinal Quilt Block – Pattern project finished, don’t forget the quilt label. Write down the name of the pattern, your name, and the date. Since cardinals are so often associated with memory and family, adding a small note about why you chose this specific pattern can add immense sentimental value for whoever inherits the quilt in the future.
Lastly, give your finished Cardinal Quilt Block – Pattern a final gentle press and perhaps a light spray of fabric protector if it will be used as a table runner or pillow. Keeping the whites bright and the reds deep is key to maintaining the visual impact of the design. With proper care, your handmade cardinal creation will remain a bright spot in your home during the cold winter months for many years to come.
FAQ – Frequently Asked Questions
Is the Cardinal Quilt Block – Pattern suitable for beginners?
Yes, while it looks complex, most versions are made using standard shapes like squares and triangles. If you can sew a consistent 1/4-inch seam and are comfortable with Half-Square Triangles, you can successfully complete this pattern.
What size is a typical Cardinal Quilt Block?
The most common size for a Cardinal Quilt Block – Pattern is 12.5 inches (unfinished), which results in a 12-inch block once sewn into a quilt. However, the pattern can usually be scaled up or down depending on your project needs.
Can I use this pattern for “Paper Piecing”?
Absolutely! Many quilters prefer the Foundation Paper Piecing (FPP) method for the Cardinal Quilt Block – Pattern because it ensures perfect points and sharp angles, which can be tricky with traditional piecing for the smaller beak and crest sections.
What is the best fabric for the cardinal’s eye?
Most patterns use a tiny black square or triangle, but you can also use a small black button or a French knot made with embroidery floss after the block is finished to give the quilted bird a more life-like appearance.
How do I stop the red fabric from bleeding?
Red fabric is notorious for bleeding. Before starting your Cardinal Quilt Block – Pattern, it is highly recommended to pre-wash your red fabrics with a “color catcher” sheet to ensure the dye won’t ruin your white background during the first wash.
Can I flip the pattern to have the bird face the other way?
Yes! To have the bird face the opposite direction, simply mirror the Cardinal Quilt Block – Pattern instructions. If you are using paper piecing, you would print the pattern on the opposite side of the paper to achieve a mirrored result.
Conclusion
The Cardinal Quilt Block – Pattern is a wonderful way to combine technical quilting skills with a love for the natural world. In this article, we’ve covered the importance of selecting high-contrast fabrics, the essential tools for precision, and the various piecing techniques like HSTs and “stitch and flip” that make this bird come to life.
We also explored creative ways to use the block in everything from modern wall hangings to functional tote bags, and discussed the finishing touches that ensure your work lasts a lifetime. This pattern is a beautiful reminder that even in the coldest months, there is vibrant color and life to be found.