The Carolina Lily Quilt Pattern is a timeless design that has captured the hearts of quilters for generations.
Known for its intricate yet beautiful floral motifs, this quilt pattern is perfect for quilters who enjoy a challenge and wish to create a quilt that will become a cherished heirloom.
Whether you’re a beginner or an experienced quilter, the Carolina Lily Quilt Pattern offers something for everyone.
When you embark on a quilting project, choosing the right pattern is essential to the overall experience. The Carolina Lily Quilt Pattern stands out due to its vibrant, detailed blocks and the opportunity to experiment with colors and fabrics. This pattern allows quilters to explore various techniques while producing a quilt that reflects their personal style.
In this article, we’ll dive into everything you need to know about the Carolina Lily Quilt Pattern, including how to gather materials, step-by-step instructions, tips for success, and more. Whether you’re new to quilting or looking for a fresh challenge, this pattern provides an opportunity to stretch your creativity and craft a quilt that is both stunning and meaningful.
1. What is the Carolina Lily Quilt Pattern?
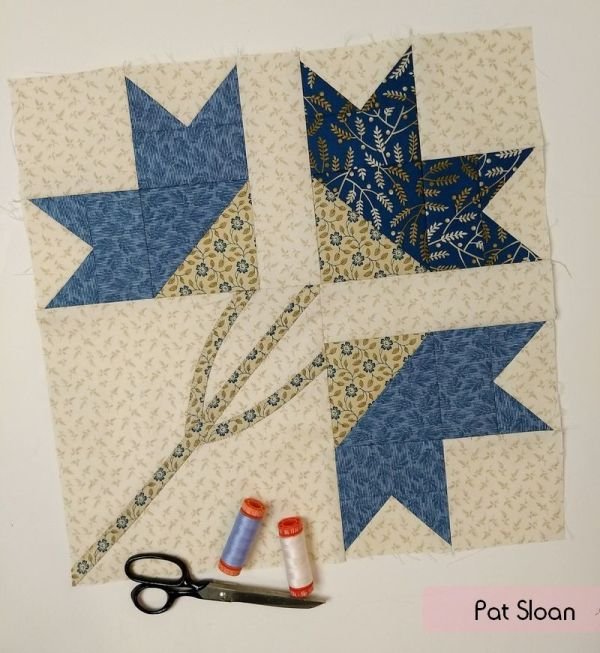
The Carolina Lily Quilt Pattern is a traditional quilt design featuring floral motifs that resemble the shape of a lily flower. The pattern is typically made up of intricate piecing that combines blocks with curved shapes and sharp angles, creating a visually appealing and complex design. The “lily” aspect of the pattern is reflected in the petal-like shapes, making it an excellent choice for those who appreciate nature-inspired quilt designs.
This pattern has deep historical roots in American quilting traditions, particularly in the southern United States. The Carolina Lily Quilt Pattern has been passed down through generations, often associated with hand-piecing and applique techniques. While the pattern is often seen in more traditional quilts, it has also been modernized by quilters who enjoy using contemporary fabrics and techniques.
One of the most appealing aspects of the Carolina Lily Quilt Pattern is its versatility. The pattern can be used to create quilts of various sizes, from small wall hangings to large bed quilts. Additionally, the blocks can be arranged in many ways, allowing quilters to personalize the design and make it their own.
For those looking to create a quilt with a bit of history and beauty, the Carolina Lily Quilt Pattern provides a wonderful opportunity to honor a classic design while still putting a unique spin on it. Whether you choose to stick to traditional color schemes or experiment with more modern hues, this quilt pattern offers endless possibilities.
2. Materials Needed for the Carolina Lily Quilt Pattern
Before you begin your quilting project, gathering the right materials is crucial for achieving the best results. The Carolina Lily Quilt Pattern requires specific tools and fabrics to ensure your quilt turns out beautifully. Here’s a list of the materials you’ll need to get started:
Fabric: The most important material for any quilt is fabric. For the Carolina Lily Quilt Pattern, you’ll need a combination of fabrics in different colors and patterns. It’s ideal to use high-quality cotton fabric for its durability and ease of sewing. Choose fabrics that contrast well to make the floral shapes stand out, or go for a more subtle, monochromatic look depending on your style preferences.
Thread: High-quality quilting thread is essential for strong seams and a professional finish. Choose a thread that complements the colors of your fabrics. Cotton or polyester threads are both good choices for quilting, with cotton thread often being the preferred option for hand quilting.
Rotary Cutter and Ruler: Accuracy is key when working with the Carolina Lily Quilt Pattern, and using a rotary cutter and ruler will help you achieve precise fabric cuts. These tools are essential for cutting out the various shapes required for the blocks.
Needles: Ensure you use the correct quilting needles for your sewing machine. A size 75/11 or 80/12 quilting needle is a good choice for working with cotton fabrics.
Cutting Mat: A self-healing cutting mat will help protect your work surface and ensure that your cuts are straight and clean.
Batting and Backing Fabric: Once you’ve pieced your quilt top, you’ll need batting and backing fabric to complete the quilt. Cotton batting is often preferred for its softness and breathability, while the backing fabric can be chosen to match or complement the colors of the quilt top.
3. Step-by-Step Guide to Creating the Carolina Lily Quilt
The Carolina Lily Quilt Pattern is a beautiful and intricate design that requires careful planning and attention to detail. Follow this step-by-step guide to bring your quilt to life:
Step 1: Cutting the Fabric
Start by cutting your fabric into the necessary pieces. The Carolina Lily Quilt Pattern usually involves cutting out petal shapes and background pieces. Use a rotary cutter and ruler for precise cuts. Take your time to ensure that all pieces are cut accurately, as this will affect the overall appearance of your quilt.
Step 2: Piecing the Blocks
Next, begin piecing the quilt blocks together. The blocks in the Carolina Lily Quilt Pattern often involve curved piecing, so it’s essential to take your time and sew carefully. Use a quarter-inch seam allowance to ensure your blocks align correctly. If you’re new to curved piecing, consider practicing on scrap fabric before working with your main pieces.
Step 3: Arranging the Blocks
Once you’ve pieced all the blocks, arrange them in a layout that is visually pleasing to you. The Carolina Lily Quilt Pattern offers several options for block placement, so experiment with different arrangements to see what works best. You can alternate colors and fabrics or create a symmetrical design, depending on your preferences.
Step 4: Joining the Blocks
Once you’ve finalized the arrangement, sew the blocks together. Press the seams flat to ensure the quilt top is smooth and neat. Pay attention to matching the seams at the intersections of the blocks for a polished look.
Step 5: Adding the Borders
To complete the quilt top, add borders around the edges of the blocks. Borders can help frame the quilt and give it a finished look. Choose a fabric that complements the colors of the quilt top and adds balance to the overall design.
Step 6: Quilting and Binding
The final steps involve quilting and binding the quilt. You can quilt the layers by hand or machine, depending on your preference. After quilting, bind the edges with a fabric of your choice, making sure to sew the binding securely to prevent any fraying.
4. Tips for Success When Working with the Carolina Lily Quilt Pattern
The Carolina Lily Quilt Pattern can be challenging, but with the right techniques and mindset, you can create a beautiful quilt that you’ll be proud of. Here are some tips to help you succeed:
Take your time. The Carolina Lily Quilt Pattern involves intricate piecing and curved shapes, so it’s important to work at a pace that feels comfortable for you. Rushing through the process can lead to mistakes, so focus on quality over speed.
Press your seams. Pressing seams as you go will ensure that your quilt top lies flat and that the blocks align correctly. This is especially important when working with curved piecing, as pressing helps the fabric maintain its shape.
Use a design wall. A design wall is an excellent tool for arranging quilt blocks and visualizing the finished quilt. By placing your blocks on a design wall, you can easily rearrange them until you find the perfect layout.
Practice curved piecing. If you’re new to curved piecing, practice on scrap fabric before working with your main pieces. Curved seams can be tricky, but with patience and practice, you’ll improve your skills.
Choose fabrics carefully. The fabrics you choose will greatly impact the overall look of your quilt. Consider how the colors and patterns work together to create a harmonious design. Don’t be afraid to experiment with different fabric combinations.
Stay organized. Keep track of the fabric pieces and patterns as you work through the quilt. Staying organized will help you avoid confusion and mistakes along the way.
Frequently Asked Questions
- What skill level is required for the Carolina Lily Quilt Pattern?
The Carolina Lily Quilt Pattern is best suited for intermediate quilters due to the curved piecing involved. However, beginners who are comfortable with basic quilting techniques can still tackle this project with patience and practice. - Can I use different fabrics for the Carolina Lily Quilt?
Yes, you can personalize your quilt by using different fabrics. Whether you prefer traditional florals or modern prints, the Carolina Lily Quilt Pattern can accommodate a wide range of fabric choices. - Is it necessary to use curved piecing for this pattern?
Yes, the Carolina Lily Quilt Pattern typically involves curved piecing. However, if you are new to curved piecing, there are plenty of resources available to help you learn this technique. - How long does it take to complete the Carolina Lily Quilt?
The time it takes to complete the quilt depends on your skill level and how much time you dedicate to the project. On average, it may take several weeks or even months to finish, depending on the size and complexity. - Can I make a smaller version of the Carolina Lily Quilt?
Yes, you can adapt the Carolina Lily Quilt Pattern to make a smaller version, such as a wall hanging or throw quilt. Simply adjust the number of blocks and the layout to fit the desired size.
Conclusion
The Carolina Lily Quilt Pattern is a beautiful and intricate quilt design that offers both a challenge and a rewarding experience for quilters. Whether you’re an experienced quilter or just beginning, this pattern allows you to explore new techniques and create a quilt that will be treasured for years to come. By following the steps outlined in this article, you can confidently embark on your quilting journey and create a stunning masterpiece. We’d love to hear your thoughts and suggestions—feel free to leave a comment below!