The Carrot Block Pattern has become a sensation in the world of modern quilting and textile design, offering a whimsical yet sophisticated aesthetic that appeals to both beginners and seasoned artisans. Whether you are looking to brighten up a kitchen space or create a themed quilt for a seasonal display, understanding the intricacies of this specific quilt block design is essential for achieving a professional finish. This pattern relies on a combination of geometric precision and creative fabric selection to bring a simple vegetable shape to life through patchwork techniques.
When we dive into the Carrot Block Pattern, we are essentially looking at a masterclass in stitch-and-flip methods and color theory. The beauty of this design lies in its versatility; it can be scaled up for a large table runner or miniaturized for delicate pot holders. By mastering the angles required to create the tapered look of a carrot, quilters can improve their overall piecing skills while producing something visually striking and joyful.
The popularity of the Carrot Block Pattern is also fueled by the growing trend of “farmhouse chic” and sustainable living decor. People are increasingly drawn to handmade crafts that celebrate nature and gardening. In this comprehensive guide, we will explore the technical aspects of constructing this pattern, the best materials to use, and how to optimize your workflow to ensure every fabric point aligns perfectly for a high-quality result.
1. Understanding the Foundations of the Carrot Block Pattern
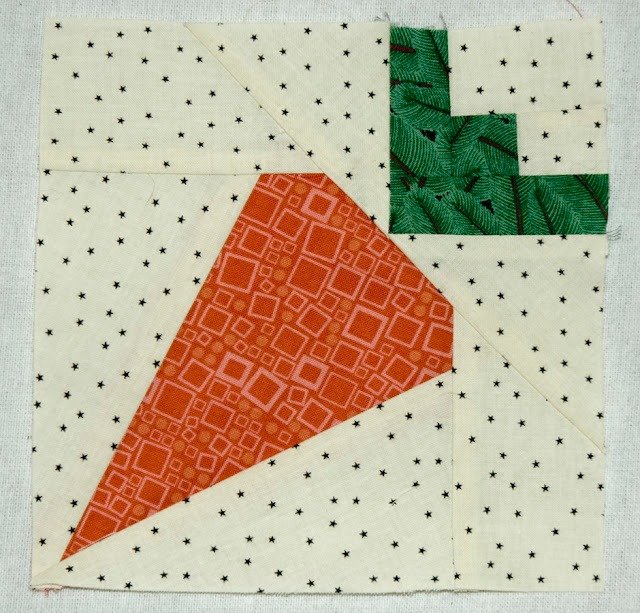
The Carrot Block Pattern is primarily constructed using a technique known as foundation paper piecing or traditional grid-based quilting. At its core, the pattern consists of a long, triangular orange section representing the root and a smaller, textured green section for the leaves. To make the design pop, choosing the right high-quality cotton fabric is the first step toward success.
Precision is the name of the game when cutting your fabric strips. Because carrots have a distinct taper, you will often use snowballing techniques—sewing a small square of background fabric onto the corners of an orange rectangle—to create the illusion of a pointed tip. This ensures that the Carrot Block Pattern maintains its iconic silhouette without requiring complex Y-seams.
For the “foliage” or the top of the carrot, many designers opt for scrappy quilting styles. Using various shades of emerald, forest, and lime green can add depth and realism to your quilt top. This section of the Carrot Block Pattern is where you can truly let your creativity shine by mixing different patterns like polka dots or subtle florals.
The background fabric you choose for your Carrot Block Pattern acts as the canvas. Most experts recommend a neutral low-volume fabric, such as cream, white, or light grey, to ensure the vibrant orange and green hues remain the focal point. This contrast is vital for making the quilt blocks stand out once they are joined together into a larger project.
One common mistake when starting a Carrot Block Pattern is neglecting the seam allowance. Always use a consistent 1/4 inch seam to ensure that your blocks finish at the intended size. If your seams are inconsistent, the carrots may appear distorted or wonky, which can be frustrating when you try to assemble the final quilt layout.
Finally, pressing is a non-negotiable step in creating a crisp Carrot Block Pattern. You should press your seams open or to the dark side to prevent bulk, especially where the carrot root meets the leafy greens. A well-pressed block not only looks better but also makes the quilting process much easier when it comes time to add the batting and backing.
2. Choosing the Right Materials and Color Palette
Selecting the perfect shades of orange is the most exciting part of working on a Carrot Block Pattern. Instead of using just one solid color, try a “gradient” approach with hand-dyed fabrics or batiks. This adds a “garden-fresh” look to the textile art, making the carrots look three-dimensional rather than flat.
Texture plays a significant role in the visual impact of the Carrot Block Pattern. Consider using linen blends for the background to give the piece a rustic, organic feel. The slightly irregular weave of linen complements the earthy theme of the vegetable quilt pattern, elevating the overall design from a simple craft to a piece of home decor.
Thread choice is often overlooked but is crucial for a durable Carrot Block Pattern. Using a 50wt cotton thread in a neutral color allows the stitches to disappear into the fabric, keeping the focus on the shapes. However, if you want to add “root lines” to your carrot, decorative topstitching with a darker orange thread can add a lovely professional touch.
Don’t forget the importance of fabric starch. When dealing with the small triangles and diagonal cuts often found in a Carrot Block Pattern, the fabric can easily stretch out of shape. Applying a bit of starch before cutting helps the cotton fibers stay stiff, ensuring that your angles remain sharp and your block stays square.
Your cutting tools will make or break your experience with the Carrot Block Pattern. A sharp rotary cutter and a non-slip quilting ruler are essential for getting those clean, straight lines. Accurate cutting is 50% of the work in patchwork quilting, and it saves a significant amount of time during the assembly phase.
If you are planning to make a seasonal item, like an Easter table runner, you might want to incorporate some themed prints into your Carrot Block Pattern. Small prints of bunnies or garden tools can be hidden within the carrot body or the border to create a “seek and find” element that delights anyone who sees your finished quilt.
3. Step-by-Step Assembly of the Carrot Block Pattern
The first stage of assembly for the Carrot Block Pattern involves preparing the main body. You will typically start with a rectangle of orange fabric. By placing background squares on the bottom corners and sewing diagonally, you create the “V” shape of the carrot. This is the most efficient way to handle diagonal piecing without wasting fabric.
Next, you move to the “carrot top.” This part of the Carrot Block Pattern often involves smaller pieces of fabric, sometimes referred to as charm squares. You will sew these green strips together first before attaching them to the orange body. Ensuring the green section is centered is the key to a balanced visual composition.
Once the individual components are ready, it’s time for the “join.” This is the moment the Carrot Block Pattern truly takes shape. Align the top of the orange root with the bottom of the green leaves. Using quilting pins or clips is highly recommended here to prevent the layers from shifting while they under the sewing machine needle.
After the main block is joined, you may need to add side borders or “coping strips.” This is common in the Carrot Block Pattern to bring the block to a standard size, such as 6×12 or 12×12 inches. These strips are usually made from the same background fabric used in the earlier steps to maintain a seamless look.
Once the block is fully assembled, give it a final “stay stitch” around the edges. This is a pro-quilting tip that prevents the outer seams from pulling apart as you handle the blocks. Since the Carrot Block Pattern involves several diagonal seams, this extra step provides much-needed stability for the next phase of your project.
Inspect your Carrot Block Pattern for any “beheaded” points. This happens when a seam allowance cuts off the tip of a triangle. If this happens, don’t worry—seam rippers are a quilter’s best friend. Correcting these small errors at the block stage ensures that your completed quilt looks like it was made by a master.
4. Creative Ways to Use Your Finished Carrot Block
The most common use for the Carrot Block Pattern is, of course, a full-sized quilt. By alternating the carrot blocks with solid fabric squares or “star blocks,” you can create a dynamic and modern layout. This “alternate grid” style is very popular in contemporary quilting circles and makes the carrots pop.
If a full quilt feels too ambitious, the Carrot Block Pattern is perfect for smaller “weekend projects.” A set of quilted placemats featuring a single carrot on the side is a wonderful way to decorate a dining room for spring. These smaller items also make thoughtful handmade gifts for friends who love gardening or cooking.
Wall hangings are another fantastic way to showcase the Carrot Block Pattern. You can quilt the background with a “raindrop” or “soil” pattern to enhance the garden theme. Adding a few applique bees or butterflies around the carrot can turn a simple block into a detailed storytelling piece of art.
For those who enjoy functional crafts, consider turning your Carrot Block Pattern into a decorative pillow cover. By using a heavy-duty canvas backing and a hidden zipper, you can create a durable piece of home decor. The bright oranges of the pattern add a much-needed “pop of color” to any living room sofa.
You can also experiment with the scale of the Carrot Block Pattern. Try making “miniature carrots” to create a quilted mug rug. Working in a smaller scale requires more patience and fine motor skills, but the result is an incredibly cute and detailed piece of fiber art that is sure to be a conversation starter.
Lastly, don’t be afraid to mix the Carrot Block Pattern with other vegetable patterns. A “Garden Quilt” featuring carrots, tomatoes, and pea pods is a wonderful project for using up your fabric stash. This eclectic approach celebrates the diversity of nature and allows you to practice various piecing techniques in one single, large-scale project.
FAQ: Frequently Asked Questions about the Carrot Block Pattern
What is the best fabric for a Carrot Block Pattern?
The most recommended fabric is 100% quilting cotton. It is easy to handle, doesn’t slip under the presser foot, and comes in an endless variety of orange and green shades. For a more rustic look, linen-cotton blends are also a popular choice.
Is the Carrot Block Pattern suitable for beginners?
Yes, it is! While it looks detailed, it primarily uses straight-line sewing and the “flip and stitch” method. It is a great way for beginners to practice angle piecing without the stress of complex curves.
How do I make my carrot look more realistic?
To add realism to your Carrot Block Pattern, use variegated thread for quilting or choose fabrics with subtle textures. Using multiple shades of orange (scrappy style) instead of a single solid color also adds depth and “dimension” to the root.
What size should a Carrot Block be?
There is no “official” size, but most patterns range from 6 to 12 inches in height. Smaller blocks are great for borders, while larger blocks work well as the main focus of a baby quilt or wall hanging.
Can I use this pattern for applique?
Absolutely. If you find piecing difficult, you can cut the carrot shapes out of fabric and use a zigzag stitch or blanket stitch to attach them to a background. This is a faster alternative to the traditional pieced Carrot Block Pattern.
How do I care for a quilt made with these blocks?
Since these are usually made of cotton, you can machine wash them on a cold, gentle cycle. Use a color catcher sheet in the wash to ensure the vibrant orange dye doesn’t bleed into the light background fabric.
Conclusion
In this article, we have explored the delightful world of the Carrot Block Pattern, covering everything from the initial fabric selection to the final assembly and creative applications. We learned that while the design looks intricate, it is built on foundational quilting techniques like diagonal piecing and color layering.
By focusing on high-quality materials and precise cutting, anyone can create a beautiful piece of textile art that celebrates the charm of the garden. Whether you are making a simple pot holder or a grand heirloom quilt, this pattern offers a perfect blend of challenge and reward.