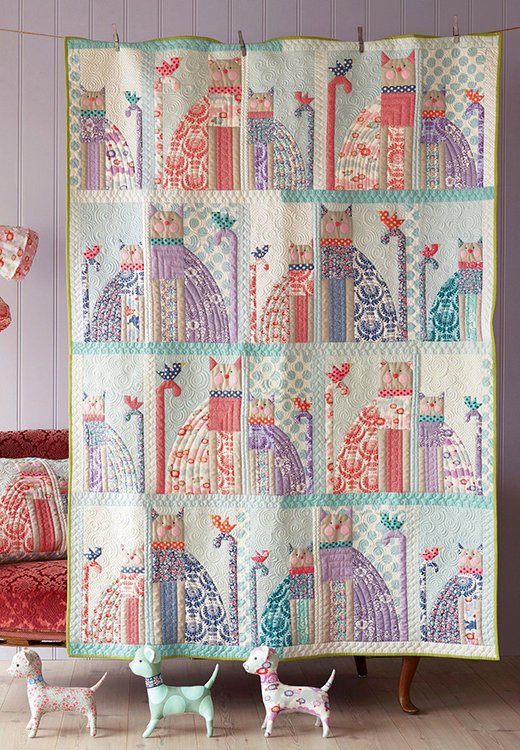
The Cat and Bird Quilt – Pattern is a delightful and whimsical design that brings a sense of warmth, fun, and creativity to your quilting projects.
This pattern features playful depictions of cats and birds, creating a charming juxtaposition of natural elements and beloved animals.
Whether you’re a seasoned quilter or a beginner, this quilt pattern offers a fantastic opportunity to work with a variety of techniques, colors, and fabric textures.
In this article, we will explore how to create your own Cat and Bird Quilt – Pattern, providing detailed instructions and tips for customization along the way.
Creating a quilt based on the Cat and Bird Quilt – Pattern allows quilters to experiment with various fabric choices. You can choose playful and vibrant fabrics for the animals, or go for more neutral tones to make the animals stand out. The use of different quilting techniques, such as appliqué or piecing, will ensure that your quilt is uniquely yours. The Cat and Bird Quilt – Pattern is perfect for a variety of projects, from a cozy throw for your living room to a sweet gift for a loved one.
In this guide, we’ll walk through the steps of making a Cat and Bird Quilt – Pattern, tips for choosing the right fabrics, and how to add personal touches to your quilt. Whether you’re looking for a fun project or a meaningful handmade gift, this pattern is sure to inspire your quilting journey. Let’s dive into the details!
1. Getting Started with the Cat and Bird Quilt – Pattern
Before you begin making your Cat and Bird Quilt – Pattern, it’s important to gather all the necessary materials and make some decisions about the design elements. The quilt’s playful theme will depend heavily on the fabrics and colors you choose, so take your time selecting materials that reflect the whimsical nature of the design.
Choose Your Fabric Colors
Selecting the right fabric is crucial when creating your Cat and Bird Quilt – Pattern. For the cats, you may want to use solid fabrics or animal prints that resemble fur textures. The birds can be represented with bright, vivid fabrics to contrast with the softness of the cats. Consider using fabrics with playful patterns or solid colors to allow the animals to stand out.
Select a Quilt Design Layout
The layout of your quilt will depend on your preferences and the size of the quilt you want to create. If you are making a lap-sized quilt, a simple block layout featuring alternating blocks with cat and bird motifs works well. For a larger quilt, you can arrange the blocks in a more complex pattern, creating a visually dynamic design that includes a mix of cats, birds, and complementary background fabrics.
Gather the Necessary Quilting Tools
To start working on the Cat and Bird Quilt – Pattern, make sure you have the following quilting tools at hand:
- Rotary cutter and cutting mat
- Quilting ruler
- Fabric for appliqué or piecing
- Thread in matching or contrasting colors
- Needle for hand-sewing appliqué (if you’re choosing to hand-appliqué)
- Iron and ironing board for pressing fabric
These basic tools will help you cut, sew, and assemble the quilt pieces with precision, ensuring a neat and professional finish.
2. Step-by-Step Instructions for the Cat and Bird Quilt – Pattern
Creating the Cat and Bird Quilt – Pattern involves a combination of piecing and appliqué techniques. Here’s a detailed guide on how to make the blocks that feature cats and birds:
Step 1: Prepare the Cat and Bird Templates
To begin, print out or draw templates for the cat and bird shapes. The templates can be as simple or detailed as you want them to be. If you’re using appliqué, you can trace these shapes onto fusible webbing to make them easier to attach to the quilt top.
Step 2: Cut the Fabric Pieces
Next, cut the fabric pieces for your quilt blocks. For the cat, cut out the shapes needed for the body, ears, whiskers, and eyes. For the bird, you will need pieces for the wings, beak, and body. When cutting, ensure that the pieces are slightly larger than needed to allow for seam allowances.
Step 3: Appliqué the Cat and Bird Shapes
Once you have your fabric pieces cut out, begin the appliqué process. Apply fusible webbing to the back of the cat and bird fabric pieces, and iron them onto the background fabric. Use a small zigzag stitch or straight stitch around the edges of the appliqué shapes to secure them in place. This step adds dimension and texture to your quilt blocks.
Step 4: Assemble the Quilt Blocks
Once the appliqué pieces are attached, you can begin assembling the quilt blocks. If you’re piecing the blocks together, cut the background fabric into squares or rectangles, depending on your preferred layout. Sew the cat and bird appliqué blocks onto the background fabric, ensuring all pieces are aligned properly.
Step 5: Join the Quilt Blocks
Once you have all the individual blocks completed, it’s time to join them together. Use a quarter-inch seam allowance to sew the blocks into rows, then join the rows together. Press the seams as you go to ensure the quilt top is flat and smooth.
Step 6: Quilt and Bind
Once your quilt top is complete, layer it with batting and a quilt backing fabric. Pin or baste the layers together and begin quilting. You can choose to quilt by hand or machine, depending on your preference. Once the quilted layers are complete, bind the edges with fabric strips to finish off your Cat and Bird Quilt – Pattern.
This process requires patience and attention to detail, but the result is a fun and vibrant quilt that features your unique take on the Cat and Bird Quilt – Pattern.
3. Customizing Your Cat and Bird Quilt
While the basic Cat and Bird Quilt – Pattern is delightful on its own, there are several ways you can personalize and enhance the design to make it truly unique. Here are some ideas for customization:
1. Play with Fabric Patterns
Experiment with different fabric textures and patterns to make the cats and birds stand out. You could use patterned fabrics for the birds to mimic feathers or a variety of prints for the cats’ fur. By mixing and matching, you can create a more dynamic design.
2. Adjust the Size of the Blocks
If you want a larger or smaller quilt, adjust the size of the individual blocks. You can also combine smaller blocks with larger blocks to create a more diverse layout. Larger blocks can emphasize the cats and birds, while smaller blocks can add intricate detail to the overall quilt.
3. Add Background Details
To make your quilt even more whimsical, consider adding extra details to the background. For example, you can stitch grass, trees, or clouds behind the cats and birds to enhance the theme. These additions will provide more visual interest and context for your animals.
4. Experiment with Quilting Techniques
If you’re comfortable with different quilting techniques, you can experiment with free-motion quilting or embroidery to add texture and dimension to the quilt. You can quilt around the appliqué pieces or create designs like swirls or leaves in the background fabric.
5. Create a Mixed Animal Theme
Instead of just cats and birds, you could expand the pattern to include other animals, such as rabbits, dogs, or squirrels. This adds variety and fun, making your quilt even more playful.
6. Use Bold, Contrasting Colors
If you prefer a more modern or bold aesthetic, use contrasting colors for the animals and background. You can go for bright, saturated colors that make the cats and birds pop against a more neutral backdrop.
Customizing your Cat and Bird Quilt – Pattern can be a fun and rewarding process that allows you to add your personal touch to the quilt. The sky’s the limit when it comes to design possibilities!
4. Common Mistakes to Avoid When Making the Cat and Bird Quilt
While making the Cat and Bird Quilt – Pattern can be an enjoyable and creative process, there are a few common mistakes that quilters should be aware of. Here are some tips for avoiding these errors:
1. Misaligned Blocks
One of the most common mistakes is misaligning the quilt blocks. When sewing your blocks together, always double-check that the edges are aligned properly before sewing. This will help ensure that your quilt top looks neat and professional.
2. Inconsistent Seam Allowances
Inconsistent seam allowances can result in blocks that are too small or too large. Make sure to use a consistent seam allowance throughout the project to maintain the correct size and shape of the blocks.
3. Forgetting to Press Seams
Failing to press your seams as you go can lead to bulky or uneven blocks. Pressing the seams helps to flatten the fabric and creates a more polished quilt top.
4. Overcrowding the Design
While adding extra details can enhance the quilt, overcrowding the design with too many embellishments can make it look cluttered. Stick to a balanced number of elements for a cohesive and visually appealing quilt.
5. Not Using a Quilting Frame
If you’re hand-quilting, using a quilting frame can make the process much easier. It helps keep the fabric taut and allows you to quilt more efficiently, preventing puckering or uneven stitching.
6. Skipping the Binding Process
The binding is the final step in completing your quilt, and skipping it can lead to raw edges and an unfinished look. Take the time to bind your quilt properly to give it a clean, finished appearance.
FAQ – Frequently Asked Questions
1. What fabrics should I use for the Cat and Bird Quilt?
Cotton fabrics are highly recommended for quilting. Choose prints or solids for the cats and birds, and complement them with a neutral background fabric.
2. Can I make the quilt larger or smaller?
Yes, you can adjust the size of the quilt by changing the number of blocks, the size of each block, or adding more rows and columns to the layout.
3. What’s the best way to quilt the layers together?
You can quilt by hand or machine. For machine quilting, a walking foot can help you quilt evenly. For hand quilting, a quilting hoop will keep the fabric taut.
4. How can I add more details to the quilt?
You can add embroidery, additional appliqué elements like flowers or trees, or use free-motion quilting for added texture and design.
5. What should I do if I make a mistake?
If you make a mistake, don’t worry! Simply remove the stitches with a seam ripper and re-sew the piece correctly. Quilting is all about learning and improving as you go.
Conclusion
The Cat and Bird Quilt – Pattern is a wonderful project that allows quilters to combine creativity with technique. Whether you’re a beginner or an experienced quilter, this design offers endless opportunities for customization. By following the steps outlined in this article, you can create a beautiful quilt that reflects your personal style and love for whimsical themes. Remember to take your time, experiment with fabrics, and enjoy the process. We’d love to hear your thoughts and suggestions, so feel free to leave a comment below!