The Cat Blocks in Boxes Quilt Pattern is one of the most charming and versatile designs for feline lovers and quilting enthusiasts alike. This delightful project combines the structured geometry of traditional quilting with the whimsical silhouette of a cat, creating a piece that is both sophisticated and playful. Whether you are looking to create a cozy throw for your sofa or a personalized gift for a fellow pet owner, mastering this quilt design provides a rewarding creative experience that results in a stunning piece of textile art.
When you dive into the world of the Cat Blocks in Boxes Quilt Pattern, you are engaging with a style that celebrates the “if it fits, I sits” mentality of our feline friends. The quilt layout features stylized cats nestled inside square borders, mimicking the classic image of a cat in a cardboard box. This modern quilt pattern is highly customizable, allowing you to play with various fabric choices, colors, and textures to represent different breeds or even your own specific pets, making each finished product entirely unique.
Achieving a professional finish with the Cat Blocks in Boxes Quilt Pattern requires a blend of precise cutting, careful seam allowance management, and a bit of creative flair. Because this pattern relies on clean lines to form the “box” and the cat’s ears and tail, it serves as an excellent exercise for improving your piecing skills. Throughout this guide, we will explore the nuances of this design, from selecting the perfect cotton fabrics to the final quilting stitches, ensuring your journey into cat-themed quilting is as smooth and enjoyable as possible.
1 Understanding the Cat Blocks in Boxes Quilt Pattern Basics
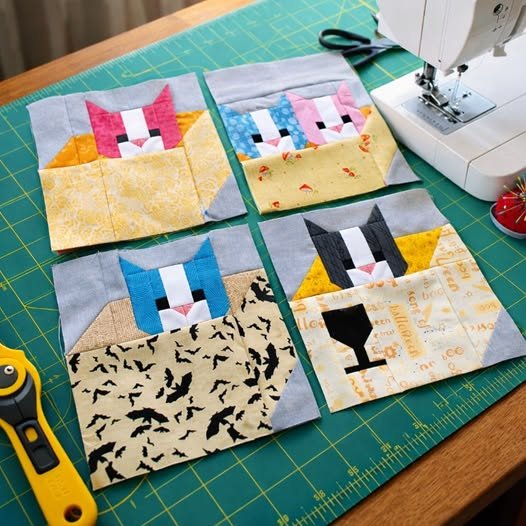
The core of the Cat Blocks in Boxes Quilt Pattern lies in its clever use of block construction. Each block is essentially a “box” created by contrasting fabric strips that frame a central cat figure. To start, you need to understand the geometric shapes involved, which usually include squares and half-square triangles (HSTs) to form the cat’s ears and body.
Choosing the right quilt batting and backing is crucial for this specific pattern. Since the design is often graphic and bold, you want a quilt sandwich that lies flat to show off the intricate topstitching. Using a high-quality 100% cotton thread will ensure that your quilt blocks remain durable and the seams stay crisp through years of washes.
Color theory plays a massive role in making your Cat Blocks in Boxes Quilt Pattern pop. Many quilters opt for a “scrappy” look, using leftovers from their fabric stash to create a multi-colored clowder of cats. Alternatively, a minimalist approach using monochromatic tones can turn this whimsical pattern into a piece of modern home decor that fits a contemporary living room.
Precision is your best friend when working with feline-themed quilts. Because the “box” frame requires straight lines, ensuring your rotary cutter is sharp and your quilting ruler is steady is vital. Small errors in the frame can make the cat look lopsided, so many experts recommend pinning your fabric strips before heading to the sewing machine.
One of the most appealing aspects of the Cat Blocks in Boxes Quilt Pattern is its scalability. You can easily adjust the size of the “boxes” to create a baby quilt, a wall hanging, or a full-sized king quilt. This flexibility is why it remains a top-searched quilting template among hobbyists who enjoy adapting designs to fit their specific project needs.
Finally, don’t forget the quilt borders. While the blocks themselves are the stars of the show, a well-chosen border can act as a “window” for your cats. Using a neutral background fabric allows the colorful cats and their boxes to stand out, providing a clean visual break that keeps the overall quilt composition from feeling cluttered or overwhelming.
2 Essential Materials and Tools for Success
Before you begin your Cat Blocks in Boxes Quilt Pattern, gathering high-quality materials is the first step toward a masterpiece. You will need a variety of fat quarters or yardage, depending on the size of your project. High-quality quilting cotton is the gold standard here because it has a tight weave that prevents fraying and holds its shape during the piecing process.
A reliable sewing machine with a consistent 1/4-inch foot is the most important tool in your arsenal. The Cat Blocks in Boxes Quilt Pattern relies on these precise seams to ensure that all the corners of the boxes align perfectly. If your seams are inconsistent, the “cats” may not fit into their “boxes” correctly, leading to frustration during the quilt assembly.
Your cutting station should include a large self-healing cutting mat, a 45mm or 60mm rotary cutter, and several sizes of acrylic quilting rulers. For the Cat Blocks in Boxes Quilt Pattern, a square ruler is particularly helpful for squaring up your blocks after they are sewn. This step is often skipped by beginners but is the secret to a flat, professional-looking finished quilt.
Don’t overlook the importance of fabric marking pens or tailor’s chalk. When creating the cat’s features or marking the diagonal lines for half-square triangles, having a clear, removable line is essential. This ensures that the diagonal seams are sewn exactly where they need to be, giving your cats those perfectly pointed ears that define the pattern’s silhouette.
Ironing is just as important as sewing in the Cat Blocks in Boxes Quilt Pattern. A good steam iron and a sturdy ironing board will help you press your seams to the side or open, depending on your preference. “Pressing as you go” ensures that the quilt top remains flat and prevents bulky intersections where several pieces of fabric meet.
Lastly, consider your quilting notions like glass-head pins, wonder clips, and a seam ripper (just in case!). These small items make the workflow of the Cat Blocks in Boxes Quilt Pattern much more manageable. Having everything organized before you start prevents interruptions and allows you to stay in the creative flow while working on your textile project.
3 Step by Step Construction of the Cat Blocks
The assembly of the Cat Blocks in Boxes Quilt Pattern starts with the “cat” unit. You will typically sew the body first, followed by the head and those iconic ears. Using the stitch-and-flip method for the ears is a common technique in this quilt tutorial, as it allows for sharp points without the complexity of paper piecing or advanced templates.
Once the cat figure is complete, it is time to build the “box” around it. This involves sewing side strips to the cat unit and then adding the top and bottom pieces. This framing technique is a staple in traditional quilting, often referred to as a “log cabin” or “framed block” style, which provides a sturdy structure for the overall quilt design.
Consistency is key when repeating the Cat Blocks in Boxes Quilt Pattern across multiple blocks. Many quilters use the chain piecing technique to save time and thread. By sewing all the ears, then all the heads, and then all the bodies in long rows, you can assemble a large number of cat blocks much faster than working on one at a time.
As you finish each block, it is vital to square up the blocks. Use your square ruler to trim any excess fabric, ensuring every block in your Cat Blocks in Boxes Quilt Pattern is the exact same size. This step is the difference between a quilt that ripples and one that lies perfectly flat once the binding is applied.
Joining the blocks together into a quilt top is where the magic happens. You can choose to sew the blocks directly to each other or use sashing strips to create more space between the cats. Sashing can help highlight individual fabric patterns and gives the eye a place to rest, making the overall quilt layout feel more organized and professional.
After the top is assembled, you will layer it with your quilt batting and backing fabric. This is known as “basting.” Whether you use safety pins or a spray baste, ensuring there are no wrinkles is crucial before you begin the final quilting process. This foundation allows the Cat Blocks in Boxes Quilt Pattern to shine once the decorative stitching is added.
4 Creative Customization and Finishing Touches
The beauty of the Cat Blocks in Boxes Quilt Pattern is how easily it can be personalized. Consider using appliqué techniques to add whiskers, eyes, or even a small collar to your cats. Using embroidery floss for these details adds a handcrafted, “heirloom” feel to the finished quilt that machine sewing alone cannot replicate.
Experimenting with fabric textures can take your quilt to the next level. Try using a soft flannel or a minky fabric for the cat’s body to create a tactile quilt that children or pets will love. Just remember that different fabrics may stretch differently, so using a fabric stabilizer can help keep your Cat Blocks in Boxes Quilt Pattern uniform.
The quilting motif you choose for the final stitching can also reinforce the theme. You might choose a “meander” stitch that looks like tangled yarn, or perhaps straight-line quilting to emphasize the “box” shape. These decorative stitches provide the structural integrity needed to keep the layers together while adding a final layer of artistic expression.
Selecting the quilt binding is the final design choice for your project. A striped binding can add a playful “candy cane” effect, while a solid color that matches the “boxes” can create a seamless, sophisticated edge. The double-fold binding method is recommended for durability, ensuring your Cat Blocks in Boxes Quilt Pattern lasts for generations.
Don’t forget to add a quilt label to the back of your project. Include your name, the date, and the name of the pattern. Because the Cat Blocks in Boxes Quilt Pattern is so distinctive, future owners will appreciate knowing the history behind the piece. It turns a simple blanket into a documented piece of family history or a professional portfolio item.
Once your quilt is bound and labeled, give it a final press. This sets the stitches and smooths out any minor puckers from the quilting process. Your Cat Blocks in Boxes Quilt Pattern is now ready to be gifted, displayed, or snuggled under. The combination of your hard work and this charming design is sure to be a conversation starter in any home.
FAQ: Frequently Asked Questions
1. Is the Cat Blocks in Boxes Quilt Pattern suitable for beginners? Yes! While it requires some attention to detail regarding seam allowances, the shapes are mostly squares and rectangles. If you can sew a straight line and make a half-square triangle, you can successfully complete this quilt project.
2. How much fabric do I need for a standard throw size? For a standard 50″ x 60″ throw, you typically need about 3 to 4 yards of background fabric and a variety of fat quarters (usually 12-15) for the cats and boxes. Always check your specific pattern instructions for exact yardage.
3. Can I use scraps for the Cat Blocks in Boxes Quilt Pattern? Absolutely! This is a fantastic scrap-buster project. Using different colors for each “cat” and each “box” creates a vibrant, eclectic look that celebrates the diversity of your fabric collection.
4. What is the best way to wash a cat-themed quilt? To preserve the life of your quilting cotton, wash on a cold, gentle cycle with a mild detergent. Using “color catchers” is highly recommended to prevent any dark fabrics from bleeding into your lighter background fabrics.
5. How do I make the cat’s ears look sharp? The secret is in the pressing. After sewing the diagonal seam for the ear, trim the excess fabric and press the seam toward the darker fabric. Using a bit of best press or starch can help keep those points crisp.
6. Can I add borders to this pattern? Yes, adding a double border can frame the entire collection of cats beautifully. It also allows you to increase the size of the quilt to fit a specific bed without having to sew additional complex blocks.
Conclusion
The Cat Blocks in Boxes Quilt Pattern is more than just a sewing project; it is a celebration of creativity, precision, and a love for animals. Throughout this article, we have explored the essential quilting tools, the step-by-step construction of the cat blocks, and various ways to customize the design to make it your own.
By focusing on accurate cutting, consistent seams, and thoughtful fabric selection, you can create a high-quality piece that is as functional as it is beautiful.