The art of fabric manipulation offers endless opportunities for creating intricate, beautiful decorations, and the Cathedral Window Ornament – Pattern is a stunning example that brings a touch of classic elegance to any holiday display. This particular technique, renowned for its dimensional texture and the clever way it showcases small squares of contrasting fabric, creates a piece that looks remarkably like stained glass. Mastering a Cathedral Window Ornament – Pattern is a rewarding project for quilters and sewers looking to craft meaningful, heirloom-quality decorations.
The visual impact of the Cathedral Window Ornament lies in its construction. Unlike flat applique, this technique involves folding and stitching large foundation squares to create small, rounded frames—the “windows”—through which smaller, contrasting fabric pieces are inserted and secured. This process results in a cushioned, three-dimensional puff that catches the light beautifully, making it an ideal candidate for a shimmering tree ornament.
This comprehensive guide will walk you through every precise step of creating a beautiful Cathedral Window Ornament – Pattern. We will cover the essential material choices for optimal contrast and shape, the meticulous folding techniques that form the “window” structure, and the finishing details required to transform the piece into a dazzling, durable ornament. Prepare your sharp needle, gather your colorful fabric scraps, and get ready to stitch a piece of textile artistry that will become a cherished part of your holiday tradition.
1. Essential Materials and Fabric Selection for the Cathedral Window Ornament – Pattern
The success of the Cathedral Window Ornament – Pattern is highly dependent on selecting the correct types of fabric and ensuring high contrast between the main body and the inner “window.” Precision cutting is also key to a crisp, neat finish.
For the foundation squares—the part that forms the “window” frame—choose a solid, medium-weight quilting cotton. The fabric must be stable and easy to crease and fold. Light colors like white, cream, or a pale gray are often chosen for the foundation as they simulate the light mortar around the stained glass.
The “window” insert fabric is where you can truly showcase color and pattern. Choose brightly colored, highly contrasting prints or solids for these smaller squares. Fabric scraps from favorite projects are perfect for this, as the small size allows you to highlight tiny details. Traditional holiday colors like deep reds, emerald greens, and shimmering golds work beautifully.
Interfacing is generally not required for the Cathedral Window Ornament – Pattern because the folding of the foundation squares creates substantial thickness and stability. However, ensure both the foundation and the insert fabrics are high-quality $100\%$ cotton that have been pre-washed and pressed to prevent shrinking and wrinkling after assembly.
For sewing, you will need a strong, fine thread that matches the color of the foundation fabric (e.g., white thread for white foundation fabric). Since most of the securing stitches are done by hand, a fine, sharp needle is also essential for gliding through the multiple layers of folded fabric.
The size of your initial foundation squares will determine the final size of the ornament. A common size for a small ornament is a $5 \text{ inch}$ square, which, when folded, creates a small, manageable piece. Always use a rotary cutter and a square acrylic ruler to ensure your initial squares are perfectly symmetrical before you begin folding.
Finally, to hang the finished ornament, you will need a small loop of ribbon, twine, or metallic thread. Choosing a ribbon with a slight shimmer or a metallic gold thread adds to the Cathedral Window effect, enhancing its resemblance to jewelry or a treasured antique.
2. Mastering the Folding Technique for the Cathedral Window Frame
The most specialized and crucial technique in the Cathedral Window Ornament – Pattern is the series of meticulous folds that create the signature dimensional frame. This is a repetitive process that demands patience and precision.
Begin with your perfectly cut foundation square. The first step is to fold all four corners of the square to the exact center point. Press these folds very flat with a hot iron. This creates a smaller square with four triangular folds meeting in the middle.
The second, more complex fold requires you to fold the four raw edges of this new square back again, meeting them precisely at the center where the first folds met. Pressing is vital after this step; you now have a square that is smaller still, with all raw edges neatly encased inside.
The third stage is where the “window” shape starts to emerge. Turn the square over so the folded edges are facing down. Now, fold the four new corners (the corners of the doubled-up square) back toward the center. This action creates the initial four curved sides that will form the frame of the Cathedral Window.
Once all three sets of folds are complete and heavily pressed, the piece should resemble a small, firm square with a slight central opening and four rounded, soft edges. This carefully folded piece is the foundation that provides the necessary puffiness and structure for the finished ornament.
At this point, you will often stitch the folded corners to the center point on the back of the piece to stabilize the shape before attaching the small insert squares. These small basting stitches ensure the frame remains intact and flat, making the subsequent steps much easier.
Remember that precision is your best friend. Even a tiny misalignment in the initial folds will result in a distorted final frame. Take your time, use a ruler to check alignment, and press fiercely at every stage—this is the secret to a professional-looking Cathedral Window Ornament.
3. Inserting the Fabric “Glass” and Final Assembly of the Ornament
Once the foundation frame is perfectly folded and stabilized, the next step in the Cathedral Window Ornament – Pattern is to insert the colorful “glass” piece and secure all the raw edges to complete the dimensional look.
Take your small, contrasting “window” insert square. Place it face-up beneath the center opening of your folded foundation piece. The size of the insert square should be just slightly larger than the opening to ensure that its raw edges can be easily tucked under the folded frame.
The securing process is typically done entirely by hand using a blind or slip stitch. Working from the center outward, carefully fold the curved edge of the foundation frame over the raw edge of the insert square, pinning it in place if necessary. The goal is to hide the raw edge of the insert fabric entirely.
Stitch the folded foundation frame down to the insert fabric using very small, close, and precise stitches. Use a thread that matches the frame fabric so the securing stitches become virtually invisible. This technique creates the beautiful, cushioned, rounded frame that characterizes the Cathedral Window Ornament.
Repeat this process for all four sides of the center window. When you are finished, the small insert square will be neatly framed by the puffy foundation fabric, and all the raw edges from the center will be completely concealed, leaving a clean, smooth surface.
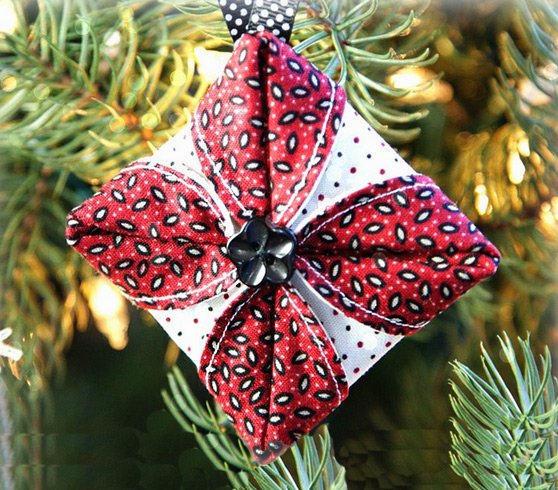
Once the center is secured, the final piece is often a small embellishment. Many Cathedral Window Ornament Patterns call for a decorative button, a small jewel, or a tiny crocheted flower to be sewn directly into the exact center of the window, hiding the small meeting point of the four corners and adding a final touch of sparkle.
The final structural step is attaching the hanging loop. Fold your ribbon or thread into a loop and sew it securely to one of the corners on the back side of the ornament. Use several secure stitches, working through the thickness of the folded fabric to ensure the loop can safely support the ornament’s weight when hung.
4. Customization and SEO for Your Cathedral Window Ornament – Pattern
Mastering the foundational Cathedral Window Ornament – Pattern allows for exciting customization, transforming it into various shapes and sizes. Simultaneously, utilizing effective SEO techniques will help share your beautiful textile creations with a wider audience.
To customize the shape, you can start with a different foundation. While the square is traditional, using a foundation made from three triangles can create a six-pointed star shape, or two long rectangles can form a diamond ornament. Each variation maintains the Cathedral Window look but offers a fresh visual appeal.
Vary the size and use. Making the foundation squares much larger (e.g., $8 \text{ inch}$ squares) and stitching them together in a grid can create a gorgeous pincushion or a quilted hot pad instead of a small ornament. Conversely, using $3 \text{ inch}$ squares creates delicate mini-charms for gift wrapping.
To enhance the visual texture, try using velvet or satin for the inner “glass” piece. The reflective quality of these materials creates an even more dramatic contrast with a matte cotton frame, truly making the ornament shimmer under the Christmas tree lights.
For SEO purposes, when sharing your finished Cathedral Window Ornament – Pattern or a tutorial, use highly descriptive, appealing keywords. Examples include: “DIY Cathedral Window Ornament Sewing Tutorial,” “Heirloom Fabric Christmas Ornament Pattern,” “Stained Glass Quilt Block Ornament,” and “Handmade Holiday Fabric Decoration.”
Ensure your blog post or product listing is well-structured with clear headings and detailed instructions. Highlight the heirloom quality and the scrap-busting nature of the project, as these are strong selling points for crafters.
High-quality photography is non-negotiable. Take bright, focused images that clearly show the dimensional puff and the contrast between the two fabrics. Photograph the ornament hanging on a tree to demonstrate its final use. Name your image files with relevant keywords (e.g., cathedral-window-ornament-pattern-finished-red.jpg) to improve search visibility.
Finally, offer suggestions for color pairings. Provide palettes for vintage, modern, and traditional holiday looks. This extra content helps users visualize the possibilities, increasing engagement and signaling high-quality, comprehensive content to search engines.
Frequently Asked Questions (FAQ) about Cathedral Window Ornament – Pattern
1: Do I need to pre-wash my fabric for the Cathedral Window Ornament?
Yes, it is highly recommended to pre-wash both the foundation and the insert fabrics. Because the ornament combines multiple layers of fabric, any shrinkage after assembly could distort the careful folds and seams, ruining the perfect Cathedral Window shape.
2: Why are my Cathedral Window folds not lying flat and looking bulky?
Bulkiness is usually caused by using fabric that is too thick (like décor weight) or by imprecise folding. Ensure you clip the corners close to the seam allowance of your initial folds, and use a very hot iron with steam to press the creases absolutely flat at every stage of the pattern.
3: Can I sew the Cathedral Window Ornament entirely by machine?
While the initial foundation folds can be machine-stitched for stabilization, the final securing of the frame over the insert fabric is traditionally done by hand using a slip stitch. This hand stitching is necessary to achieve the signature invisible, smooth, rounded frame.
4: What size fabric scrap is ideal for the inner “window” insert?
The ideal size for the inner insert is typically about $1.5 \text{ inches}$ smaller than the original foundation square. For example, if your foundation is $5 \text{ inches}$, the insert might be $3.5 \text{ inches}$. This allows enough extra fabric to be securely hidden beneath the folded frame.
5: How do I make my Cathedral Window Ornament look more like stained glass?
To enhance the stained glass look, use dark or black fabric for the foundation (the “mortar”) and bright, jewel-toned solids or metallic prints for the inner “glass.” Applying a clear, glassy coating (like a thin layer of dimensional paint) to the center after finishing can also increase the reflective quality.
6: Can I use batting or interfacing in this pattern for extra puffiness?
You typically do not need batting. The Cathedral Window Ornament gets its puffiness naturally from the multiple layers of folded fabric. Adding batting might make the folding process too bulky and difficult to manage, potentially hindering the creation of the crisp window frame.
Conclusion
The Cathedral Window Ornament – Pattern is a timeless piece of textile art that rewards the stitcher with a dimensional, heirloom-quality decoration. We have meticulously covered every essential step: from selecting high-contrast fabrics and mastering the complex multi-stage folding technique that creates the signature Cathedral Window frame, to the final, precise hand-stitching required to secure the inner “glass” and attach the hanging loop.
The emphasis on precision and the use of small, decorative inserts ensures that your finished piece is a stunning focal point.We sincerely hope this detailed guide has inspired you to create your own shimmering Cathedral Window Ornament to illuminate your home or give as a cherished, handmade gift.