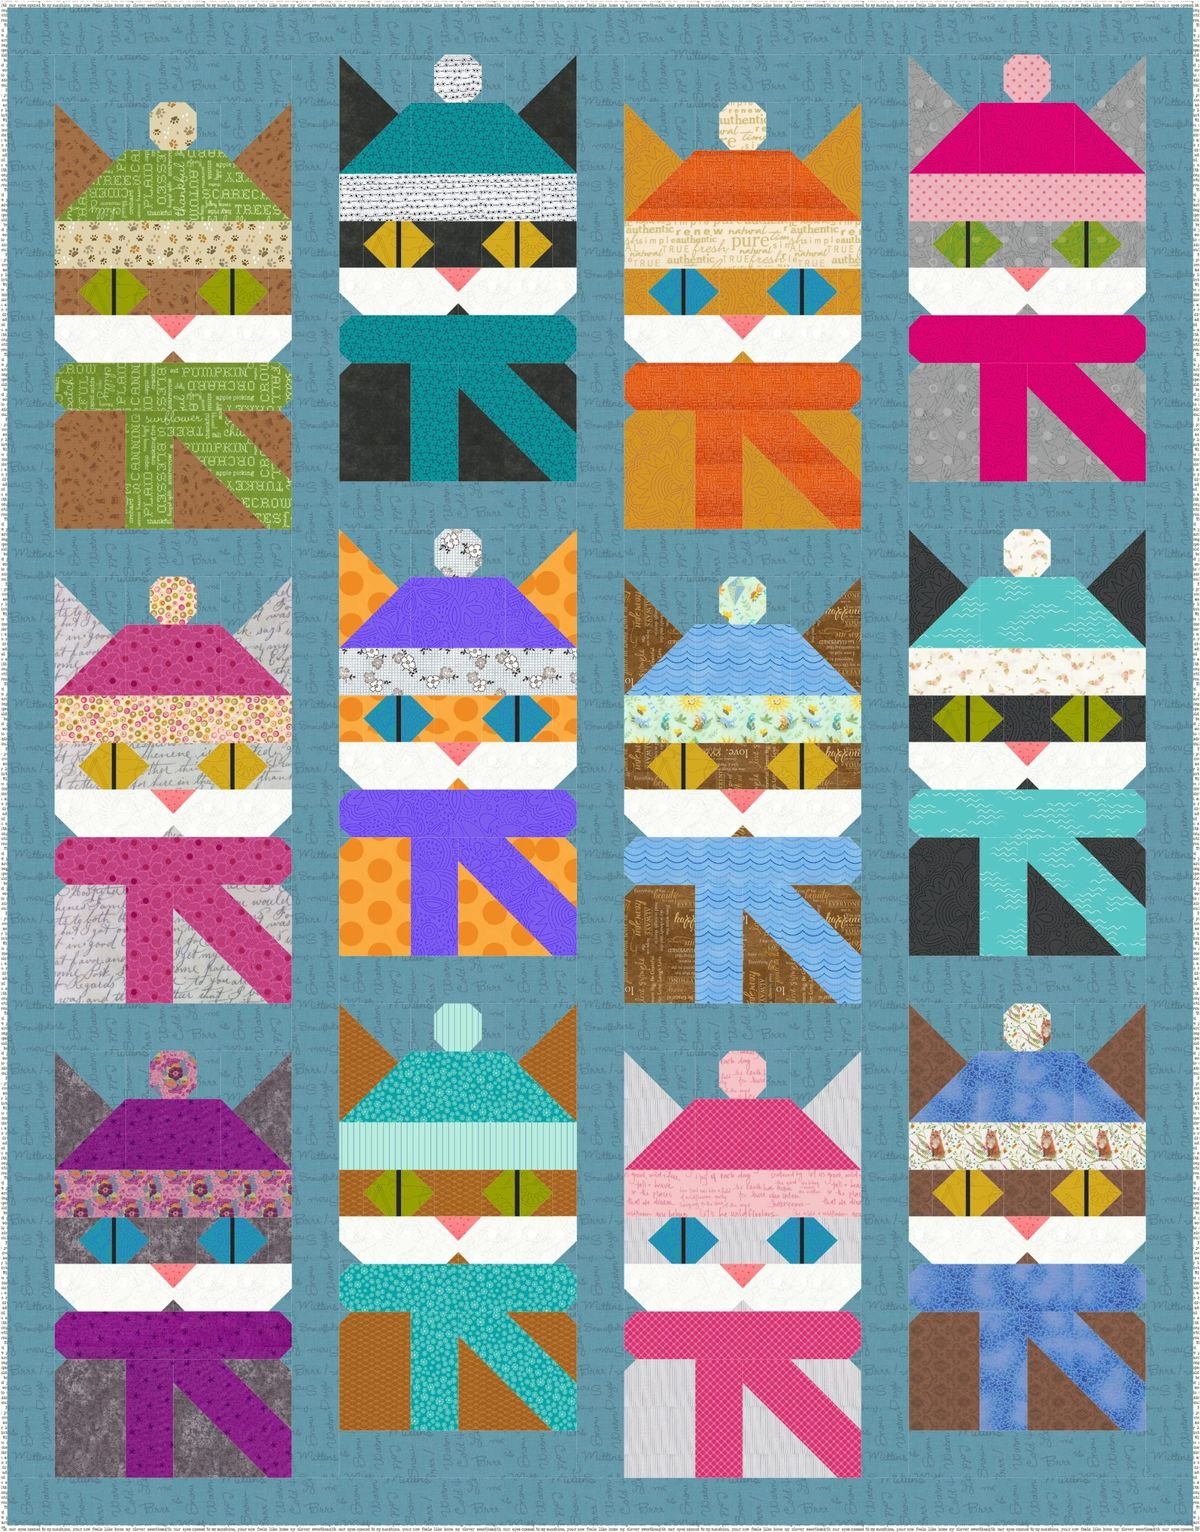
If you’re a fan of cozy quilts, whimsical designs, and feline charm, then the Cats in Hats Quilt – Pattern is just what your creative heart has been waiting for. This delightful quilting project combines adorable cats wearing quirky hats with classic quilting techniques, resulting in a piece that is both playful and heartwarming.
Whether you’re quilting for fun, gifting a loved one, or looking for a new conversation starter in your home, this pattern is a purr-fect choice.The Cats in Hats Quilt – Pattern is suitable for quilters of all levels.
Beginners will find the blocks simple to work with, while experienced quilters can take it a step further by customizing details, experimenting with fabric textures, or adding embroidery and appliqué elements. The best part? It’s a project that invites joy at every step—choosing fabrics, stitching faces, and seeing your quirky cat characters come to life.
In this article, we’ll take a deep dive into how to make your own Cats in Hats Quilt, including materials, construction tips, creative customizations, and more. If you love quilting and have a soft spot for cats, this tutorial will be your new favorite guide. We’ll also answer common questions and provide pro tips so your quilt turns out as charming as you imagine.
1. Materials You’ll Need for the Cats in Hats Quilt
Getting started with the Cats in Hats Quilt – Pattern begins with choosing the right materials. While quilting doesn’t require a huge investment, having the right fabrics and tools on hand makes the process much more enjoyable and successful.
Start by selecting cotton quilting fabric. It’s durable, easy to sew, and holds its shape well. Choose a variety of solid colors and patterns to represent different cats and their hats. You can use fat quarters or fabric scraps, making this an ideal project for stash-busting.
Next, you’ll need batting, which is the soft inner layer of the quilt. Cotton, polyester, or bamboo batting all work, depending on how soft or warm you want the finished quilt to be.
Choose a neutral or playful backing fabric that complements your cat blocks. Backing fabric is often overlooked but plays an important role in the final look and feel of your quilt.
Basic quilting tools include a rotary cutter, self-healing mat, quilting ruler, and pins or clips. These will help you cut and align your fabric pieces with precision.
A sewing machine with a walking foot is ideal for quilting, although hand quilting is also an option for those who enjoy a slower pace. Be sure to have quilting thread in colors that blend well with your chosen fabrics.
Lastly, consider embellishments like embroidery floss for whiskers or facial features, and fusible interfacing if you want to appliqué the cat and hat shapes onto your quilt blocks.
2. Step-by-Step Guide to Assembling the Quilt
Now that your materials are ready, let’s go through the process of bringing the Cats in Hats Quilt – Pattern to life. This project is usually created block by block, which makes it manageable and fun.
Begin by preparing your cat face blocks. These are typically square or rectangular patches featuring cat faces. Use a simple patchwork or appliqué technique to construct the head, ears, and facial features. The face can be sewn directly onto the fabric or appliquéd for a more layered effect.
Next, add the hats! Each cat should wear a different hat—be it a top hat, beanie, beret, or even a tiny wizard hat. Use your creativity here to make each block unique. The hats can be sewn directly or added using raw-edge appliqué and a zigzag or blanket stitch for security.
Once your cat blocks are finished, arrange them in a layout that feels balanced and colorful. You can use sashing (strips of fabric between blocks) for added contrast or border each block for a framed look.
Sew the blocks together row by row, pressing seams as you go. Then assemble the rows into a quilt top, checking alignment and trimming edges if necessary.
Create your quilt sandwich: layer the backing (right side down), batting, and quilt top (right side up). Baste the layers using spray adhesive, pins, or hand basting, depending on your preference.
Quilt through all three layers using straight-line quilting, free-motion quilting, or hand stitching. Pay special attention to stitching around your cats and hats to make the designs pop. Finish by adding a binding around the edges and sewing it down.
3. Customization Ideas and Creative Touches
The charm of the Cats in Hats Quilt – Pattern lies in its playful creativity. There are endless ways to personalize your quilt, making it one-of-a-kind and special.
One popular customization is to give each cat its own personality. Use embroidery to add glasses, freckles, bow ties, or eyelashes. Each cat becomes a character in your whimsical story quilt.
Choose seasonal or themed hats—Santa hats for a holiday quilt, sun hats for summer, or graduation caps for a celebration. This adds variety and can turn your quilt into a themed masterpiece.
Use different fabric textures for added depth. Try flannel for fuzzy cats, felt for hats, or metallic thread for sparkly details. Texture makes the quilt more tactile and visually interesting.
Add names or captions under each block using fabric markers or embroidered lettering. This is great for memory quilts or for gifting to cat-loving friends and family.
You could also turn the quilt into a wall hanging, baby quilt, or lap blanket depending on the size and block count. The flexibility of the pattern allows for various applications.
Lastly, involve your family or quilting group by letting each person design a cat block. The finished quilt will be full of personal touches and become a treasured keepsake.
4. Tips for Quilting Success and Beginner Advice
If you’re new to quilting or this is your first time working with a Cats in Hats Quilt – Pattern, here are some helpful tips to make your experience smoother and more enjoyable.
Start with a small project if the full quilt feels overwhelming. Try making a mini wall hanging or table runner with just a few cat blocks to get the hang of the process.
Pre-wash your fabrics to avoid shrinking or bleeding later. Cotton quilting fabrics sometimes release dye in the wash, so it’s best to rinse them before cutting.
Use a design wall or large surface to lay out your blocks before sewing. This helps you visualize the final quilt and allows you to experiment with placement and color balance.
Keep your seam allowances consistent, usually ¼ inch, to ensure that all blocks line up properly. Small inconsistencies can add up quickly across multiple blocks.
Label each block and row during assembly. This prevents confusion when you’re joining everything together, especially if you’ve used a complex layout or multiple styles of hats.
Finally, enjoy the process. Quilting is both a creative outlet and a form of relaxation. Don’t worry about perfection—focus on making something fun, beautiful, and uniquely yours.
FAQ: Cats in Hats Quilt – Pattern
Q1: Is the Cats in Hats Quilt beginner-friendly?
Yes! The pattern is beginner-friendly, especially if you use basic patchwork techniques. Appliqué adds some complexity but is easy to learn with practice.
Q2: How many cat blocks should I make for a full quilt?
This depends on the size you want. A throw quilt typically has 20–25 blocks, while a baby quilt might use 9–12 blocks. Adjust based on your layout and block size.
Q3: What size should each cat block be?
Most blocks are 10” to 12” square, but you can scale them up or down. Just ensure all blocks are the same size before assembling the quilt top.
Q4: Can I use a sewing machine for appliqué?
Yes, absolutely. A zigzag or blanket stitch on your machine works well for securing appliqué pieces. You can also hand-stitch for a more traditional feel.
Q5: Where can I find the Cats in Hats Quilt pattern?
There are many quilting websites and designers offering variations of this pattern. Look for free or paid patterns from trusted quilt pattern creators or craft marketplaces.
Q6: Can I sell quilts made from this pattern?
If the pattern is marked for personal use only, you should not sell finished products. Always check the copyright terms of the designer or source before selling.
Conclusion
The Cats in Hats Quilt – Pattern brings together creativity, charm, and classic quilting skills to produce a project that’s both heartwarming and delightful. From selecting your fabrics and assembling your cat blocks to adding whimsical hats and decorative details, this pattern invites joy at every turn. Whether you’re quilting solo or with loved ones, it’s a project that tells a story with every stitch.
If you’ve enjoyed this guide, we’d love to hear your feedback. Please leave a sincere opinion or suggestion in the comments below—your input helps us and other readers grow in this wonderful quilting community. Happy stitching and may your cats (and their hats) bring plenty of warmth and smiles!