If you’ve ever been curious about how to make a stylish and functional bag using small fabric squares, then the Charm Square Bag – Pattern is the perfect project for you. This pattern is a favorite among sewing and quilting communities because it combines creativity with practicality.
Whether you’re a beginner or a seasoned quilter, making your own charm square bag is a rewarding experience.The term “charm square” refers to pre-cut 5″x5″ fabric pieces that are sold in coordinating bundles. These squares are ideal for patchwork and quilting projects because they save time and come in beautifully matched designs.
A Charm Square Bag – Pattern typically uses these squares to create a unique, colorful exterior with a soft, quilted texture that gives the bag its charm—pun intended.
In this guide, we’ll dive deep into how to work with charm squares, how to read and follow a pattern, and how to personalize your own charm square bag. You’ll get a solid understanding of how to choose your fabric, assemble your bag, and finish it professionally. If you’re ready to express your creativity through sewing, the Charm Square Bag – Pattern is the ideal place to start.
1. Understanding the Charm Square Bag – Pattern
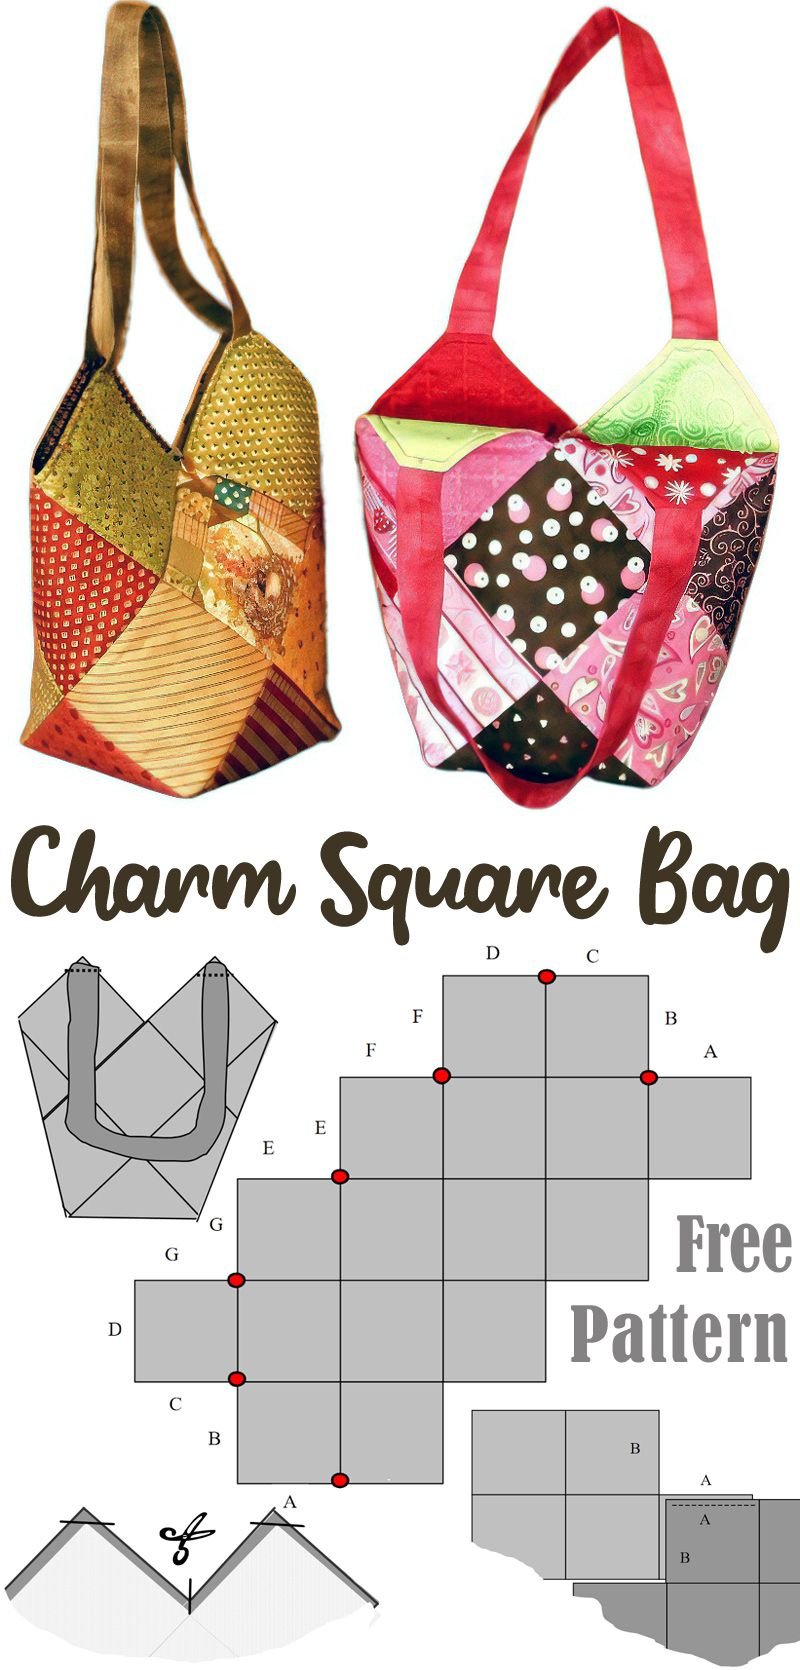
The first step to creating a charm square bag is to understand what the pattern entails. At its core, a Charm Square Bag – Pattern outlines how to stitch together charm squares to create a fabric panel, which is then sewn into a functional bag.
Charm square patterns often include clear diagrams, measurements, and step-by-step instructions. Some even provide fabric layout guides, so you can visualize how the pieces come together. These patterns are usually easy to follow and cater to all skill levels.
Each charm square bag is unique because of the wide variety of charm packs available. Whether you choose modern, floral, vintage, or seasonal prints, your bag will have a personality of its own. This makes the process enjoyable and the final product something you can be proud of.
When choosing a pattern, consider the size and shape of the bag you want. Some patterns make tote-style bags, while others focus on crossbody or clutch designs. Be sure to check if the pattern includes extra features like interior pockets, zippers, or handles.
A good pattern will also include seam allowances and offer tips for quilting your charm square fabric before construction. Quilting adds both texture and durability to your finished bag, which is essential for everyday use.
Lastly, always read through the entire Charm Square Bag – Pattern before starting. Understanding all steps ahead of time prevents mistakes and helps you plan your sewing session efficiently.
2. Choosing the Right Materials and Tools
To successfully create a charm square bag, you’ll need the right set of materials and tools. The most important material, of course, is the charm square pack. These are available in quilt shops and online in countless themes and color palettes.
Look for 100% cotton charm squares, as they are easy to sew, press, and quilt. Avoid slippery or stretchy fabrics unless you’re confident in your skills. Cotton provides the best results for beginners and experienced quilters alike.
In addition to charm squares, you’ll need basic sewing tools such as scissors, pins, rotary cutters, rulers, and a sewing machine. You’ll also want to have coordinating thread that complements your fabric colors.
For structure, many charm square bag patterns call for interfacing or batting. These materials give your bag body and make it more durable. Fusible fleece is a popular choice for charm square bags because it’s easy to apply and adds a plush finish.
Don’t forget your lining fabric! This inner layer helps protect your seams and adds a polished look. Choose a cotton print or solid color that matches your charm squares for a cohesive design.
Handles or straps are often included in the Charm Square Bag – Pattern. These can be made from fabric, leather, or cotton webbing, depending on your desired look and function. Some patterns also recommend magnetic snaps or zippers for closure.
Lastly, have a pressing iron on hand. Pressing between steps helps your bag look crisp and professional. It’s a small step that makes a big difference in the final product.
3. Step-by-Step Assembly Process
Once you’ve gathered your materials, it’s time to dive into the construction process. The first step in your Charm Square Bag – Pattern is usually arranging your charm squares into a pleasing layout.
Start by laying out the squares on a flat surface. Mix colors and patterns to create visual interest, or follow a symmetrical layout if you prefer a more organized look. Once you’re happy with the arrangement, start sewing the squares together row by row.
After the rows are sewn, connect them to form a panel. Be sure to press the seams open or to one side as you go. This helps the quilted panel lie flat and reduces bulk in the seams. Use a ¼” seam allowance unless otherwise stated in the pattern.
Next, add batting or interfacing to the panel and quilt as desired. You can quilt in straight lines, diagonals, or free-motion designs. Quilting not only adds texture but also keeps the layers together, ensuring your bag lasts for years.
Now it’s time to cut the quilted panel according to the bag pattern. Most Charm Square Bag – Patterns will instruct you to cut shapes for the bag’s front, back, sides, and base. Be precise to ensure your pieces align properly during assembly.
Assemble the outer bag by sewing the sides and base together. Then attach the lining in a similar way, leaving a small opening for turning. If the pattern includes pockets or a zipper, this is when you’ll insert those as well.
Once the outer and inner bags are joined, turn the bag right side out through the lining opening. Press the edges, topstitch around the opening, and sew the turning hole closed. Add your handles, and your charm square bag is complete!
4. Personalizing Your Charm Square Bag
One of the most exciting parts of using a Charm Square Bag – Pattern is the ability to customize your bag to reflect your personality. From fabric choices to finishing touches, there are countless ways to make your bag unique.
Try combining two different charm packs to create a more eclectic look. Mixing bold and neutral tones can result in a modern, eye-catching design. You can also choose themed packs for holidays or events, making your bag seasonally relevant.
Adding embellishments is another great way to personalize your project. Consider sewing on buttons, lace, embroidery, or even patches. These small additions can transform a simple bag into a statement piece.
You can also change the size or shape of your bag by modifying the pattern. Want a smaller crossbody instead of a tote? Adjust the number of charm squares and follow the same assembly logic with scaled-down measurements.
Experiment with different handles or closures. Instead of fabric handles, use leather straps for a more upscale look. Replace a magnetic snap with a zipper for added security. Little adjustments like these can change the bag’s functionality.
Interior customization is just as important. Add zippered pockets, key holders, or even pen sleeves. These features make your bag more useful for daily use and elevate the overall craftsmanship.
Finally, don’t forget to label your creation. Whether it’s a custom fabric label, a signature tag, or a handwritten note tucked inside, signing your work adds a personal touch and gives your charm square bag a sense of identity.
Frequently Asked Questions (FAQ)
Q1: What exactly is a charm square in quilting?
A charm square is a pre-cut 5″x5″ piece of fabric, often sold in coordinated packs. They are popular for quilting and patchwork projects because they save cutting time and offer beautifully matched designs.
Q2: Do I need a sewing machine to make a charm square bag?
While it’s possible to sew by hand, a sewing machine is highly recommended for strength and precision. It also significantly reduces the time needed to complete your bag.
Q3: Can beginners use a Charm Square Bag – Pattern?
Yes! Many charm square bag patterns are beginner-friendly and include step-by-step instructions with illustrations. It’s a great project to build confidence in sewing and quilting.
Q4: How many charm squares are typically needed for one bag?
Most patterns require between 20 to 42 charm squares, depending on the bag’s size and design. A standard charm pack (42 squares) is usually sufficient for one bag.
Q5: How do I wash and care for a charm square bag?
Use gentle washing methods—hand wash or machine wash on a delicate cycle with mild detergent. Air dry and press with an iron if needed. Avoid bleach or harsh chemicals.
Q6: Where can I find reliable Charm Square Bag – Patterns?
You can find quality patterns online from quilting blogs, Etsy shops, or fabric manufacturer websites. Be sure to check reviews and look for patterns with clear instructions and illustrations.
Conclusion
Creating a bag using a Charm Square Bag – Pattern is a fun and fulfilling way to explore your sewing creativity. From selecting the perfect charm squares to customizing your final product, this project offers endless possibilities. We’ve covered everything you need to know—from materials and tools to step-by-step assembly and personalization tips.
Whether you’re new to sewing or a seasoned quilter, the charm square bag is a project that delivers both beauty and function. If this article helped you or inspired you to start your own charm square bag, we’d love to hear your thoughts.
Please leave your honest feedback and any suggestions you may have—we’re always looking to improve and share more helpful guides!