Christmas tree block – Pattern projects have become a favorite among crafters and quilters who love adding a handmade touch to their holiday décor. Whether you’re creating a festive quilt, wall hanging, or holiday pillow, this pattern captures the charm and warmth of Christmas in every stitch. The beauty of a Christmas tree block – Pattern lies in its versatility—it can be as simple or as intricate as you like, and it offers endless opportunities for creativity through fabric choices, colors, and embellishments. This guide will walk you through everything you need to know to make your own Christmas tree block masterpiece.
When you follow a Christmas tree block – Pattern, you’re not only making something decorative but also creating a piece that can be passed down as part of your family’s holiday traditions. Handmade decorations have a special way of bringing joy and nostalgia to festive gatherings, and a Christmas tree block captures that feeling perfectly. Whether it’s sewn onto a blanket, turned into a table runner, or framed as holiday art, the pattern allows you to express your creativity while celebrating the spirit of Christmas.
This article will help you understand how to choose materials, cut and assemble your block, and finish your design beautifully. With detailed explanations and helpful tips, even beginners can follow along confidently. By the end, you’ll have a finished Christmas tree block – Pattern that reflects your personality and adds handmade charm to your holiday décor.
1. Understanding the Christmas Tree Block – Pattern
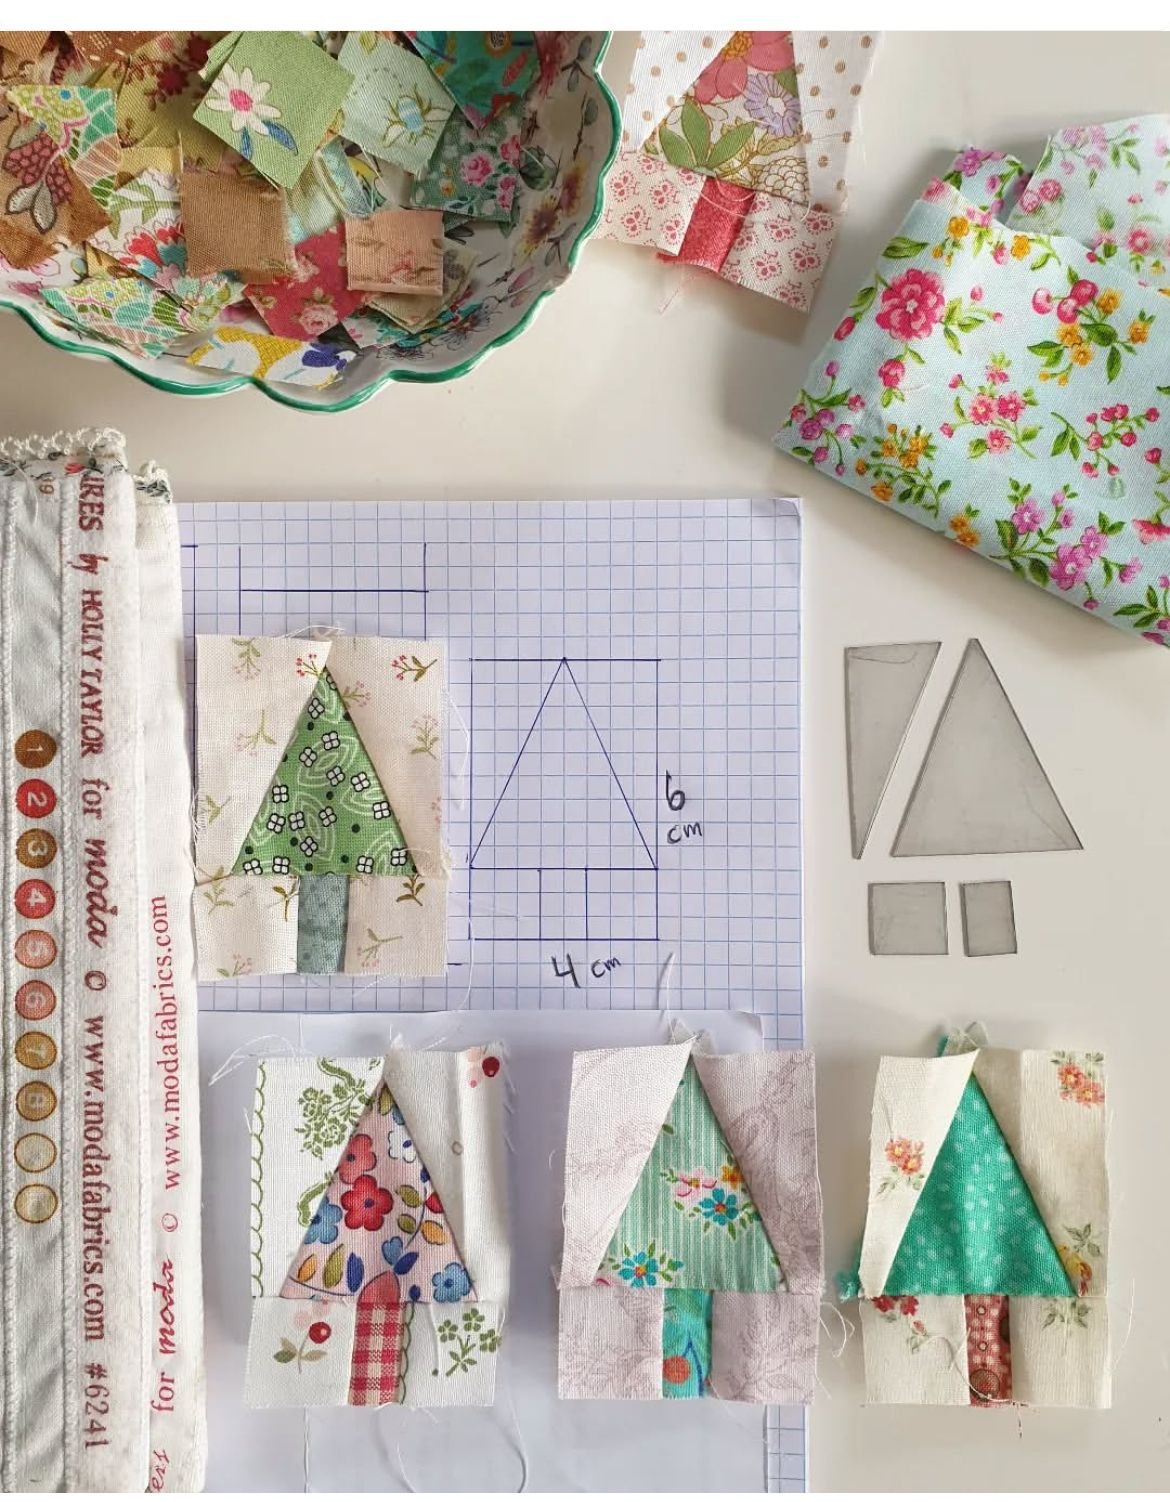
Before diving into your project, it’s important to understand what a Christmas tree block – Pattern really is. In quilting terms, a “block” is a square unit that can stand alone or be combined with others to create a larger design. The Christmas tree block represents the festive tree shape, usually constructed with triangles, squares, and rectangles. The pattern guides you step-by-step on how to piece these shapes together into a beautiful tree design.
Patterns vary in complexity. Some Christmas tree block – Patterns use simple geometric shapes that are perfect for beginners, while others include more intricate cutting and piecing techniques. Choosing the right one depends on your comfort level and the tools you have on hand. Most patterns are available as downloadable PDFs, printed guides, or even online tutorials.
The materials you choose can make your Christmas tree block stand out. Cotton fabrics in shades of green are classic, but you can also experiment with metallics, reds, or whites to create a snowy or modern effect. Using different fabric textures, like flannel or linen, can add warmth and depth to your finished piece.
Pay attention to measurements and seam allowances in your Christmas tree block – Pattern. Accuracy is key in quilting because small misalignments can affect the overall look of your block. Using a rotary cutter and quilting ruler helps you maintain clean, straight cuts. Always double-check your measurements before sewing.
Color placement also plays a major role. A dark background can make your Christmas tree pop, while a lighter background gives it a soft, wintry glow. Consider adding a small fabric star or embroidery at the top of the tree for an extra festive detail.
Lastly, review the entire pattern before starting. Familiarizing yourself with each step ensures that you understand the order of assembly and any special techniques required. Preparation helps make your Christmas tree block – Pattern experience smooth and enjoyable.
2. Cutting and Preparing Your Fabrics
Once you’ve chosen your fabrics and reviewed your Christmas tree block – Pattern, the next step is cutting and preparing your pieces. This stage requires patience and precision. Make sure your cutting surface is flat and that you have good lighting. Using a self-healing cutting mat can prevent damage to your workspace and keep your cuts clean.
Start by ironing all your fabrics to remove wrinkles and creases. Smooth fabrics are much easier to cut and sew accurately. Use your rotary cutter, ruler, and template to cut the required shapes according to the pattern. Most Christmas tree block – Patterns include a cutting guide that shows exactly how many pieces of each shape you need.
Label your pieces if the pattern involves multiple shades or fabrics. Small sticky notes or fabric clips work great for organization. Keeping your pieces sorted by color and size helps you follow the assembly instructions without confusion.
Pay attention to the grain of the fabric. Cutting along the correct grain ensures that your block holds its shape and doesn’t stretch out over time. This small detail can make a big difference in the quality of your finished Christmas tree block – Pattern.
If your pattern includes appliqué or extra details, prepare these pieces separately. Some crafters like to add ornaments, ribbons, or small embroidered stars to their Christmas tree block. Preparing them early allows you to incorporate them seamlessly into the design.
Before sewing, do a quick layout of your cut pieces on a flat surface. This “dry run” gives you a visual preview of how the block will look once it’s assembled and helps ensure that all pieces are oriented correctly. Adjust as needed before you start stitching.
3. Sewing and Assembling the Christmas Tree Block
With your fabrics prepared, it’s time to start sewing your Christmas tree block – Pattern together. Begin by joining the smaller pieces, following the order outlined in the pattern. Precision is essential—use a consistent seam allowance (usually ¼ inch) to ensure all parts align properly. Press seams open or to one side as recommended by the pattern to reduce bulk and maintain a smooth finish.
Many Christmas tree block – Patterns are constructed row by row, from the top of the tree downward. This method helps you stay organized and reduces the risk of mixing up pieces. If your block includes background squares or sky pieces, sew them alongside each row before joining everything together.
Chain piecing can save you time. This quilting technique involves sewing multiple pieces continuously without cutting the thread between them. It’s efficient and helps keep your fabric pieces in order.
After assembling the main tree shape, add the trunk section at the bottom. This small but crucial part gives your Christmas tree block balance and completes the overall look. Some crafters use brown fabric for a realistic touch, while others choose festive prints for a fun twist.
Once your block is sewn, give it a final press using an iron on low heat. Avoid stretching the fabric as you press. A crisp, flat block will make it easier to join with others if you’re creating a quilt or table runner.
Inspect your seams and edges carefully. If any sections are uneven, trim them slightly to square up the block. Taking time to perfect this step ensures that your finished Christmas tree block – Pattern looks professional and well-crafted.
4. Finishing Touches and Display Ideas
Now that your Christmas tree block – Pattern is complete, it’s time to add finishing touches that make your creation shine. Trimming any loose threads and giving your block one final press will enhance its overall appearance. If your pattern allows, consider embellishments such as beads, sequins, or small buttons to mimic ornaments on the tree.
You can also quilt around the edges of your tree to add texture and dimension. Using metallic or gold thread can make the design sparkle under holiday lights. Quilting stitches not only enhance the look but also strengthen the block for long-term use.
If you plan to frame or hang your block, add a backing fabric and binding. Choose colors that complement your design—neutral tones for a classic look or bold shades for a modern holiday statement. A well-bound block looks polished and ready to display.
Another creative idea is to combine several Christmas tree block – Patterns to create a festive quilt, table runner, or advent calendar. Mixing different fabrics and tree sizes adds charm and variety to the overall piece.
Remember that personalization makes your project truly special. You can embroider names, dates, or holiday messages onto your block to commemorate a particular year or family event. This turns your Christmas tree block – Pattern into a cherished keepsake.
Finally, display your finished block proudly. Hang it on a wall, use it as part of your holiday table décor, or gift it to a loved one. Handmade items always carry warmth and meaning, especially during the Christmas season.
FAQ
Q: What is a Christmas tree block – Pattern used for?
A: It’s a design template used to create quilt blocks or decorative pieces featuring a Christmas tree shape. These blocks can be part of quilts, pillows, or wall hangings.
Q: Do I need special tools to make one?
A: Basic sewing supplies—rotary cutter, ruler, sewing machine, and iron—are usually enough. A cutting mat and quilting foot can also help.
Q: Can beginners make a Christmas tree block?
A: Absolutely! There are many beginner-friendly Christmas tree block – Patterns with simple shapes and easy instructions. Start small and build confidence.
Q: How do I choose fabrics for my block?
A: Go for greens and neutrals for a traditional look, or experiment with bright prints for a modern twist. Mixing patterns and textures can make your block unique.
Q: Can I resize the pattern?
A: Yes, you can scale the template up or down depending on your project. Just be consistent with seam allowances to maintain proportions.
Q: How should I display my finished block?
A: Frame it, incorporate it into a quilt, or turn it into a festive pillow cover. Handmade blocks make great gifts too.
Conclusion
Creating your own Christmas tree block – Pattern is a delightful and rewarding project that celebrates both creativity and the holiday spirit. You’ve learned how to select materials, cut fabrics accurately, sew with precision, and add personal touches that make your piece stand out.
Each step brings you closer to a handmade decoration that reflects your love for Christmas and your crafting skills. Now it’s your turn—gather your fabrics, pick your favorite pattern, and start stitching your festive masterpiece. I’d love to hear your thoughts! Share your honest opinions and suggestions about this project so we can keep spreading the joy of handmade holiday creations.