The Churn Dasher Quilt Block – Pattern is one of the most beloved and enduring designs in the world of quilting, offering a perfect blend of geometric simplicity and historical charm. This classic block, often referred to as the Churn Dash, dates back to the early 19th century and remains a staple for both beginner and expert quilters today. Its name originates from its resemblance to the mechanical parts of an old-fashioned butter churn, specifically the “dash” or the wooden pole used to agitate the cream. By mastering this traditional quilt pattern, you gain a versatile tool that can be used to create everything from rustic farmhouse quilts to sleek, modern wall hangings.
Understanding the construction of a Churn Dasher Quilt Block – Pattern is essential for any crafter looking to improve their piecing skills. The block is essentially a nine-patch construction, consisting of a center square, four side units made of bar segments, and four corner units made of half-square triangles (HSTs). Because it relies on these fundamental building blocks, it serves as an excellent educational project for learning how to maintain a consistent quarter-inch seam allowance. Once you understand the basic geometry, the possibilities for customization through fabric choice and color placement are virtually endless.
In this guide, we will dive deep into the world of the Churn Dasher Quilt Block – Pattern, exploring its rich history, the necessary materials for success, and a step-by-step approach to assembly. We will also discuss how to optimize your quilt layout and choose the right fabric contrast to make your design pop. Whether you are looking to create a vintage-inspired heirloom or a contemporary masterpiece, this article provides all the insights you need to master this iconic design while ensuring your project meets the highest standards of quilting craftsmanship.
1 Understanding the Churn Dasher Quilt Block – Pattern Anatomy
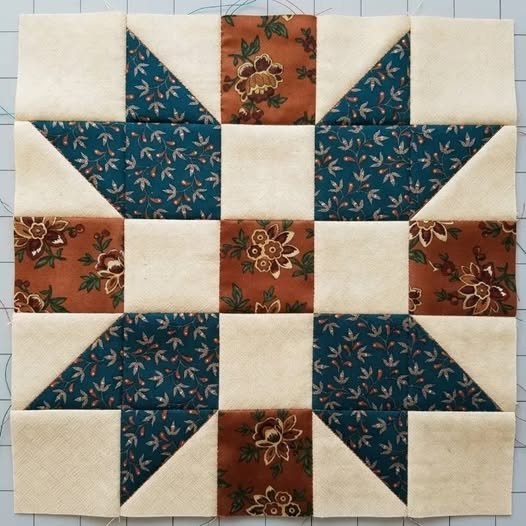
The Churn Dasher Quilt Block – Pattern is defined by its clean lines and symmetrical layout, which makes it incredibly satisfying to assemble. At its core, the design is a 3×3 grid, meaning the total width and height are always divisible by three in its most basic form. The central element is a solid square of fabric, which acts as the focal point and can be used to showcase a fussy-cut fabric or a bold, contrasting color. Surrounding this center are the “dashes” and the “corners” that give the block its name.
The side units of the block are typically composed of two rectangular strips sewn together, creating a “bar” effect. These bars represent the wooden frame of the churn, and their simplicity allows for great color play. When selecting fabrics for your Churn Dasher Quilt Block – Pattern, many quilters choose a dark value for the dash and a light value for the background to create a crisp, readable design. This high contrast ensures that the geometric shape is visible even from a distance.
The corner units are perhaps the most critical part of the Churn Dasher Quilt Block – Pattern because they utilize half-square triangles. These units provide the diagonal lines that lead the eye toward the center of the block. Accuracy is paramount here; if your triangles are trimmed incorrectly, the corners of your block won’t align, leading to “blunted points.” Many modern quilters use the “two-at-a-time” method for HST construction to save time and increase precision.
In the context of the Churn Dasher Quilt Block – Pattern, the background fabric is just as important as the print fabrics. The background defines the “negative space” and allows the main pattern to breathe. If you use a busy print for both the dash and the background, the iconic shape of the Churn Dash might get lost. Most successful patterns utilize a solid or a “read-as-solid” fabric for the background to ensure the quilt block geometry remains the star of the show.
Scale is another fascinating aspect of this quilt pattern. You can create a tiny 6-inch block for a delicate baby quilt or scale it up to an 18-inch block for a bold, modern bedspread. Because the math is based on a nine-patch grid, it is relatively easy to calculate the cutting requirements for various sizes. This flexibility is one reason why the Churn Dasher Quilt Block – Pattern has remained a favorite in the quilting community for over a century.
Finally, the way these blocks are joined together can completely change the look of the finished quilt. You can sew them edge-to-edge for a continuous pattern, or you can add sashing and cornerstones to frame each individual block. When you use the Churn Dasher Quilt Block – Pattern in a repeated layout, the corners of the blocks often meet to create secondary patterns, such as stars or secondary squares, which adds a layer of professional complexity to your work.
2 Essential Materials and Tools for Your Quilt Project
To create a high-quality Churn Dasher Quilt Block – Pattern, you must start with the right materials. High-quality 100% cotton quilting fabric is the industry standard because it holds its shape well and is easy to press. Since this pattern relies heavily on straight lines and precise angles, using fabric with a tight weave prevents fraying and stretching during the sewing process. Before you begin cutting, it is often recommended to starch your fabric to give it extra stability, especially for the bias edges of the triangles.
A sharp rotary cutter and a self-healing cutting mat are indispensable tools for any Churn Dasher Quilt Block – Pattern. Precision cutting is the foundation of a flat, square block. If your initial strips or squares are off by even an eighth of an inch, those errors will compound as you sew the pieces together. Using a non-slip quilting ruler helps you maintain accuracy, especially when trimming your half-square triangles to the exact size required for the pattern.
Thread choice is another factor that impacts the final result of your Churn Dasher Quilt Block – Pattern. A fine, 50-weight cotton thread is ideal because it is strong but thin enough to not add bulk to your seam allowances. When you are pressing multiple layers of fabric, bulky seams can cause the block to become distorted. Matching your thread color to your background fabric is a safe bet, though many quilters prefer a neutral grey or tan that blends in with most fabric palettes.
Your sewing machine should be equipped with a quarter-inch presser foot. This tool is a game-changer for the Churn Dasher Quilt Block – Pattern, as it provides a physical guide to ensure every seam is perfectly consistent. If you don’t have a specialized foot, you can use painter’s tape on the throat plate of your machine to mark the 1/4″ line. Consistent seams are the secret to ensuring that the three rows of your nine-patch block fit together perfectly at the end.
Pressing tools are just as important as sewing tools. A good steam iron and a flat ironing board are necessary for “locking” your stitches and flattening the seams. In a Churn Dasher Quilt Block – Pattern, the direction in which you press your seams can make a big difference in how the block lies. Most quilters recommend “pressing to the dark side” or using nested seams to reduce bulk where multiple pieces of fabric meet at a single point.
Lastly, consider using a design board or a flat surface to lay out your pieces before sewing. Because the Churn Dasher Quilt Block – Pattern has several components that look similar, it is easy to accidentally flip a triangle or a bar unit the wrong way. By laying out the entire block visually, you can double-check the orientation of your fabric prints and colors. This simple step prevents the frustration of having to use a seam ripper later in the process.
3 Step-by-Step Assembly of the Churn Dash Design
The first step in assembling the Churn Dasher Quilt Block – Pattern is preparing your units. Start by creating the four half-square triangles that will serve as the corners. To do this, place a background square and a print square right sides together, draw a diagonal line, and sew a quarter inch away from both sides of that line. Once cut and pressed, these units must be trimmed to the exact size specified in your quilt instructions to ensure the block stays square.
Next, you will move on to the four side units, often called the “bar units.” For a standard Churn Dasher Quilt Block – Pattern, you will sew a long strip of your background fabric to a long strip of your accent fabric. Once joined, you will sub-cut this strip set into four equal segments. This “strip piecing” technique is much faster and more accurate than sewing individual small rectangles together, making it a favorite method for efficient quilting.
Once your four corner HSTs and your four side bar units are ready, you can begin the nine-patch assembly. Lay out your pieces in three rows: the top row consists of an HST, a bar unit, and another HST; the middle row consists of a bar unit, the center square, and another bar unit; the bottom row mirrors the top row. Pay close attention to the orientation of the half-square triangles, as they should point toward the center to create the “dash” effect of the Churn Dasher Quilt Block – Pattern.
Sew the pieces within each row together first. It is helpful to use chain piecing to speed up this part of the process. After sewing the pieces into rows, press the seams of the first and third rows in one direction, and the seams of the second row in the opposite direction. This allows the seams to “nest” or lock together when you join the rows, resulting in perfectly matched corners for your Churn Dasher Quilt Block – Pattern.
Now, pin the rows together, carefully aligning the nested seams. Sew across the width of the block to join the three rows. As you sew, ensure that you aren’t cutting off the “points” of your triangles. If your seam allowance is accurate, your needle should pass exactly through the intersection of the previous stitches. This attention to detail is what separates a beginner project from a professional-looking Churn Dash quilt.
After the final rows are joined, give the entire Churn Dasher Quilt Block – Pattern a final press. Press the row seams outward or open, depending on your preference for reducing bulk. Measure your finished block to ensure it matches the target size. If the block is slightly too large, you can “square it up” using a large square ruler, but be careful not to trim so much that you lose your seam allowance for the next stage of the quilt construction.
4 Creative Variations and Modern Quilt Styling
One of the best things about the Churn Dasher Quilt Block – Pattern is how easily it can be adapted to different styles. For a traditional quilt look, use reproduction fabrics from the 1800s, like small florals, indigos, and madder reds. This gives the quilt a timeless, “scrappy” feel that honors the history of the design. Using a variety of different fabrics for the “dashes” while keeping a consistent background can result in a beautiful scrap quilt that tells a story.
For those who prefer a modern quilting aesthetic, consider using solid fabrics in bold, saturated colors or a monochromatic palette. You can also experiment with “oversized” versions of the Churn Dasher Quilt Block – Pattern, where a single 40-inch block becomes the entire quilt top. This minimalist approach highlights the geometric beauty of the design and works perfectly with high-contrast pairings like navy and white or charcoal and neon yellow.
Another popular variation is the “wonky” or “improv” Churn Dasher Quilt Block – Pattern. Instead of using precise measurements, you can cut your strips and triangles at slight angles to create a whimsical, hand-drawn effect. This style is very forgiving and is a great way to express creativity without the pressure of perfect points. Improv quilting is a growing trend that breathes new life into classic patterns like the Churn Dash.
You can also play with the “block within a block” concept. Instead of a solid center square, try placing a smaller Churn Dasher Quilt Block – Pattern or even a different design, like a Sawtooth Star, inside the center. This creates a complex, nested look that will surely impress anyone who sees your work. Using secondary patterns in the center is a great way to practice finesse in piecing and color theory.
The choice of quilting motifs for the finishing stage also impacts the style of your Churn Dasher Quilt Block – Pattern. For a vintage feel, hand-quilting or simple “stitch-in-the-ditch” works well. If you want a more contemporary finish, try dense free-motion quilting or geometric straight-line quilting using a walking foot. The quilting lines can either follow the shape of the block or run counter to it to create an interesting visual tension.
Finally, consider the layout of your finished blocks. Rotating every other Churn Dasher Quilt Block – Pattern by 45 degrees or using an “on-point” setting can completely transform the visual rhythm of the quilt. Adding wide borders or using a negative space heavy layout (where blocks are scattered) are effective ways to make this old pattern feel brand new. No matter how you choose to style it, the Churn Dash remains a versatile foundation for any creative vision.
FAQ: Frequently Asked Questions
What is the best size for a Churn Dasher Quilt Block – Pattern?
The most common sizes are 6, 9, or 12 inches. Because the block is a nine-patch, sizes divisible by three are the easiest to calculate and sew without complex fractions.
Is this pattern suitable for beginners?
Yes, it is highly recommended for beginners. It teaches three essential skills: sewing straight seams, creating strip sets, and making half-square triangles. It is a “rite of passage” in the quilting world.
How do I prevent my points from being cut off?
The key is a consistent 1/4″ seam allowance. When sewing units together, ensure your needle lands exactly at the “V” where the previous seams meet. This preserves the sharp points of the triangles.
Can I use scraps for a Churn Dash quilt?
Absolutely! The Churn Dasher Quilt Block – Pattern is one of the best designs for using up your fabric stash. You can use a different fabric for every “dash” as long as your background remains consistent to tie the look together.
What fabric works best for the background?
Solid white, cream, or light grey are traditional favorites. However, “low volume” prints (white fabrics with very small, subtle patterns) are very popular in modern versions of this block.
Why is my block coming out the wrong size?
This is usually due to “seam creep.” If each seam is just a hair too wide, the final block will be significantly smaller than intended. Check your seam allowance by sewing two scrap pieces together and measuring the result.
Conclusion
In conclusion, the Churn Dasher Quilt Block – Pattern is a versatile and essential design that every quilter should have in their repertoire. We have explored its historical roots, the critical importance of precision cutting and sewing, and the various ways you can modernize this classic look through fabric selection and layout.
By following the step-by-step assembly process and focusing on accurate half-square triangles, you can create stunning quilts that are both structurally sound and visually captivating. This pattern serves as a bridge between the quilting traditions of the past and the creative innovations of the future.