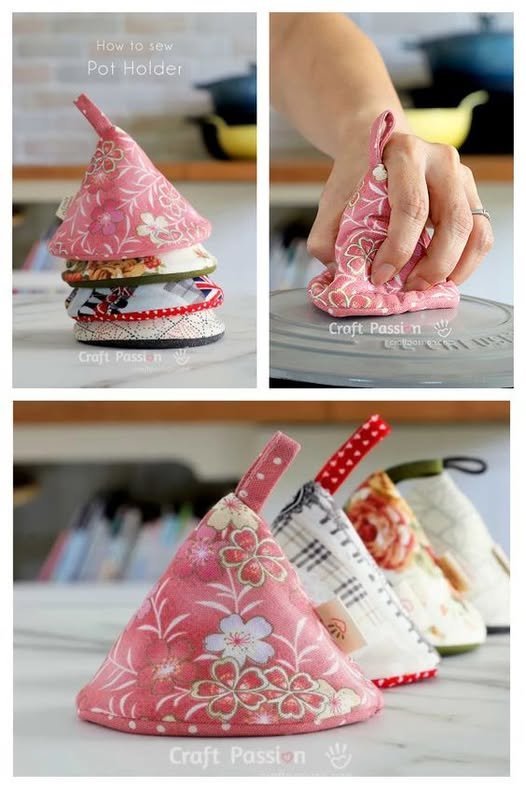
Creating a unique Cone-shaped pot holder- Pattern is an incredibly rewarding project that blends functional kitchen utility with the charm of handmade textiles. Whether you are an experienced sewer or a beginner looking to master your first 3D fabric construction, this design offers a refreshing departure from the standard square hot pad. By using a specialized Cone-shaped pot holder- Pattern, you can craft a tool that slips easily over handles or acts as a protective shield for your fingers, adding a touch of personalized flair to your culinary workspace.
The beauty of a Cone-shaped pot holder- Pattern lies in its geometric simplicity and its ergonomic advantage. Unlike flat pads that can easily slide off a hot pan or leave your fingertips exposed, the conical structure provides a snug fit, allowing you to grip handles or lids with total confidence. This DIY project is not only cost-effective but also allows for an endless variety of aesthetic choices, making it the perfect item to gift to friends or family who appreciate the heart and soul of a well-decorated, functional kitchen.
In this guide, we will walk you through the essential steps to construct your own kitchen essential. We will focus on the technical drafting of the Cone-shaped pot holder- Pattern, the selection of heat-resistant materials, and the assembly techniques that ensure safety and longevity. By following these instructions carefully, you will create a high-quality accessory that stands up to the rigors of daily cooking while looking like a boutique-purchased item. Let’s prepare to cut, stitch, and create a masterpiece that will become your favorite companion at the stove.
1. Choosing Heat-Resistant Materials for Your Pattern
Selecting the right fabric is the most critical step when you decide to sew a Cone-shaped pot holder- Pattern. You must use natural fibers like 100% cotton, as synthetic fabrics like polyester or nylon will melt when they come into contact with high heat. A heavy-duty cotton canvas or a thick quilting cotton is ideal for the exterior, as these fabrics provide the necessary durability to withstand the friction of grabbing heavy pots and pans repeatedly.
The internal insulation is the “secret sauce” of a successful Cone-shaped pot holder- Pattern. You should look for specialized heat-resistant batting, such as Insul-Bright or layers of cotton terry cloth. These materials reflect heat back to the source or absorb it effectively, ensuring that your hands remain cool while you move hot cookware. Never skip this layer, as the structure of the cone relies on the thickness of the batting to maintain its shape.
When purchasing materials, remember that you will need a backing fabric for your Cone-shaped pot holder- Pattern. This layer should also be made of cotton and, ideally, should be a darker color to hide potential stains from grease or food splashes. Pre-washing your fabrics before cutting them is highly recommended to prevent any shrinkage later, which could distort the shape of your cone once it is finished and put to work in the kitchen.
If you want to add a loop for hanging, consider using a sturdy cotton twill tape or a braided fabric cord. Adding this to your Cone-shaped pot holder- Pattern allows you to hang your finished product near the stove for easy access. Ensure the loop is sewn securely into the seam before you turn the cone right-side out, reinforcing it with a few extra stitches to handle the weight of the pot holder over time.
For the decorative aspect, you can use coordinating quilting fabrics to give your kitchen a cohesive look. Because the cone shape has multiple sections, it provides a perfect canvas to mix and match prints. Following the guidelines of the Cone-shaped pot holder- Pattern, you can use small scraps of leftover fabric, making this project an excellent way to practice sustainable crafting while reducing waste in your sewing room.
Lastly, consider the quality of your thread. Use a heavy-duty cotton thread that matches the heat tolerance of your fabric. Using a synthetic thread could result in the stitches failing if they are exposed to extreme heat. By matching the thermal properties of all your materials to the requirements of the Cone-shaped pot holder- Pattern, you ensure that your homemade kitchen tool is as safe as it is beautiful.
2. Drafting the Perfect Cone-Shaped Pattern
The Cone-shaped pot holder- Pattern is fundamentally a geometric sector, which looks like a large pie slice when laid flat. To draft this, you will need a compass or a simple string-and-pencil setup to draw a perfect arc on your paper template. The radius of the arc determines the height of your cone, so measure a standard pan handle to ensure your design provides enough coverage for your specific cooking needs.
Accuracy is key when tracing your Cone-shaped pot holder- Pattern onto your fabric. If your arc is slightly off, the edges of the cone will not align perfectly when you fold it into its 3D shape. Use a rotary cutter or a sharp pair of fabric shears to follow the line precisely. A stable template made of cardboard or freezer paper is often better than thin printer paper, as it won’t slide around while you are working.
Don’t forget to add a seam allowance to your template. A standard half-inch allowance is usually perfect for a Cone-shaped pot holder- Pattern. If you fail to include this extra space, your finished pot holder will be significantly smaller than your measurements. Mark these lines clearly on your fabric, as they will serve as your guide when you start pinning the layers together for the main seam.
If you are a beginner, you might want to create a prototype using inexpensive scrap fabric first. This allows you to test the fit of your Cone-shaped pot holder- Pattern before cutting into your nice, decorative cotton. If you find the cone is too wide or too narrow, you can adjust the angle of the arc on your pattern paper until the shape feels comfortable and secure in your hand.
Once you are satisfied with your template, label it clearly as “Main Piece” or “Lining Piece.” Having a well-labeled Cone-shaped pot holder- Pattern makes it much easier to keep your projects organized if you decide to batch-produce these as gifts for friends or family. Keep the template in a safe place, as you will likely want to use it again and again for future kitchen updates.
Advanced crafters might consider adding darts or gussets to their Cone-shaped pot holder- Pattern to create a more contoured fit. Darts allow the fabric to curve more naturally around the base of a handle. While a simple cone is functional, these small professional touches can make the difference between a DIY project that looks amateur and one that looks like a high-end designer home good.
3. Stitching and Assembling Your Kitchen Accessory
Assembly begins by layering your fabric pieces: backing, heat-resistant batting, and the exterior decorative fabric. Pin these layers together carefully, or use a basting spray to hold them in place. The goal is to create a “quilt sandwich” that won’t shift under your sewing machine foot. When you move to the machine for your Cone-shaped pot holder- Pattern, use a walking foot if possible to feed the layers evenly.
Quilting the layers together before folding the cone is a great technique to increase heat protection. Sew a series of parallel lines or a cross-hatch pattern across the fabric before you form the cone. This step from the Cone-shaped pot holder- Pattern helps to secure the batting in place, ensuring it doesn’t bunch up over time, which maintains the uniform thickness required for effective heat insulation.
Once quilted, fold your fabric into the cone shape, aligning the straight edges to create the seam. Stitch this main seam with a durable backstitch at the start and end to prevent it from coming undone. A double stitch or a reinforced straight stitch is highly recommended, as the seam will be under tension every time you slip the pot holder over a hot handle or tray.
After the main seam is sewn, trim the excess seam allowance to reduce bulk. Turning the Cone-shaped pot holder- Pattern right-side out can be tricky because of the batting thickness. Use a dull, blunt object like a knitting needle or a chopstick to gently push the tip of the cone out. Don’t force it, as you don’t want to pop the stitches you worked so hard to put in place.
Finish the opening of your pot holder by folding the raw edges inward and stitching them closed with a decorative topstitch. This gives your project a clean, professional finish. If you decided to add a loop, make sure it is tucked into this top hem before you complete the final stitch. This circular finish is what gives the Cone-shaped pot holder- Pattern its signature look and stability.
Finally, give your project a good press with a steam iron to flatten the seams. Be mindful of the heat-resistant batting inside; do not use an iron setting that is too hot, as it could melt the insulation. Once pressed, your Cone-shaped pot holder- Pattern project is complete and ready to take its place in your kitchen, providing both safety and style for your daily culinary tasks.
4. Care, Maintenance, and Safety Tips
The longevity of your finished project depends on proper care. Since your Cone-shaped pot holder- Pattern will be used around food and heat, it will inevitably get dirty. Most cotton-based holders can be machine washed on a gentle cycle. However, always use a laundry mesh bag to protect the shape of the cone from being crushed in the washing machine or getting snagged on other clothing items.
Air drying is the preferred method for maintaining the shape of your Cone-shaped pot holder- Pattern. Heat from a clothes dryer can sometimes shrink the inner batting or cause the fabric to pucker, which could ruin the fit of the cone. Simply reshape the pot holder with your hands while it is damp and set it out on a drying rack, allowing it to dry naturally in a well-ventilated area.
Check your pot holder regularly for signs of wear. If you notice the fabric thinning, a hole forming, or the stitching coming undone, it is time to retire the item. A compromised Cone-shaped pot holder- Pattern loses its insulating properties, which can lead to accidental burns. Given how easy it is to whip up a new one using your template, never risk using a damaged tool when safety is at stake.
Store your pot holders in a place that is easy to reach but away from direct flames. Hanging them on a hook near the stove is convenient, but ensure they are at least a few inches away from the burners to prevent fire hazards. Following these simple safety protocols ensures that your Cone-shaped pot holder- Pattern remains a useful tool for your kitchen rather than a danger.
If your pot holder develops stubborn grease stains, try pre-treating them with a small amount of dish soap before washing. Dish soap is designed to break down oils, making it the perfect cleaner for kitchen textiles. Avoid harsh bleach, which can weaken the cotton fibers and break down the internal heat-resistant layer, ultimately shortening the lifespan of your Cone-shaped pot holder- Pattern significantly.
Lastly, share your tips with others! If you find a particular type of batting or a unique way to embellish the Cone-shaped pot holder- Pattern, consider passing that knowledge on to fellow crafters. Whether you keep them for yourself or give them as gifts, these handmade items carry a personal touch that store-bought items simply cannot replicate, making them a special part of any home-cooked meal.
Frequently Asked Questions (FAQ)
Can I use a Cone-shaped pot holder- Pattern for very heavy cast iron pans?
While the cone shape provides great coverage, always ensure you have used a high-quality, dense batting. For very heavy or long-exposed cast iron, you may want to use two layers of batting in your Cone-shaped pot holder- Pattern to provide extra protection against sustained heat.
What is the best fabric for the outside of the cone?
Heavyweight cotton canvas or quilting-weight cotton is best. Avoid any fabrics that feel thin or have a high synthetic content, as they are not safe for hot kitchen environments.
How do I make my pot holder stand up better?
Adding a layer of fusible interfacing to the exterior fabric before assembling the cone can give it more structure. This ensures the cone doesn’t sag and remains easy to slip onto pan handles.
Can I make these in different sizes?
Absolutely! The beauty of drafting your own Cone-shaped pot holder- Pattern is that you can scale the arc to fit everything from small saucepans to large oven mitts. Simply adjust the radius of your circle template.
Is it safe to wash my pot holder if it has a leather tab?
If you used a real leather tag, it is best to hand wash the item to prevent the leather from cracking or bleeding color. For machine-safe items, stick to cotton or nylon twill tape for the hanging loops.
What do I do if I burn the fabric?
If the fabric shows any signs of scorching, stop using the item immediately. Heat damage weakens the structural integrity of the fabric and the insulation, making the pot holder unsafe for further use.
Conclusion
Creating a Cone-shaped pot holder- Pattern is an excellent project for anyone looking to combine sewing skills with kitchen utility. We have covered the importance of selecting heat-resistant materials, the geometric precision required to draft a functional template, the assembly process for a durable 3D shape, and essential care tips to keep your gear safe.
By following these steps, you have created a bespoke tool that is as practical as it is beautiful. We hope you enjoy using your new pot holder, and we would love to hear your sincere opinion and suggestions—leave us a comment below and let us know how your project turned out!