The Cow Quilt – Pattern is one of the most charming and sought-after designs in the world of modern quilting, bringing a touch of rustic whimsy and farmhouse elegance to any bedroom. Whether you are a seasoned quilter or a curious beginner, working on a cow-themed quilt allows you to experiment with bold animal prints, unique applique techniques, and a color palette that ranges from classic black and white to soft, pastoral neutrals. This specific pattern has gained immense popularity due to the “cottagecore” trend, where handmade items that celebrate rural life are highly valued for their warmth and personality.
When you embark on the journey of creating a Cow Quilt – Pattern, you are not just sewing pieces of fabric together; you are storytelling through textiles. The pattern typically features iconic bovine silhouettes, playful cow spots, or even intricate “portrait” blocks that capture the gentle expression of these farm animals. Because the shapes involved in a cow quilt can be both geometric and organic, this project serves as an excellent educational tool for mastering different sewing methods, such as traditional piecing, paper piecing, or raw-edge applique.
Choosing a high-quality Cow Quilt – Pattern is essential for ensuring that your finished project has the structural integrity to become a cherished family heirloom. A well-designed quilt pattern provides clear instructions on fabric requirements, cutting diagrams, and assembly steps that prevent common mistakes like mismatched seams or distorted blocks. In the following sections, we will explore everything from material selection to advanced finishing touches, ensuring your handmade cow quilt is as durable as it is beautiful and stays perfectly within the aesthetic goals of your home decor.
1. Selecting Fabrics and Colors for Your Cow Quilt – Pattern
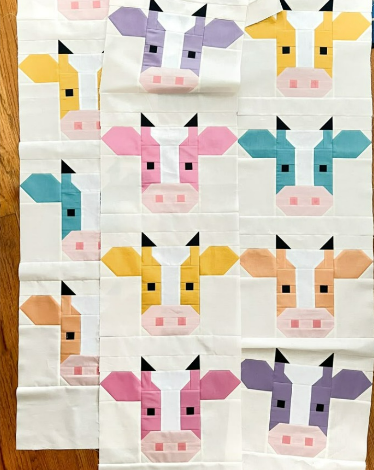
The soul of any Cow Quilt – Pattern lies in the fabric selection, as the contrast between the “spots” and the background determines the visual impact of the piece. Most quilters opt for high-quality 100% cotton quilting fabric, which offers the best stability and ease of handling under a sewing machine. For a classic look, look for “cow spot” prints or mottled black-and-white batiks that mimic the natural hide of a Holstein cow.
If you want a more modern or “shabby chic” version of the Cow Quilt – Pattern, consider using unconventional colors like dusty rose, sage green, or even denim blue for the cow silhouettes. This approach turns a traditional farmhouse pattern into a contemporary piece of art that can fit into a variety of nursery or living room themes. Soft flannels are also a popular choice for the backing of a cow quilt, adding an extra layer of snuggable texture.
Texture is another element that can elevate your Cow Quilt – Pattern from standard to extraordinary. Some crafters enjoy using “minky” or faux fur for the cow patches to create a sensory quilt that is particularly appealing for children. However, keep in mind that these fabrics can be slippery, so using plenty of quilting pins or a walking foot is necessary to maintain the precision required by the pattern instructions.
The background fabric in your Cow Quilt – Pattern acts as the “pasture” for your design, so choosing a neutral cream, a soft grey, or a subtle grass-print can provide the perfect canvas. Avoid backgrounds that are too busy, as they might compete with the cow blocks and make the overall design feel cluttered. A solid or “read-as-solid” fabric ensures that the bovine shapes remain the focal point of the finished quilt.
Don’t forget to consider the binding fabric, which is the thin strip that wraps around the edges of the quilt. For a Cow Quilt – Pattern, a striped “ticking” fabric or a solid black binding creates a clean, framed look that ties the whole farmhouse aesthetic together. It is often the small details in fabric coordination that make a handcrafted quilt look like it was designed by a professional textile artist.
Lastly, always pre-wash your fabrics before starting the Cow Quilt – Pattern, especially when dealing with high-contrast colors like black and white. Darker dyes can sometimes bleed into lighter areas during the first wash of the finished quilt, so using “color catchers” and pre-shrinking your cotton will ensure the quilt’s longevity and keep those crisp cow spots looking sharp for years to come.
2. Essential Tools and Techniques for a Successful Pattern
To execute a Cow Quilt – Pattern with precision, you need a set of reliable quilting tools that go beyond a basic sewing kit. A rotary cutter, a self-healing cutting mat, and an acrylic quilting ruler are non-negotiable for achieving the straight lines and exact angles required for the quilt blocks. Precision in cutting is the “secret sauce” that ensures all your pieces line up perfectly during the final assembly.
Many Cow Quilt – Pattern designs utilize applique, which involves sewing a smaller piece of fabric (the cow) onto a larger background piece. You can choose between “turn-edge” applique for a hidden seam or “fusible web” applique for a faster, modern finish. If you are new to this, using a fusible backing is highly recommended as it keeps the fabric from fraying while you stitch around the edges of the cow shapes.
If your chosen Cow Quilt – Pattern involves foundation paper piecing (FPP), you will need to familiarize yourself with sewing on paper templates. This technique is fantastic for creating sharp points and complex angles that are difficult to achieve with traditional piecing. FPP is often used for the more detailed parts of the cow’s face or ears, providing a level of realism that makes the pattern truly stand out.
A walking foot is an essential attachment for your sewing machine when you reach the “quilting” stage of the Cow Quilt – Pattern. Because a quilt consists of three layers—the top, the batting, and the backing—a walking foot ensures all layers move through the machine at the same speed. This prevents puckering and shifting, which is especially important when you are sewing the decorative quilt lines across the cow motifs.
Marking tools, such as water-soluble pens or tailor’s chalk, are vital for transferring the pattern details onto your fabric. Whether you are marking the placement of the cow’s eyes or drawing a grid for the topstitching, having clear, temporary lines helps you stay on track. Always test your marking tool on a scrap of fabric first to ensure it disappears completely once the cow quilt is finished.
Finally, consider the type of quilt batting (the middle fluff) you use. Cotton batting is traditional and provides a flat, vintage look, while polyester batting offers more “loft” or puffiness. For a Cow Quilt – Pattern, a cotton-poly blend is often the “Goldilocks” choice, offering durability, warmth, and a beautiful drape that highlights the intricate stitchwork of your cow-themed masterpiece.
3. Step-by-Step Assembly of the Cow Blocks
The first stage of assembling your Cow Quilt – Pattern is the “block construction” phase. You will typically work on one cow at a time, treating each square as a mini-project. This modular approach makes the large task of making a full-sized quilt feel much more manageable and allows you to catch any errors in your seam allowance early on in the process.
Consistency is key when following a Cow Quilt – Pattern. Most patterns rely on a 1/4-inch seam allowance, which is the standard for the quilting industry. If your seams are even slightly off, the blocks won’t line up when you try to sew them into rows, leading to a frustrated quilter and a crooked cow design. Using a specialized quilting foot can help you maintain this exact distance.
As you finish each section of the cow block, pressing is your best friend. In quilting, we “press” rather than “iron”—meaning you lift and set the iron down rather than sliding it. This prevents the fabric from stretching out of shape. Pressing your seams toward the darker fabric ensures that the seam allowance doesn’t show through the white parts of your Cow Quilt – Pattern.
Once your individual cow blocks are complete, it is time for the “sashing” and “borders.” Sashing refers to the strips of fabric that go between the blocks, acting like windows for your cow illustrations. This step in the Cow Quilt – Pattern is where the quilt really starts to grow in size and the overall composition begins to harmonize into a cohesive farmhouse theme.
The layout phase is where you can get creative. Lay your finished blocks out on the floor or a “design wall” to decide on the placement of colors and spots. In a Cow Quilt – Pattern, you want to ensure that the “weight” of the black spots is distributed evenly across the surface so the quilt doesn’t look heavier on one side than the other.
The final step of the top assembly is sewing the blocks into rows and then sewing the rows together. This requires “nesting” your seams—aligning the junctions where four corners meet—to ensure the quilt top is flat and professional. Following the Cow Quilt – Pattern layout guide carefully during this stage will result in a perfectly square and balanced quilt ready for the final layer.
4. Finishing and Customizing Your Cow Quilt
After the top of your Cow Quilt – Pattern is finished, you enter the “quilting the layers” phase. This is where you can add “quilt motifs” like swirls, wind-lines, or even small grass shapes to the background. For the cow itself, “stitching in the ditch” (sewing along the seams) helps the animal shapes pop forward, giving the quilt a 3D effect.
Customization is what makes your Cow Quilt – Pattern unique. You might consider adding embroidery for the cow’s eyelashes or nostrils, or perhaps sewing on a small fabric “ear tag” with a family member’s name or birthdate. These personal touches transform a standard sewing pattern into a meaningful gift or a personalized piece of home decor.
If you are making the Cow Quilt – Pattern for a baby, safety is paramount. Ensure all applique pieces are sewn down securely with a tight zigzag or blanket stitch so that little fingers can’t pull them up. Avoid using plastic buttons for eyes; instead, use embroidery thread or fabric markers to create the facial features, making the quilt 100% safe for infant use.
Borders can also be customized to change the final size of the quilt. If the Cow Quilt – Pattern results in a throw-sized quilt but you need a queen-sized one, simply add multiple borders in coordinating colors. A “piano key” border—made of small scraps of all the fabrics used in the cow blocks—is a wonderful way to use up your leftovers and add a festive touch.
Labeling your quilt is a tradition every quilter should follow. Create a small fabric tag for the back of your Cow Quilt – Pattern that includes the name of the quilt, your name, the date, and the location where it was made. This documentation adds historical value to your handmade project and ensures that future generations know the story behind the cow quilt.
Finally, take the time to “bury your threads” and trim any loose ends. A clean finish is the hallmark of a high-quality Cow Quilt – Pattern execution. Once you have finished the binding, give the quilt a final steam press. The result will be a stunning, cozy, and professionally crafted cow-themed quilt that serves as a testament to your hard work and creativity in the quilting arts.
FAQ: Common Questions About the Cow Quilt – Pattern
1. Is the Cow Quilt – Pattern suitable for a beginner?
Yes, many Cow Quilt – Pattern designs are created specifically with beginners in mind. If you choose a pattern that uses “large-scale applique” rather than “tiny piecing,” it is very manageable for someone just starting their quilting journey.
2. How much fabric do I need for a standard cow quilt?
For a throw-sized Cow Quilt – Pattern, you generally need about 3 to 5 yards of various fabrics for the top, plus another 4 yards for the backing. Always check the specific pattern requirements before shopping to ensure you have enough.
3. Can I use this pattern to make a pillow instead of a full quilt?
Absolutely! You can take a single “cow block” from the Cow Quilt – Pattern and turn it into a decorative throw pillow or a wall hanging. This is a great way to “test” the pattern before committing to a full-sized blanket.
4. What is the best way to sew the cow spots?
The most popular method in a Cow Quilt – Pattern is “fusible applique.” You iron a double-sided adhesive onto the back of your “spot” fabric, cut the shape, iron it onto the base, and then stitch around the edges with a decorative stitch.
5. How do I make the quilt look “farmhouse style”?
To achieve that specific look with your Cow Quilt – Pattern, stick to a palette of white, cream, black, and maybe a “pop” of barn red. Using fabrics with subtle textures like linen or homespun cotton also enhances the rustic feel.
6. Is it okay to sell quilts made from this Cow Quilt – Pattern?
Most designers allow you to sell finished items made from their patterns on a small scale (like at craft fairs), but it is always polite to check the “terms of use” page included with your Cow Quilt – Pattern purchase.
Conclusion
In this comprehensive guide, we have explored the wonderful world of the Cow Quilt – Pattern, covering everything from the initial fabric selection to the intricate details of assembly and finishing.
We learned that while the design may look complex, breaking it down into individual cow blocks and using techniques like fusible applique makes the project accessible to everyone. By choosing the right materials, such as high-quality cotton and durable batting, and focusing on precision in your seam allowance, you can create a stunning piece of farmhouse art that will last for decades.