Finding the perfect Cozy Casserole Tutorial – Pattern is a game-changer for anyone who loves spending time in the kitchen or crafting handmade gifts that combine utility with charm. There is something deeply satisfying about pulling a steaming dish out of the oven and placing it into a beautiful, quilted carrier that protects your surfaces and keeps the meal warm. This guide is designed to help you master the art of creating a functional kitchen staple that looks as good as it performs.
When you start working on a Cozy Casserole Tutorial – Pattern, you aren’t just sewing a piece of fabric; you are creating an heirloom-quality accessory that facilitates community and sharing. Whether you are heading to a family potluck, a neighborhood barbecue, or simply serving dinner at your own table, a well-made casserole cozy is the ultimate companion for your cookware. It bridges the gap between rustic tradition and modern convenience, ensuring your hands stay safe and your food stays hot.
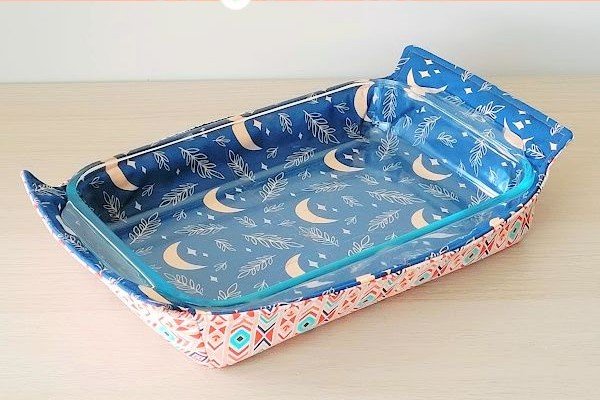
In this comprehensive guide, we will dive deep into the specific techniques and materials needed to ensure your Cozy Casserole Tutorial – Pattern results in a professional-grade finished product. We will explore the nuances of heat-resistant batting, the importance of 100% cotton materials, and the step-by-step construction process. By the end of this article, you will have all the knowledge necessary to stitch together a beautiful quilted casserole carrier that will be the envy of every dinner party.
1 Understanding the Materials for Your Cozy Casserole Tutorial – Pattern
The foundation of any successful Cozy Casserole Tutorial – Pattern begins with selecting the right fabric. Because this item will be in close proximity to high heat, it is vital to use 100% cotton fabric. Synthetic fibers like polyester can melt when they touch a hot dish, which is a safety hazard you definitely want to avoid. Look for high-quality quilting cotton in vibrant prints to make your cozy stand out.
Beyond the outer shell, the interior padding is what provides the necessary insulation. For this Cozy Casserole Tutorial – Pattern, I highly recommend using a combination of cotton batting and a specialized heat-reflective lining like Insul-Bright. This metallicized polyester film reflects heat back to the source, keeping your lasagna or brownies warm for much longer than standard padding would.
Precision is key when cutting your materials for this DIY sewing project. You will typically need two large rectangles for the main body and smaller strips for the handles. Using a rotary cutter and a transparent quilting ruler ensures that your edges are perfectly straight, which makes the assembly process much smoother and results in a more symmetrical casserole carrier.
Don’t forget about the thread quality when following this Cozy Casserole Tutorial – Pattern. Just like the fabric, your thread should be 100% cotton to prevent any issues with heat. While it might be tempting to use a standard all-purpose polyester thread, the high temperatures of a dish fresh from a 200°C oven can compromise the integrity of synthetic threads over time.
Interfacing is another hidden hero in this sewing tutorial. If you find that your cotton fabric is a bit too lightweight, applying a layer of fusible fleece can give the carrier more structure. This ensures that the “walls” of your cozy don’t collapse when you are trying to slide a heavy glass dish inside, making the pattern functionality much higher.
Lastly, consider your notions and tools before you sit down at your sewing machine. You will want a fresh 90/14 sewing needle to handle the multiple layers of fabric and batting. Having plenty of wonder clips or pins on hand is also essential, as the bulk of the insulated layers can be tricky to hold together while navigating corners and edges.
2 Step by Step Assembly of the Cozy Casserole Tutorial – Pattern
The first active step in the Cozy Casserole Tutorial – Pattern is preparing your “quilt sandwich.” Lay your backing fabric face down, place your batting and heat-reflective layer in the middle, and top it with your main exterior fabric face up. Use a temporary spray adhesive or safety pins to keep these layers from shifting as you begin the quilting process.
Quilting the layers together is not just for aesthetics; it secures the insulation so it doesn’t bunch up during washing. For this Cozy Casserole Tutorial – Pattern, a simple crosshatch design or straight parallel lines works beautifully. If you are feeling adventurous, you can try free-motion quilting to add a more artistic flair to your handmade kitchen accessory.
Once your main panel is quilted, it is time to focus on the handle construction. Handles take a lot of stress, so they need to be reinforced. Fold your fabric strips using the double-fold method and sew along both edges. This creates a sturdy strap that won’t snap or fray when you are carrying a heavy 9×13 ceramic dish across a parking lot.
Attaching the handles is a crucial part of the Cozy Casserole Tutorial – Pattern. You want to center them perfectly on the shorter ends of your rectangle. I recommend “box-stitching” the handles—sewing a square with an ‘X’ through the middle—to provide maximum structural integrity. This ensures the weight of the casserole is distributed evenly across the fabric.
Now comes the “boxing” of the corners, which gives the Cozy Casserole Tutorial – Pattern its three-dimensional shape. By folding the corners and sewing a perpendicular line, you create a pocket that fits the base of your dish. This box-corner technique is what transforms a flat piece of quilted fabric into a snug, protective vessel for your cookware.
The final touch in the assembly is finishing the raw edges. You can either use the “turn and topstitch” method or apply bias tape around the perimeter. Bias tape adds a lovely pop of contrasting color and provides a very clean, professional finish to your quilted pattern. Once the edges are sealed, your cozy is officially ready for its first kitchen adventure.
3 Customizing Your Cozy Casserole Tutorial – Pattern for Different Sizes
One of the best things about this Cozy Casserole Tutorial – Pattern is its versatility. While the 9×13 inch dish is the industry standard, you can easily scale the measurements up or down. To customize the fit, measure the length, width, and height of your favorite baking dish and add two inches to each side to account for the thickness of the batting and seam allowances.
If you frequently bake round dishes or use a slow cooker, you can adapt this Cozy Casserole Tutorial – Pattern into a circular format. The logic remains the same: you need heat-resistant layers and sturdy handles. A circular cozy often uses a drawstring closure at the top to keep the heat trapped, which is a great variation for keeping soups or stews warm.
Color coordination is another way to make this Cozy Casserole Tutorial – Pattern uniquely yours. You can choose seasonal fabrics—think pumpkins for Thanksgiving or holly for Christmas—to make themed carriers. This turns a simple sewing project into a thoughtful personalized gift for bridal showers, housewarmings, or holiday gift exchanges.
For those who want to add extra functionality, consider adding a pocket for utensils on the outside of the carrier. By sewing an extra flap of fabric onto the side during the assembly phase of the Cozy Casserole Tutorial – Pattern, you create a convenient spot to tuck in a serving spoon or a set of salad tongs. This keeps everything organized in one place.
You can also experiment with different fastening methods in your version of the Cozy Casserole Tutorial – Pattern. While many patterns rely on the handles to keep the dish secure, you can add hook-and-loop fasteners (Velcro) or large decorative buttons to ensure the cozy stays shut during transport. This adds an extra layer of security when traveling over bumpy roads.
Finally, don’t forget that this Cozy Casserole Tutorial – Pattern can be reversible! By choosing two coordinating fabrics that you love equally, you can flip the cozy inside out whenever you want a fresh look. It’s like getting two handmade accessories in one, and it’s a great way to use up different pieces from your fabric stash.
4 Care and Maintenance of Your Finished Pattern Project
Once you have completed your Cozy Casserole Tutorial – Pattern, you want to make sure it lasts for years to come. Since it will be used around food, spills are inevitable. Because we used 100% cotton materials, your cozy is completely machine washable. I recommend a cold, gentle cycle to preserve the vibrancy of the fabric colors.
Drying your cozy requires a bit of care. While you can put it in the dryer on a low heat setting, air drying is often better for the Insul-Bright lining. The high heat of a commercial dryer can sometimes crinkle the metallic layer excessively. Laying it flat to dry helps the Cozy Casserole Tutorial – Pattern maintain its original shape and crispness.
If your carrier gets a stubborn stain from a stray drop of tomato sauce, treat it immediately with a gentle stain remover. Avoid using bleach, as it can weaken the cotton fibers and cause the colors to fade prematurely. Keeping your handmade cozy clean ensures it remains a hygienic and attractive part of your kitchen collection.
Over time, the quilting stitches might experience some wear, especially if you use the carrier frequently. It’s a good idea to inspect your Cozy Casserole Tutorial – Pattern every few months for any loose threads. A quick “surgical” stitch with your sewing machine can fix a loose handle or a frayed edge, extending the life of your quilted project significantly.
When not in use, these cozies are incredibly easy to store. Unlike bulky plastic carriers, a fabric casserole cozy can be folded flat or rolled up, taking up minimal space in your kitchen drawers. This space-saving quality is one of the main reasons why this specific Cozy Casserole Tutorial – Pattern is so popular among home cooks and crafters alike.
Sharing your work is the final step in the journey! Once you’ve mastered the Cozy Casserole Tutorial – Pattern, you can teach others or even start a small business selling these at local craft fairs. A handmade casserole carrier is a high-value item because people recognize the work that goes into the quilting and the practical benefits of the insulated design.
FAQ – Frequently Asked Questions
Can I use polyester batting for this project?
It is highly discouraged. For any Cozy Casserole Tutorial – Pattern, you should use cotton batting. Polyester can melt or singe when it comes into contact with high heat, which can ruin your dish and potentially cause a fire.
Is Insul-Bright microwave safe?
No, Insul-Bright contains a metallic film and should never be placed in the microwave. If you want a cozy specifically for the microwave (like a bowl cozy), you must use 100% cotton thread, fabric, and batting without any metallic components.
What size dish does this pattern fit?
The standard Cozy Casserole Tutorial – Pattern is designed for a 9×13 inch (approx. 23×33 cm) baking dish. However, the instructions provided in this article explain how to measure and adjust the size for any custom cookware you own.
Can I wash my casserole cozy in the machine?
Yes, as long as you used pre-washed cotton fabrics and followed the material guidelines. Use a gentle cycle with cold water and air dry for the best results to keep the quilted structure intact.
Do I need a walking foot to sew this?
While not strictly necessary, a walking foot is extremely helpful. Since the Cozy Casserole Tutorial – Pattern involves sewing through multiple thick layers (fabric, batting, and lining), a walking foot helps feed all layers through the machine evenly.
How long does it take to make one?
For an intermediate sewist, completing the Cozy Casserole Tutorial – Pattern usually takes about 2 to 3 hours, including cutting and quilting. It is a fantastic weekend project that yields immediate, practical results.
Conclusion
Creating a project from this Cozy Casserole Tutorial – Pattern is a rewarding experience that combines the best of sewing craftsmanship with everyday kitchen utility. We’ve covered everything from the vital importance of using 100% cotton materials to the technical steps of boxing corners and adding reinforced handles.
By following these steps, you now have a durable, stylish, and highly functional insulated carrier that will protect your hands and keep your favorite meals warm during transport. This project is a testament to how a little bit of fabric and some thoughtful quilting can solve a common household problem with elegance.