If you’re a vendor at craft shows, you know how important it is to have the right gear to make your experience both comfortable and professional. One essential piece of attire that many vendors overlook is the craft show vendor apron – pattern. A well-designed apron not only provides you with storage for tools, cash, or promotional materials, but it also gives your setup a polished look. Whether you’re selling jewelry, handmade goods, or baked treats, an apron will help you stay organized and stylish throughout the event.
Craft show vendor aprons can be customized to meet your specific needs. From simple, functional designs to more elaborate versions featuring decorative elements, there’s a style for every type of vendor. The beauty of making your own craft show vendor apron – pattern is that it can be tailored to your preferences. Whether you’re looking for multiple pockets for organization, adjustable straps for comfort, or a color scheme to match your brand, you can make it exactly how you want it.
In this article, we will guide you step by step through creating a craft show vendor apron – pattern, including the materials you’ll need, detailed instructions, and tips for customization. With a few basic tools and your creativity, you can craft an apron that not only helps you stay organized but also enhances your professional appearance at craft shows.
1. Materials Needed for Craft Show Vendor Apron
Before you begin making your craft show vendor apron – pattern, you’ll need to gather a few essential materials. The beauty of this project is that the materials are simple and affordable, and most can be easily found at your local fabric store or online.
First, you’ll need fabric. Since this apron will be worn during a busy event, choose a durable material that can withstand wear and tear. Canvas or denim are both excellent choices for durability, while still maintaining a lightweight feel. You can choose solid colors, patterns, or even use fabric that matches your brand’s aesthetic. If you plan to add embellishments like patches or embroidery, make sure the fabric is suitable for these additions.
Next, you’ll need bias tape or ribbon for the apron straps. Cotton webbing is another great option for straps if you want something sturdy and easy to adjust. Depending on your design, you’ll also need buttons, velcro, or snaps for fastening any pockets or adjustable features.
For the pockets, you can use additional fabric for a contrasting look or a felt material if you prefer a soft texture. Sewing machine thread that matches your fabric color is essential, and don’t forget pins for holding everything in place while you sew.
Lastly, if you’re adding any decorative elements, like embroidery or patches, make sure to have your embroidery thread and needles ready.
2. Step-by-Step Instructions for Craft Show Vendor Apron
Now that you have your materials ready, let’s walk through how to create your very own craft show vendor apron – pattern. This project is simple to follow and can be completed in just a few hours, depending on your sewing skills.
Step 1: Measure and Cut Your Fabric
Start by measuring your body to ensure a comfortable fit for your apron. The typical apron size is about 24-30 inches wide and 30-36 inches long, but you can adjust these measurements based on your preference. Cut two pieces of fabric for the main body of the apron, ensuring they are the same size.
For the straps, cut two long pieces of fabric or cotton webbing, each about 40 inches in length. This will allow enough length for the apron to comfortably fit over your neck and tie around your waist.
Step 2: Sew the Main Pieces Together
Place the two pieces of fabric together with the right sides facing each other. Pin the edges, then sew along both sides and the bottom of the apron. Leave the top open so you can add the straps later. Make sure to backstitch at the beginning and end of your seams to secure them.
Step 3: Add the Pockets
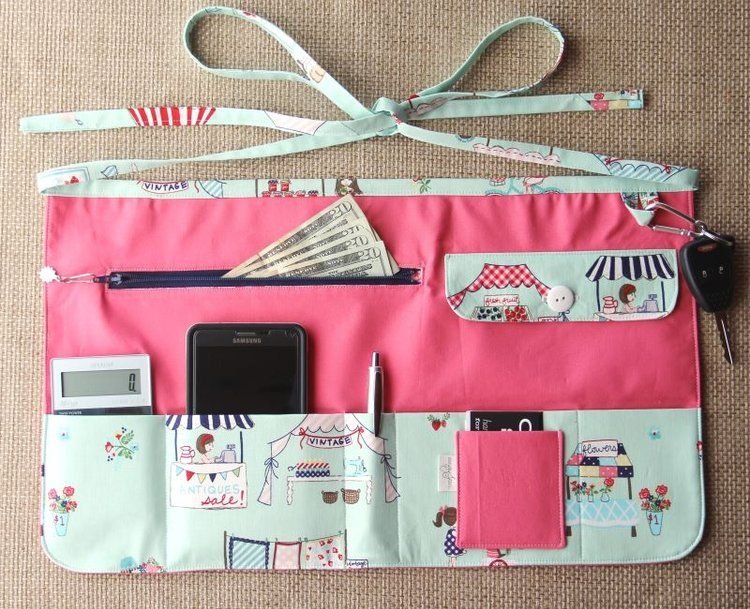
Decide where you want to place your pockets and cut additional pieces of fabric for them. The number and size of pockets depend on what you plan to carry in them. Common options include one large pocket for bills or promotional materials and several smaller pockets for pens, scissors, or other tools.
Pin the pockets to the front of the apron and sew along the edges, leaving the top open for easy access. For added strength, you can reinforce the seams by sewing a second line of stitches.
Step 4: Attach the Straps
Now it’s time to add the straps. Fold the top edge of the apron over about an inch and press it flat. This will create a channel for your neck strap. Insert the strap into the channel and sew it in place, making sure it’s secure.
Next, attach the waist straps. Pin each strap to the sides of the apron, ensuring they are evenly spaced and the same length. Sew these in place, then adjust the straps for comfort.
Step 5: Add Finishing Touches
To give your apron a finished look, you can add any additional details. For example, you can sew decorative stitching along the edges, add a small patch with your brand logo, or embellish the pockets with embroidery. If you’re using bias tape around the edges, now is the time to attach it for a clean, professional finish.
Step 6: Final Adjustments
Once all the pieces are sewn together, try on the apron and make any necessary adjustments. If the straps are too long or too short, simply trim them to the correct size. You can also adjust the pocket positions if they don’t feel quite right.
3. Customization Ideas for Your Craft Show Vendor Apron
One of the best things about making your own craft show vendor apron – pattern is the ability to customize it to suit your style. Here are some creative ideas to make your apron stand out:
1. Add Embroidery or Patches
Customize your apron by adding your name, business logo, or a fun Halloween motif. You can use embroidery thread to stitch your logo or name across the top of the apron. Iron-on patches are another quick and easy way to add personalized touches to your apron.
2. Use Fun Fabric Patterns
While solid-colored fabrics are classic and professional, you can also experiment with fun prints. For example, a floral fabric could be a great choice if you’re selling handmade jewelry, while a vintage-inspired print could be a perfect match for a craft fair booth selling retro items.
3. Create Custom Pockets
The pockets are a great place to get creative. You could make them in various sizes, or even add zippered pockets for added security. For a fun touch, try adding contrasting fabrics for the pockets, or use denim and canvas for a more rustic look.
4. Add Decorative Lace or Ribbons
For a more feminine look, consider adding lace trim or ribbons along the edges of the apron. This can give your apron a softer, more whimsical appearance, perfect for handmade crafts or vintage-style items.
5. Use Leather or Faux Leather Details
For a more upscale, professional look, add small leather accents, like leather straps or a leather pocket. This can give your apron a unique, high-end feel that’s perfect for a premium craft booth.
6. Adjustable Waist Straps
If you want your apron to be more versatile, add adjustable waist straps that can be tied in various ways. This allows for more comfort and ensures the apron fits anyone who might be wearing it.
4. Troubleshooting and Tips for Craft Show Vendor Apron
Even though making a craft show vendor apron – pattern is a fun and simple project, there may be some challenges along the way. Here are a few troubleshooting tips to make sure your apron turns out perfectly:
1. If the fabric is too thick to sew through
If you’re using heavy fabric like denim, make sure to use a denim needle for your sewing machine. This needle is specifically designed to handle thick fabrics without breaking or causing problems.
2. Uneven stitching on the pockets
If your stitching is uneven, try using a walking foot for your sewing machine. This foot helps ensure that both layers of fabric feed through evenly, preventing puckering and uneven seams.
3. Straps not fitting comfortably
Before cutting your straps to size, try the apron on to see how long the straps should be. You can always trim excess length, but you can’t add it back once it’s cut, so it’s better to measure twice before cutting.
4. Decorative elements not staying in place
If your decorative stitching or patches aren’t staying put, use fabric glue or a stronger adhesive for better hold. Just be careful not to use too much glue, as it can create a messy appearance.
FAQ – Craft Show Vendor Apron
1. What fabrics are best for a craft show vendor apron?
Durable fabrics such as canvas, denim, and cotton are ideal for aprons. They are strong enough to withstand wear and tear while still being breathable and comfortable to wear for long periods.
2. How do I make my apron more professional-looking?
To make your apron look more polished, consider adding bias tape around the edges, using high-quality fabrics, and incorporating your business logo or branding elements like embroidery or patches.
3. Can I adjust the size of the apron?
Yes! The great thing about making your own apron is that you can customize the size to fit your body. Measure your waist, neck, and the length you prefer, and adjust the pattern accordingly.
4. What kind of pockets should I add?
The type and size of pockets depend on what you need to carry. Large pockets for promotional material, small ones for pens and cash, or even zippered pockets for extra security are all great options.
5. How can I make the straps adjustable?
You can create adjustable straps by using buckles, velcro, or snap buttons. This allows the apron to be versatile and comfortable for different body types.
Conclusion
Creating your own craft show vendor apron – pattern is a great way to ensure you’re both organized and stylish at your next craft fair. By choosing the right fabric, customizing the design, and following the simple steps outlined in this guide, you’ll have an apron that not only fits your needs but also enhances your professional appearance.
Whether you’re a seasoned vendor or just starting out, a well-made apron can make all the difference.Feel free to share your thoughts, suggestions, and experiences with us! We’d love to hear how your craft show vendor apron – pattern turned out.