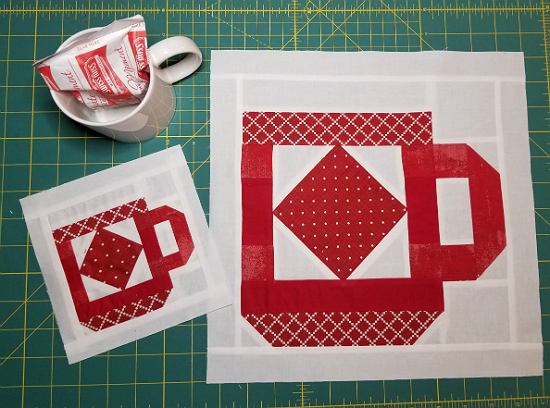
Cup of Cheer block pattern is a beloved design motif cherished by quilters and textile artists around the world. Whether rendered in fabric, knit, or paper–pieced quilting, this pattern evokes warmth, community, and festive delight. In this article, you will discover everything about the Cup of Cheer block pattern: its history, construction, design variations, and how to use it to enrich your quilting oeuvre or craft project with joyful flair.
If you’re new to quilting, the Cup of Cheer block pattern may seem intricate, but it’s surprisingly accessible for intermediate users, and its charm pays off richly in the finished work. The term “cup of cheer” suggests not only a literal cup—often depicted as a tea or coffee cup—but also a metaphorical dose of warmth, companionship, and shared happiness. The block pattern typically involves curved seams, appliqué shapes, or pieced arcs that form the cup’s shape, often paired with decorative motifs like steam, hearts, or swirls.
Using the Cup of Cheer block pattern in your artistry communicates a theme of comfort, festivity, and welcome. It can be incorporated into holiday quilts, wall hangings, table runners, or even apparel patches. Throughout this article, you will learn the origins of the pattern, how to draft and sew it, how to select fabrics, tips for sewing curves, and how to finish the piece beautifully. You’ll also find an FAQ and a conclusion summarizing what’s important, with an invitation for your honest opinion and suggestions.
1. History and Origins of the Cup of Cheer Block Pattern
The Cup of Cheer block pattern has roots in traditional quilting, where motifs representing everyday objects provided both visual interest and narrative. Quilters often used kitchen- or home-themed motifs—like cups, kettles, bowls—to symbolize domestic comfort and hospitality. The cup motif itself likely evolved from appliqué traditions, where curved shapes are cut and sewn onto a background.
During the 19th and early 20th centuries, many quilting designs were named for common household objects. While there is scant documentation of exactly when “Cup of Cheer” first became formalized as a block name, oral tradition and patterns shared through quilting guilds suggest the design was in use by mid‑20th century. It likely gained popularity in holiday quilting, particularly Christmas and winter-themed works, given its festive name and the imagery of warmth.
Over time, pattern authors adapted the Cup of Cheer block pattern to modern fabric styles, adding decorative embellishments, modifying the cup silhouette, and incorporating modern quilting techniques like improv or foundation paper piecing. Today, quilters may choose to interpret the pattern with minimalist lines or with elaborate detail, including layering, appliqué, or even embroidery.
The origins also connect to social quilting. Block exchanges and quilt-alongs often feature thematic blocks: cheer, joy, warmth. Because the Cup of Cheer block pattern embodies those sentiments, it’s a frequent choice for communal quilting projects. Sharing the pattern encourages collaboration, variation, and unique interpretations, all within a shared design framework.
Recognition of the pattern in online communities—Instagram, pattern stores, quilting blogs—has increased its visibility. Designers now create PDF patterns, video tutorials, and fabric collections specifically to match or highlight the Cup of Cheer block pattern. This modern dissemination has made the pattern accessible to quilters beyond traditional guilds and heritage circles.
Understanding this history is more than academic: it helps you appreciate design choices, fabric selection, and how to adapt the pattern to your style. Knowing the roots of the Cup of Cheer block pattern gives you insight into the symbolism of warmth, domesticity, and celebration that it carries.
2. How to Draft and Piece the Cup of Cheer Block Pattern
Drafting the Cup of Cheer block pattern begins with choosing the basic block size—commonly 12″, 9″, or even 6″ per block depending on project scale. Begin by sketching the shape of the cup: body, handle, and optional saucer or steam. Decide if the cup will be pieced or appliquéd. If appliqué, curves should be smoothed for easy sewing by hand or machine.
If piecing curved shapes, use techniques like the “pieced curve” or the “drunkard’s path” set of patches. You can draft complementary arcs to form the curves of the cup’s rim or handle. Use templates, paper piecing, or folding methods to get precise curves. Seam allowances must be consistent—usually ¼‑inch in American quilting tradition—for consistent block alignment.
Select background shapes: often, these are square or rectangle patches surrounding the cup motif. You may include alternating blocks or “filler blocks” between Cup of Cheer blocks for visual breathing space. If using sashings or borders, plan these into the draft stage to ensure symmetry and cohesion across multiple blocks.
Test your draft by making a sample block. That allows checking scale, alignment of curves, and fabric contrast. It’s easier to adjust your draft at this stage than after cutting many blocks. For appliqué versions, test how the fabric handles edges and whether you prefer fusible, needle‑turn, or freezer paper methods.
When piecing, press seams carefully, clip curves, and use pins or small seam clips. Curve accuracy is essential: mis‑aligned curves in one block will be noticeable when many blocks are assembled. Match seams and curves to save on later trimming during quilting.
Finally, once the block is pieced or appliquéd correctly, square up the block—the process of trimming it to its intended size. This ensures consistency across your quilt, and that the Cup of Cheer block pattern elements align neatly in the finished top.
3. Fabric Choices, Color Schemes, and Design Variations
Fabric choice plays a pivotal role in how the Cup of Cheer block pattern will look and feel. Cotton quilting fabrics are a natural choice—they press well and hold shape. For appliqué or curves, fabric with medium weight and stable weave helps maintain crisp edges. Novelty prints (coffee beans, teacups, florals) can add personality to the cup portion.
Color schemes may reflect seasons: warm tones (reds, golds, browns) for autumn and winter; pastels or cool hues (pinks, light blues, mint) for spring or summer interpretations. Contrast between the cup and background is crucial. A low‑value background helps the cup image stand out; conversely, a busy background may require a more solid or muted cup.
Design variations include adding decorative motifs such as steam tendrils, hearts, lace trims, buttons or appliquéd details. Another variation is to use foundation paper piecing for precise curves, or reverse appliqué for a more textured, layered effect. For a minimalist modern look, the cup shape might be abstracted into clean lines or negative space.
Alternatively, you could vary the scale: large cup blocks as focal points, smaller ones interspersed or used as border blocks. You might combine the Cup of Cheer block pattern with other block patterns—e.g., alternating with plain squares, stars, or sampler blocks—to add diversity to the quilt layout.
Innovative fabric placement—ombre shades, directional prints (grain or stripe), or chambray/denim for a rustic twist—can dramatically affect the pattern’s impact. The key is to balance complexity with visual harmony so that the motif retains its charm without becoming overwhelming.
4. Sewing Tips, Quilting, and Finishing Techniques
To sew the Cup of Cheer block pattern well, begin with accurate cutting. Use high‑quality rotary cutters, sharp blades, stable rulers. For curves, you may choose pre‑printed templates or create your own. Cutting extra margin when working with curved pieces helps avoid shortages after trimming.
When stitching curved seams, go slowly. Use plenty of pins or clips. If the curve is very tight, clip notches into seam allowances (but not through the stitching line). Press curves carefully: press toward the cup’s body or handle depending on design, and avoid stretching background fabric. Steam or finger pressing can help maintain shape.
For appliqué methods, fusible or needle‑turn appliqué each has pros and cons. Fusible is faster and helps stabilize fabric, but raw edges may need finishing to prevent fraying. Needle‑turn is traditional, produces smoother edges, works well for heirloom pieces. Edge‑stitching or blanket stitch can embellish appliqué.
Quilting the finished top brings out texture and visual depth. Straight‑line quilting in the background can make the Cup of Cheer block pattern motif pop. Quilting around the cup shape enhances definition. Free motion quilting in the cup (for example, steam lines, swirling motifs) can add charm. Use batting appropriate for the quilt’s use—warmth, loft, or washability.
For finishing, bind with a complementary color that echoes motifs in the cup or background. Labels, hanging sleeves, or decorative cornerstones may provide polish. Washing and blocking gently after quilting helps settle seams and shape. Proper stitching and finishing ensure the Cup of Cheer block pattern project lasts for years.
Frequently checking measurements, staying consistent with seam allowances, and practicing curved piecing will increase both your confidence and skill. And most importantly, enjoy the process: the joyful warmth behind the pattern shows in the finished piece.
FAQ
What is the Cup of Cheer block pattern exactly?
The Cup of Cheer block pattern is a quilting or appliqué design featuring a cup-shaped motif—often with handle, rim, sometimes saucer or steam—set within a block suitable for quilts, wall hangings, or cushions. It incorporates curves and requires either curved piecing or appliqué.
Is the Cup of Cheer block pattern good for beginners?
It is more suited to quilters with some experience in curved seams or appliqué. Beginners are encouraged to try a simplified version—perhaps appliqué instead of pieced curves—or use larger block sizes to reduce difficulty.
What block size works best?
Common sizes are 12‑inch, 9‑inch, or 6‑inch finished blocks. Larger blocks give more room for detail and ease with curves, while smaller blocks allow more repetition but require more precision.
Which fabrics are ideal for this pattern?
Cottons with stable weave, medium weight. Novelty prints or solids for the cup motif, neutral or low‑value backgrounds. Choose fabrics with good contrast so the motif stands out. Avoid slippery fabrics if you’re doing curved piecing.
What are good techniques for sewing curves?
Use plenty of pins or small clips. Stitch slowly. Clip or notch the seam allowance on tight curves (avoiding the stitch line). Press gently. Consider making a mock‑up first. Use templates or paper piecing if needed.
Can this pattern be adapted for modern quilts or mixed styles?
Yes. You can abstract the cup shape, use negative space, mix the block with minimalist squares or modern patterns. Alter color palette for modern aesthetic. Use unusual fabrics like chambray or denim for rustic modern styles.
Can I wash and use a quilt made from the Cup of Cheer block pattern frequently?
Absolutely, if you choose washable cottons, pre‑wash fabrics, use stable batting, and employ good finishing techniques (secure binding, edges). Machine wash on gentle cycle; block after washing to maintain shape.
Conclusion
In summary, the Cup of Cheer block pattern is a versatile, heartwarming design that conveys festivity, warmth, and home. We examined its history, how to draft and piece it, fabric choices and design variations, and essential sewing, quilting, and finishing techniques. Whether you are crafting your first version or aiming to perfect your curves and aesthetics, this pattern offers both challenge and satisfaction.
Please leave your honest opinion: What did you find most helpful? Are there topics you’d like expanded—such as templates, video tutorials, or fabric recommendations? Suggestions are welcome.