If you’re looking for a creative, adorable sewing project, this DIY FABRIC WHALE – PATTERN is the perfect choice. Handmade toys are not only rewarding to create, but they also make heartfelt gifts, fun decor items, or treasured keepsakes. Whales are especially loved for their soft, rounded shape and whimsical charm, making them ideal for beginners and experienced sewists alike.
In this article, you’ll learn how to sew your very own fabric whale using a simple, step-by-step approach. Whether you’re sewing for a nursery, classroom, or simply for fun, this DIY FABRIC WHALE – PATTERN guide will walk you through the entire process—from gathering materials to stitching and stuffing your whale.
Crafting your own whale allows you to personalize every detail, from the fabric choices to the size and embellishments. This is more than just a sewing project—it’s a chance to bring a little creature to life with your hands, creativity, and love. Let’s dive in and create something magical!
1. Gathering Materials for Your Fabric Whale Project
Before you start sewing your DIY FABRIC WHALE – PATTERN, you’ll want to gather all your materials in one place. Preparing ahead of time makes the process much smoother and ensures you don’t run into any delays.
The most important material is, of course, the fabric. Cotton or soft flannel works beautifully for plush whales. Choose solid colors or fun prints depending on the look you want. If it’s for a baby, opt for organic or hypoallergenic fabric options.
You’ll also need stuffing material. Polyester fiberfill is the most common and easily available option, but you could also use recycled fabric scraps if you want an eco-friendly approach. Make sure the stuffing is soft and washable if the toy is for a child.
Other essential supplies include scissors, sewing pins or clips, a fabric marker, a hand sewing needle, and a sewing machine (although the project can also be done entirely by hand). You’ll also need matching thread for a neat finish.
Safety eyes or felt pieces can be used for the whale’s eyes. If you’re making the whale for a young child or baby, it’s best to embroider the eyes or use felt rather than plastic parts, which could pose a choking hazard.
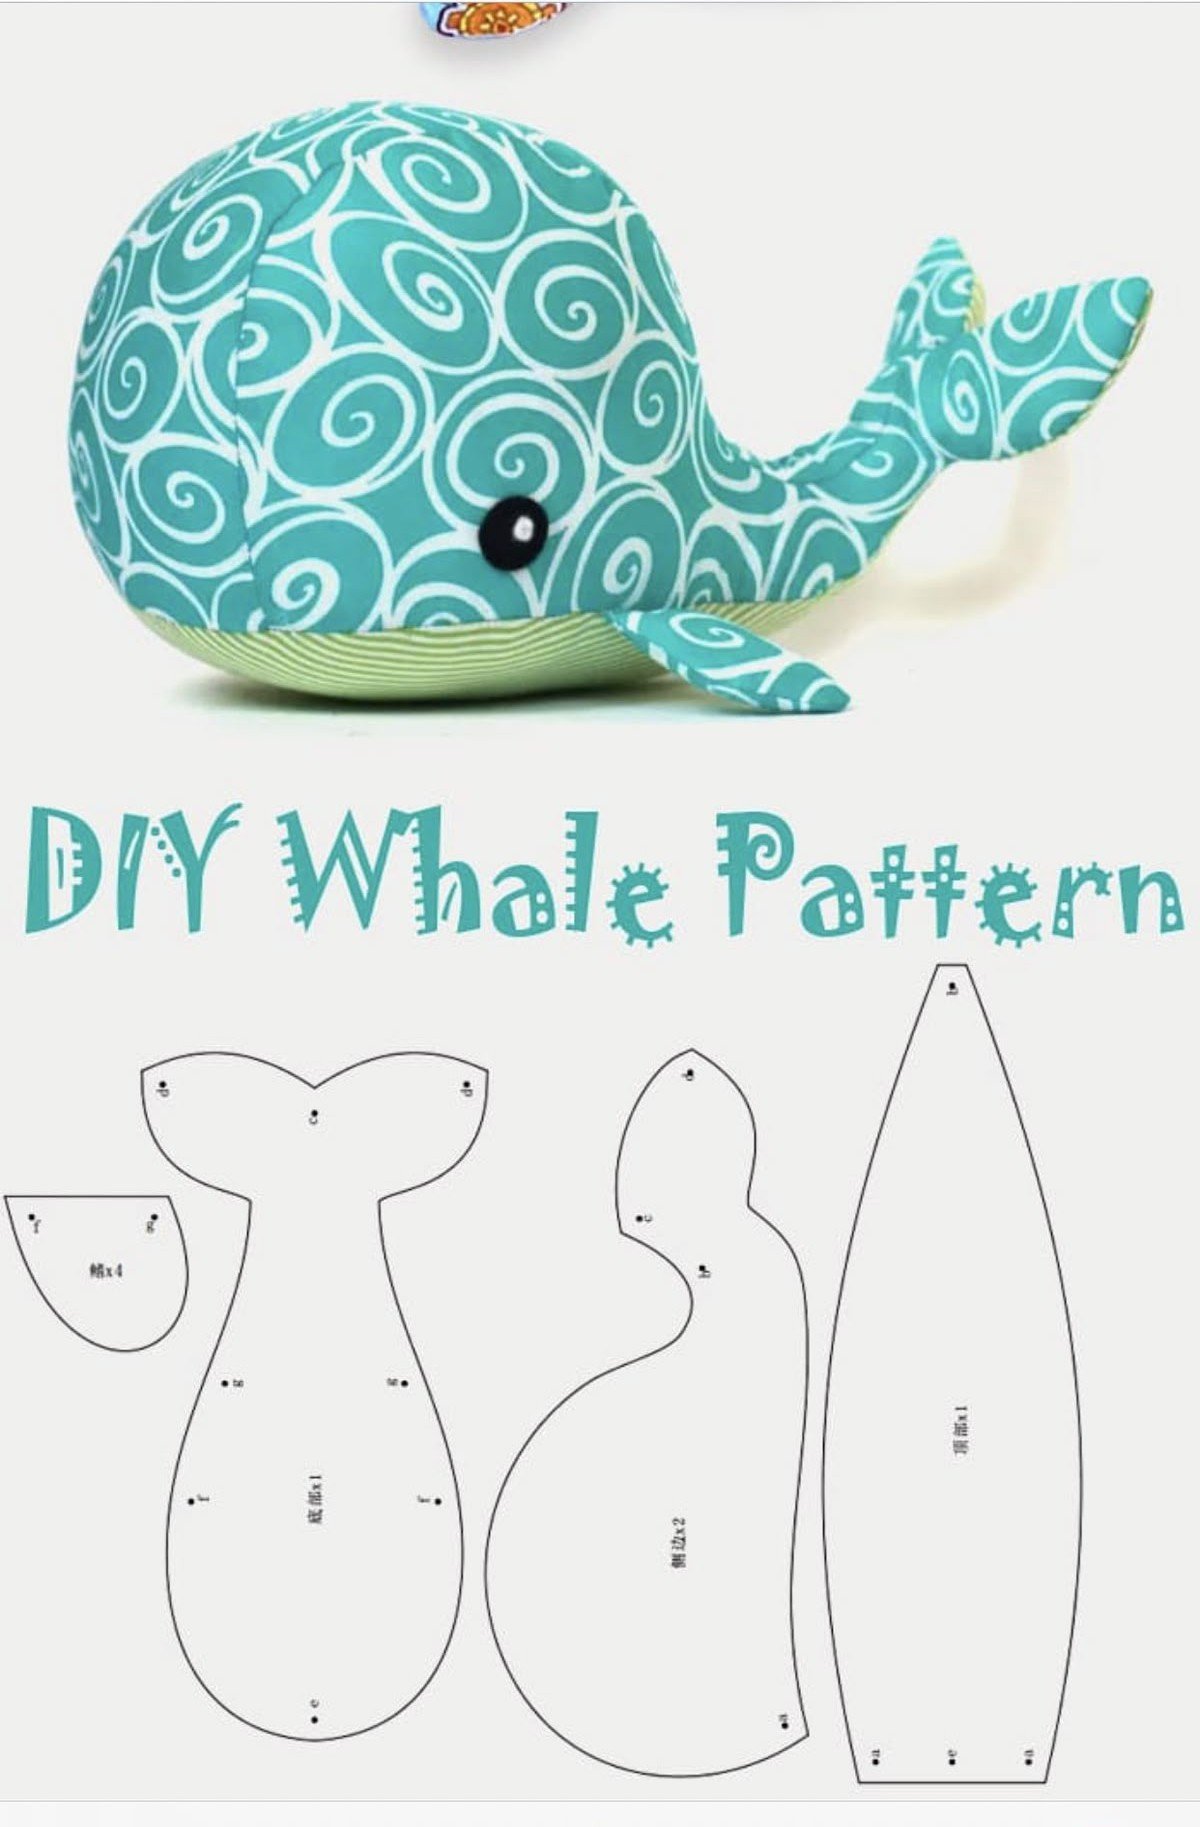
Finally, you’ll need the actual DIY FABRIC WHALE – PATTERN. You can draw one yourself or download a printable whale pattern online. Make sure it includes the main body, fins, and tail. Trace and cut your paper pattern pieces so they’re ready to use.
2. Cutting and Preparing Your Fabric Pieces
Once you’ve collected your materials, the next step in this DIY FABRIC WHALE – PATTERN project is cutting and prepping your fabric. This stage lays the foundation for clean, professional-looking results.
Begin by laying your fabric flat and ironing it if needed to remove any wrinkles. Smooth, crease-free fabric ensures accuracy when tracing your pattern pieces and cutting your shapes.
Place the paper whale pattern pieces on the fabric and secure them using pins or fabric clips. Use a fabric marker to carefully trace around each shape, making sure to mark any special notches or alignment points noted in the pattern.
Cut your fabric pieces precisely along the traced lines. For a standard plush whale, you’ll usually need two mirrored body pieces, a pair of side fins, and one or two tail pieces. If your fabric has a right side and a wrong side, make sure to flip the pattern for mirrored parts.
If you’re adding details like appliqué spots, a belly panel, or decorative stitching, cut those now as well. It’s easier to attach these elements before the main pieces are sewn together.
At this stage, you may also want to reinforce areas that will be under stress—like where the fins attach—by adding a small piece of interfacing. This helps your fabric whale hold up better with time and use.
Once all your pieces are cut and ready, organize them on a table in sewing order. Double-check that you have everything you need before you begin assembling your whale.
3. Assembling and Sewing Your Fabric Whale
Now comes the fun part: putting your DIY FABRIC WHALE – PATTERN together! This is where your whale begins to take shape, and it’s incredibly satisfying to see the project come to life.
Start by sewing on any embellishments or decorative elements to the body pieces. This could include embroidered eyes, stitched-on cheeks, or felt cutouts. It’s easier to do this now than after the whale is stuffed.
Next, sew the fins. Place each fin’s two fabric pieces right sides together, sew around the edge leaving the top open, and then turn them right side out. You can lightly stuff them for a puffy look or leave them flat—it’s up to you.
With the body pieces right sides together, pin or clip the fins in place between the layers so they’ll be caught in the seam. Leave the tail area and a small section of the belly open for stuffing.
Sew carefully around the body, making sure to backstitch at the beginning and end. Use a ¼ inch seam allowance or whatever your pattern recommends. Go slowly around curves for smoother seams.
After sewing, trim any excess seam allowance and clip the curves to help the whale turn smoothly. Turn the whale right side out and gently push out the edges with a blunt tool like a chopstick.
Stuff the whale firmly but not overly tight. Start with the tail and work your way toward the body, adjusting the fill to your desired firmness. Once stuffed, hand-stitch the opening closed using an invisible ladder stitch.
4. Personalizing, Styling, and Displaying Your Whale
Once your fabric whale is complete, it’s time to give it those final personal touches that make it truly yours. One of the joys of the DIY FABRIC WHALE – PATTERN is that it can be as unique as the person who makes it.
Consider adding a cute name tag or ribbon bow around the neck for extra charm. Some crafters even embroider a name or date onto the whale to mark a special occasion like a birth or birthday.
You can create themed whales to match a nursery, classroom, or seasonal decor. For instance, soft blue and white fabrics for an ocean theme or red, green, and gold for a holiday version.
Try using textured fabrics like fleece, minky, or corduroy for added tactile interest. Just be sure the fabric is safe and durable if the whale will be handled by children.
If you’re gifting the whale, package it beautifully. Wrap it in tissue paper and place it in a decorative box or reusable fabric bag. Adding a handwritten note adds a thoughtful, personal touch.
Your handmade whale can be used as a toy, a cushion, a pet plushie, or even a quirky decorative item on a shelf or bed. Its uses are as wide as your imagination.
Crafting a whale from fabric is not only enjoyable—it also allows you to create a lasting item that tells a story, one stitch at a time.
FAQ – Frequently Asked Questions
Q1: Is this DIY fabric whale suitable for beginners?
Yes! This DIY FABRIC WHALE – PATTERN is perfect for beginners. With a simple pattern and basic sewing techniques, it’s a great project to practice stitching, cutting, and fabric work.
Q2: How much fabric do I need for one whale?
For a small whale (around 10 inches long), 1/4 yard of fabric is usually enough. If you’re making a larger whale or want contrasting fins and tail, consider getting 1/2 yard of each fabric.
Q3: Can I sew the fabric whale entirely by hand?
Absolutely. While a sewing machine speeds up the process, hand-sewing is completely possible and allows for more control around curves.
Q4: Is this whale safe for babies?
Yes, as long as you use baby-safe materials. Avoid buttons or plastic eyes—embroider or sew felt pieces instead. Use hypoallergenic stuffing and pre-wash your fabric.
Q5: Can I wash the finished whale?
Yes. If you’ve used machine-washable fabric and stuffing, your fabric whale can be washed gently in cold water. Air-dry it to preserve its shape.
Q6: Where can I find a good whale pattern?
You can find free and paid DIY FABRIC WHALE – PATTERN downloads on craft blogs, Etsy, or sewing forums. Choose one with clear instructions and full-size printable templates.
Conclusion
Making your own plush toy is a heartwarming and fulfilling project, and this guide has shown you how to create your very own DIY FABRIC WHALE – PATTERN from start to finish. From selecting the perfect fabric to sewing, stuffing, and customizing your whale, each step is a joyful part of the journey.
Whether you’re making this for yourself, a child, or as a thoughtful gift, your handmade whale will be filled with charm, creativity, and care. And the best part? Every stitch is yours.
If this tutorial helped you create a whale you love, we’d appreciate a sincere opinion in the comments below. Share your experience, show us your results, or let us know what patterns you’d like to see next!
Happy sewing!