There’s something incredibly satisfying about creating something beautiful and practical with your own hands. The DIY Patchwork Backpack – Pattern is a perfect example of this kind of handmade joy.
It allows you to combine functionality with artistic expression, and the final product is a sturdy, eye-catching bag you’ll be proud to carry or gift.
Patchwork projects are all about combining fabric scraps, colors, textures, and patterns in a way that reflects your style. With a DIY Patchwork Backpack – Pattern, you can repurpose old clothes, upcycle textile scraps, and make a unique item that’s not only environmentally conscious but also fashion-forward.
In this article, we’ll walk you through the reasons why making your own patchwork backpack is a great idea, what materials you’ll need, how to follow a pattern step by step, and creative ideas to customize it. At the end, we’ll answer common questions in the FAQ and wrap up with a friendly conclusion that invites your feedback.
1. Why Choose a DIY Patchwork Backpack – Pattern?
Creating a DIY Patchwork Backpack – Pattern lets you design something that’s both artistic and practical. You’re not just making a bag; you’re telling a story with fabric. Each piece of material you choose adds character and charm to your finished backpack.
Unlike store-bought bags, your DIY backpack is 100% unique. No one else will have the same mix of patterns, colors, and details. It becomes a wearable piece of art, and that’s part of the magic that makes patchwork so rewarding.
Sustainability is another big reason to try this project. If you have fabric scraps, old jeans, or leftover quilting materials, this is a fantastic way to give them new life. It’s a responsible and eco-friendly way to make something useful from what you already have.
Using a DIY Patchwork Backpack – Pattern also saves money. Designer patchwork bags can be expensive, but with a pattern, some thread, and creativity, you can create your own version for a fraction of the cost.
This kind of project is great for beginner and intermediate sewists. You don’t need a high-end sewing machine or complicated tools. As long as you can sew straight seams and follow simple pattern instructions, you’re good to go.
Finally, there’s the satisfaction that comes with making something yourself. Every stitch becomes part of a labor of love. Whether you’re crafting a gift or making something functional for your daily use, the process is deeply fulfilling.
2. Materials You’ll Need for a DIY Patchwork Backpack
Starting your DIY Patchwork Backpack – Pattern project requires just a few key materials, many of which you might already have at home. This is part of what makes patchwork so approachable and fun.
First, gather your fabric. You’ll need a mix of cotton prints, denim, canvas, or even upholstery fabric for extra durability. Make sure your scraps are clean and pressed before cutting. It’s a great opportunity to mix florals, solids, stripes, and even novelty prints.
You’ll also need interfacing or fusible fleece. This adds structure to the backpack and ensures it holds its shape. Choose a weight that suits your fabric—heavier interfacing for softer cotton, and lighter for thicker fabrics.
A sturdy lining fabric is essential. Quilting cotton or twill makes a great lining and adds another layer of durability. You’ll want to choose a color that either complements or contrasts with your outer patchwork design.
Hardware is also important. Most DIY Patchwork Backpack – Patterns include instructions for zippers, D-rings, adjustable sliders, and strap webbing. These items ensure your backpack is functional and long-lasting. Be sure to follow the pattern’s suggested sizes.
You’ll need basic sewing tools: a machine, scissors or rotary cutter, ruler, pins or clips, and a fabric marking tool. A walking foot for your sewing machine can be helpful when sewing through thick layers.
Finally, make sure you have your DIY Patchwork Backpack – Pattern printed and ready to go. You can find free versions online or purchase digital patterns from creators on Etsy or crafting blogs. Always choose one with clear instructions and step-by-step images.
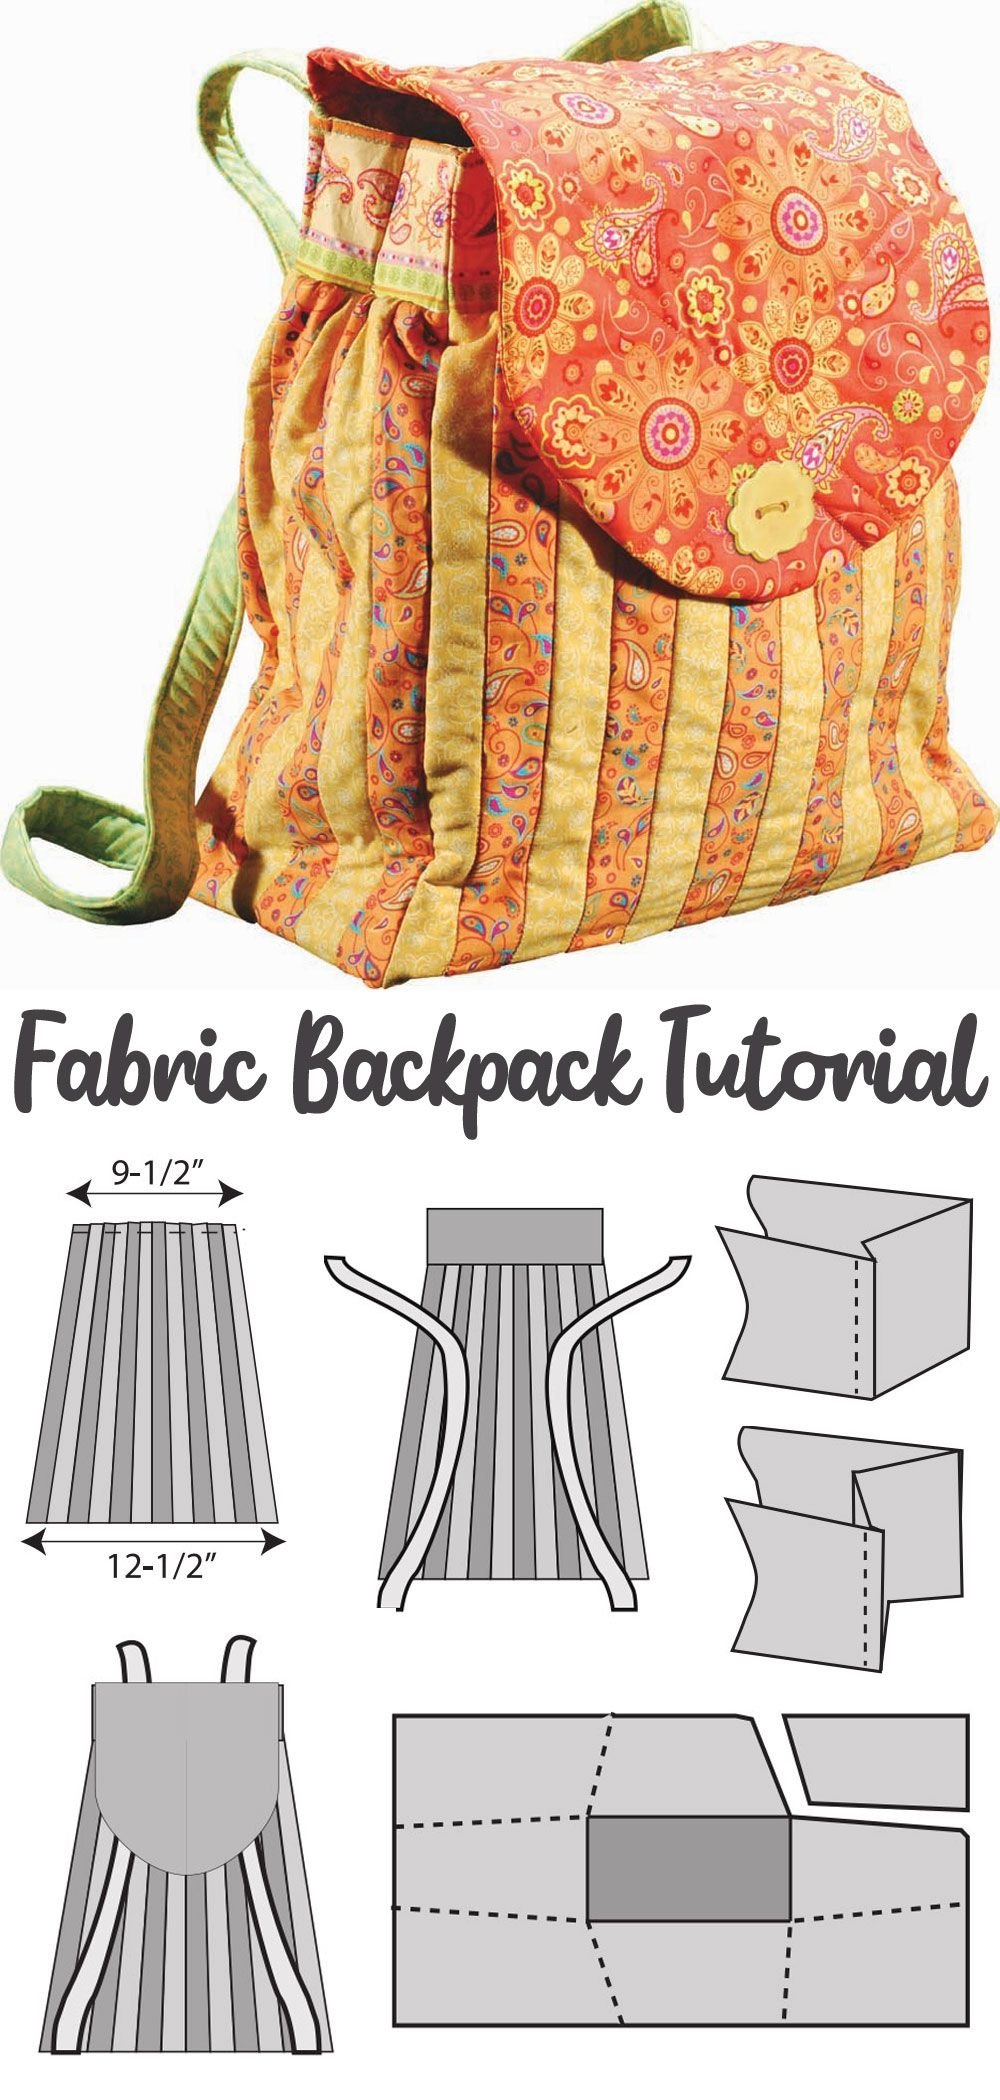
3. How to Sew Your Patchwork Backpack Step-by-Step
Once you’ve gathered all your materials, it’s time to start sewing your DIY Patchwork Backpack – Pattern. This section outlines the basic construction process used in most patchwork backpack designs.
Start by cutting your patchwork squares or shapes. Depending on the look you’re going for, you can use uniform sizes (like 5” squares) or go for a more freestyle approach with various sizes. Lay them out on a flat surface to plan your color and pattern arrangement.
Sew the patchwork pieces together into a large panel. Make sure to press the seams as you go, either open or to one side, depending on the pattern’s guidance. This step forms the outer shell of your backpack and is where your creativity really shines.
Once your patchwork panels are complete, apply interfacing or fusible fleece to the wrong side. This gives the backpack structure and helps it hold its shape. Then cut the final backpack pieces (front, back, bottom, and sides) from the patchworked fabric.
Sew the main body of the backpack by attaching the sides and bottom to the front and back. Most patterns use box corners or curved bottoms. Be sure to clip and notch corners as needed for smooth curves or sharp edges.
Next, assemble and attach the lining. Your lining should mirror the outer shell in size and shape. Add inner pockets if desired, and sew the lining pieces together. Leave a small opening for turning the backpack right-side out later.
Finally, attach straps, hardware, and zippers. Follow the pattern carefully for these steps—they require attention to detail. Once everything is in place, turn the bag through the lining, close the gap with a topstitch, and admire your finished DIY Patchwork Backpack.
4. Ways to Customize Your Patchwork Backpack
Now that your backpack is complete, it’s time to make it uniquely yours. The beauty of a DIY Patchwork Backpack – Pattern is that there’s no limit to how creative you can be with finishing touches.
Add embroidery to one of the patchwork pieces before sewing it into the backpack. A floral design, initials, or even a quote can add a personal touch and turn your bag into a conversation piece.
Play with textures. Combine different fabrics—corduroy, velvet, canvas, or linen—for an eclectic look. The variation in texture adds dimension and visual interest, especially when paired with solid-colored straps or bindings.
Incorporate small appliqués. You can cut shapes from leftover fabric and sew them onto the backpack as decorative patches. Stars, hearts, or animals are popular choices, especially for kids’ bags.
Add extra functionality with hidden pockets, a key hook inside, or an outer zip pouch. These tweaks make your DIY Patchwork Backpack – Pattern more useful for everyday use while keeping everything organized.
Try hand-stitching details along the seams or edges. A simple whipstitch or decorative topstitching can enhance the handmade charm of the backpack and help reinforce the structure as well.
Finally, consider making a matching accessory. A small pencil pouch, wallet, or even a keychain made from the same fabric can be a perfect companion to your backpack and a great gift set idea.
FAQ: DIY Patchwork Backpack – Pattern
Q1: Is the DIY patchwork backpack project beginner-friendly?
Yes, especially if you choose a simple DIY Patchwork Backpack – Pattern with basic shapes and minimal hardware. It’s a great project to practice sewing and quilting skills.
Q2: What size should the backpack be?
Backpacks typically range from 12″ to 16″ tall. The size depends on the pattern you use and your personal needs—smaller for kids or daypacks, larger for school or travel.
Q3: Can I wash the backpack after it’s made?
Yes, but use gentle detergent and wash on a delicate cycle or hand wash. Always test your fabrics first for colorfastness, especially if using bold or dark prints.
Q4: Do I need a special sewing machine?
No, a standard domestic machine works fine. A walking foot or heavy-duty needle can help when sewing through thicker fabric layers or interfacing.
Q5: How do I adjust the straps for different sizes?
Use adjustable strap sliders and webbing. These allow the straps to be lengthened or shortened for comfort and a better fit.
Q6: Can I sell backpacks made from a DIY Patchwork Backpack – Pattern?
Check the pattern’s licensing. Many free and paid patterns allow personal and small business use, but always respect the designer’s terms of use.
Conclusion
The DIY Patchwork Backpack – Pattern is more than just a sewing project—it’s a creative journey that lets you mix art, function, and sustainability in one beautiful package. Whether you’re making it for yourself, a loved one, or even to sell, the process is as fulfilling as the final product.
In this article, we explored the many benefits of choosing a DIY patchwork backpack, outlined the materials and tools you’ll need, walked through the sewing process, and shared customization ideas to make your creation truly one-of-a-kind.
Have you made your own DIY Patchwork Backpack? We’d love to hear your story! Please **share your honest opinion, experience, and suggestions