If you’re seeking a quilting project that seamlessly blends tradition with contemporary flair, the Double Wedding Ring Quilt with Stripes – Pattern is a beautiful choice.
This design combines the iconic interlocking rings—symbolizing love and unity—with bold stripes to add modern structure and style to a classic layout.
It’s ideal for commemorating anniversaries, weddings, or simply creating a meaningful heirloom.
The Double Wedding Ring Quilt with Stripes – Pattern is well-loved for its visual and emotional impact. The interwoven rings evoke romance and commitment, while the stripes infuse the quilt with fresh lines and dynamic contrast. This pattern allows you to express creativity through fabric choices, color placement, and stripe combinations—all while paying homage to the traditional double wedding ring motif.
In this article, we’ll dive deeply into creating this hybrid pattern: choosing fabrics, mastering curved seams, combining stripes seamlessly, quilting options, and finishing touches. You’ll learn how to maintain Google AdSense compliance, optimize for SEO, and craft a gorgeous, meaningful quilt that’s both visually stunning and deeply personal.
1. Choosing Fabrics and Planning Your Double Wedding Ring Quilt with Stripes
Creating a beautiful Double Wedding Ring Quilt with Stripes – Pattern begins with selecting the right fabrics and planning the color layout. Greatest impact comes from balanced hues, contrasts, and stripe placement that complement the ring arcs.
Quilting cotton is ideal for this pattern due to its stability and ease of sewing. For the rings, choose colorful prints, solids, or tone-on-tone fabrics—vibrant florals, gentle pastels, or graphic designs all work well. Background fabric should be light and neutral to ensure the rings stand out.
Integrate bold stripes into the background or between rings to create visual definition. Pre-cut yardage, striped fabrics, or pieced stripes made from coordinating yardage are excellent options. Plan stripe width and direction so they align cleanly within the curved segments.
Laying out your quilt design on graph or specialized quilt software helps. Map the ring arcs and stripe positions, making note of seam allowances and where seams will intersect. Balance the arcs and stripes to avoid distortion in the finished piece.
Measure and consider color harmony. A stripe width of 2–3 inches translates well on a queen size quilt and helps balance pattern scale. If using directional prints, ensure stripe lines don’t clash with ring curves.
Pre-wash fabrics to prevent bleed and shrinkage. Press fabric yardage, and cut out blotches of space around stripe yardage to help align pieces neatly when you sew the quilt blocks.
2. Mastering Curved Piecing of Double Wedding Rings with Stripes
Sewing the Double Wedding Ring Quilt with Stripes – Pattern involves accurate curved piecing. While curves can be intimidating, proper preparation and techniques make them straightforward.
Start with a jig—a sturdy template made of cardboard or acrylic. Use a pattern piece designed for half-rings and stripe segments. Pin carefully along the curve, using numerous pins or even curved clamps to keep fabric aligned.
Allow stripes to extend past the curve edge by a generous seam allowance (½”). Clip seam allowances for flexibility on the inner arc and add clips or notches on the outer arc to ease fabric around tight curves.
Use a ¼” seam on your sewing machine, shortening stitch length to 1.8–2 mm to reduce bulk and ease curves. Sew slowly, pivoting gently at the curves, and remove pins as you go to avoid distortion.
Press seams toward the stripe side so curves nest into the background. Pressing rather than ironing helps retain the shape of the arcs.
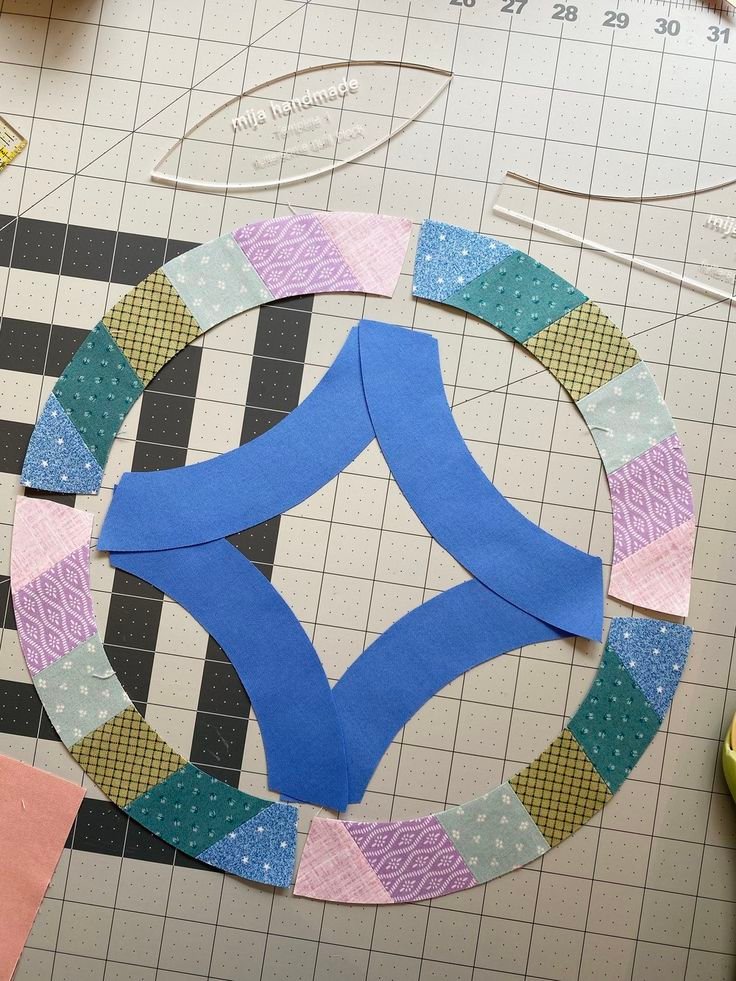
Construct ring segments first, then join them to stripe segments. Sew segment arcs into half-rings, then join halves to create full rings. Join full rings and stripe strips in pairs before assembling the quilt top.
Approach each arc with patience. Remove stripes at the concave part to release fullness. The Double Wedding Ring Quilt with Stripes requires time, but accurate piecing ensures smooth, graceful arcs.
3. Assembling the Patchwork Top and Quilting Choices
Once your curved piecing is finished, it’s time to sew the quilt blocks into the complete top and choose a quilting style that enhances the visual harmony of the design.
Lay out the blocks on a flat surface to maintain consistent background and stripe alignment. Verify seam allowances and block sizes match before sewing rows together. Pin blocks in rows and press seams for crisp alignment.
Join rows carefully. Since curved sections may shift slightly, pin each seam intersection for alignment. Press each row before final assembly to ensure smooth borders and stripes.
Once your quilt top is complete, square up all edges so they’re straight and even. This ensures your quilt is symmetrical and ready for layering.
Choose quilting designs that complement the curves and stripes—parallel lines along stripes, echo quilting around rings, or stippling in the ring areas. Quilting thread color and style can impact texture and overall visual flow.
Layer quilt top with batting and backing, pinning or spray-basting securely. Use a quilting frame or machine as preferred. Accent with metallic or pastel thread to highlight ring areas or maintain stripe contrast.
4. Finishing, Binding, and Care Instructions
After the quilting is done, the last steps bring your Double Wedding Ring Quilt with Stripes – Pattern to life and ensure durability and appeal for generations.
Trim the quilt edges so layers are even. Use a straight-edge ruler for precision. Prepare double-fold binding—make it 2.5″ wide by cutting continuous strips, then sew it around the quilt perimeter.
Miter the binding corners for a clean look. Sew the binding to the front by machine, and finish it on the back by hand or machine with tiny stitches that blend seamlessly into the quilt top.
Label the quilt with creation date, quilter name, and pattern or family details. A sewn square on the back corner adds provenance and sentimental value.
To care for your quilt, machine wash cold on gentle or hand-wash, then tumble dry low or air-dry flat. Avoid high heat to preserve fabric and seams.
Store folded in a breathable bag (like cotton or muslin) and keep it in a cool, dry place out of direct sunlight. Refold occasionally to prevent permanent creases and fabric stress.
FAQ – Double Wedding Ring Quilt with Stripes – Pattern
Q1: Is this pattern only for experienced quilters?
No. With curved piecing practice and careful pinning, confident beginners can master it. Start with smaller quilted arcs for ease.
Q2: How big is a standard ring block?
Typical ring blocks range from 12″ to 18″ finished. Choose based on quilt size and skill comfort.
Q3: Are there shortcuts for stripe seams?
Yes. Preconstruct wide strip strips and cut them to length for each stripe section. This ensures consistency and saves time.
Q4: Do I need a quilting frame or can I machine quilt?
You can machine quilt using a domestic machine. A frame helps if quilting large designs or thick batting, but it isn’t mandatory.
Q5: What batting is best?
Use 100% cotton or cotton blend to match the quilting cotton top. Low-loft polyester is also fine for crisp lines.
Q6: Can I wash the quilt without damage?
Yes, if washed cold and gently. Always use mild detergent and avoid chlorine bleach to preserve color integrity.
Conclusion
The Double Wedding Ring Quilt with Stripes – Pattern offers a perfect balance between tradition and contemporary design. Pair classic interlocking rings with vibrant stripes for an heirloom that’s both symbolic and stylish. From fabric selection through curved piecing and stripe integration to finishing and care, every step enhances your craftsmanship and personal story.
We’d love to hear your thoughts! Have you tried stripes with a curved ring pattern? Share your honest experiences and creative suggestions to inspire fellow quilters and keep this beautiful tradition growing.