This Dresden Plate Block – Tutorial is designed to guide you through one of the most beloved and visually stunning patterns in the world of quilting. Known for its radiating “petals” and its vintage charm, the Dresden Plate has remained a staple for quilters since the early 20th century. Whether you are looking to create a classic heirloom quilt or a modern wall hanging, mastering this quilt block technique will significantly expand your creative repertoire and technical precision.
The beauty of following a Dresden Plate Block – Tutorial lies in its incredible versatility, as it allows you to use up your fabric scraps while creating a sophisticated geometric design. Many quilters are intimidated by the circular nature of this block, but with the right quilting tools and a bit of patience, you will find that it is much simpler than it looks. This guide focuses on a “humanized” approach, breaking down complex steps into manageable tasks that ensure your fabric petals lie perfectly flat every time.
In this comprehensive Dresden Plate Block – Tutorial, we will explore everything from selecting the right color palette to the final appliqué process. We will discuss why fussy cutting can elevate your design and how to achieve sharp, professional points on each blade. By the end of this article, you will not only have a finished block but also the confidence to incorporate this traditional quilt pattern into larger, more ambitious projects that showcase your unique artisan style.
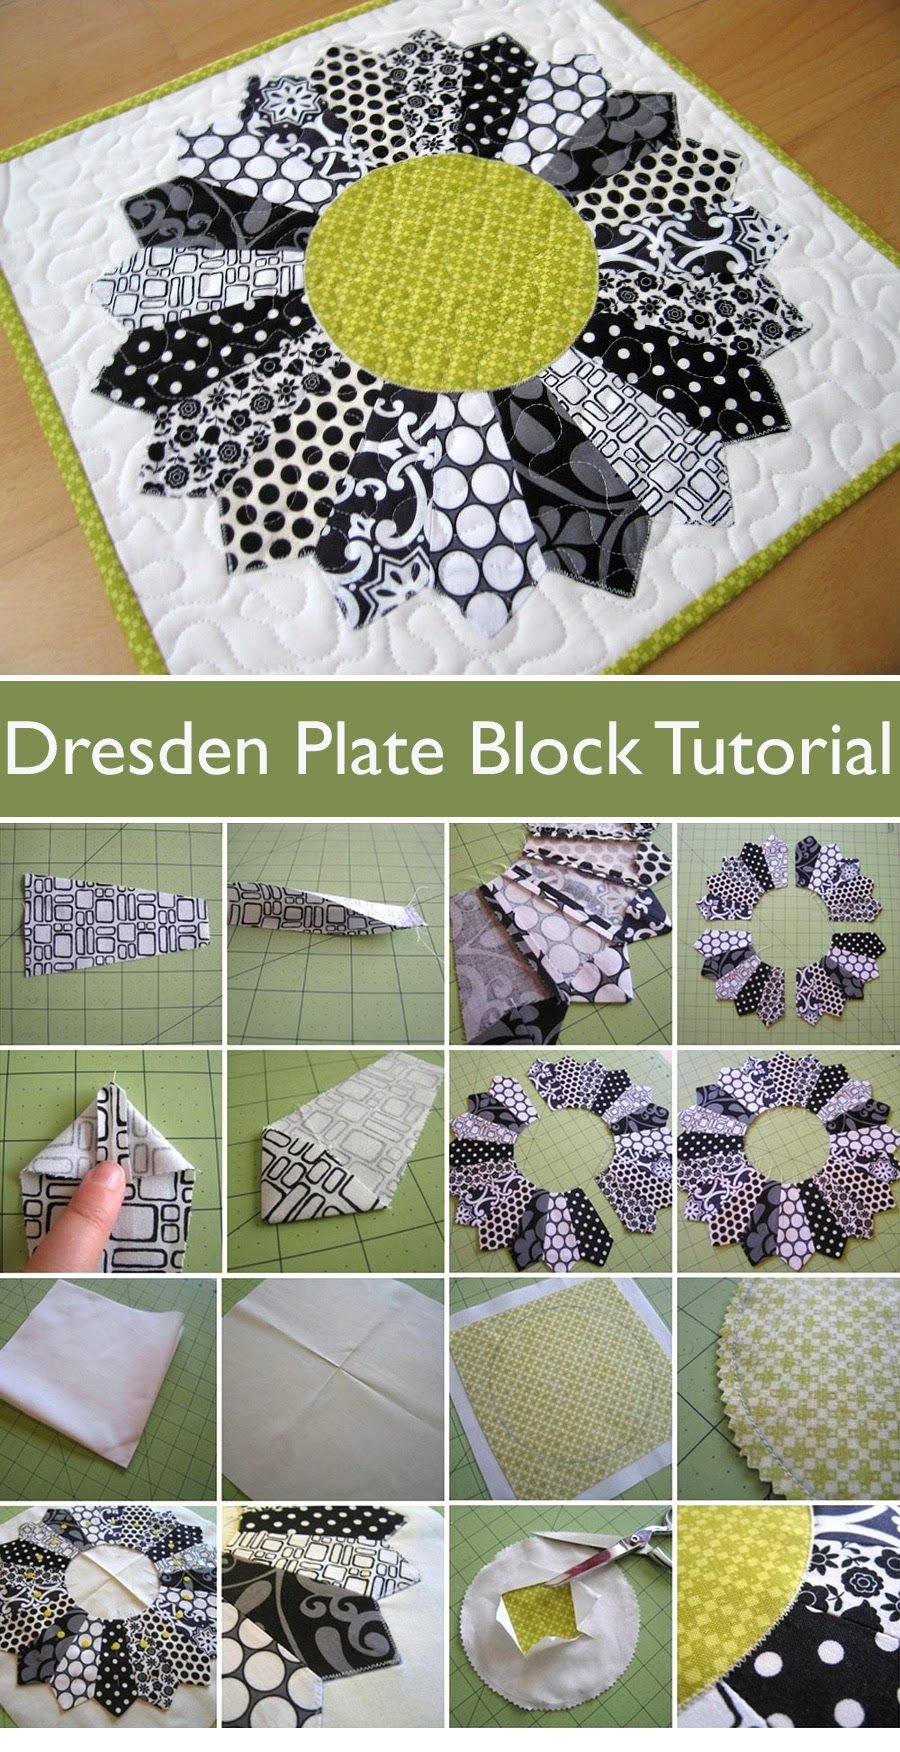
1. Gathering Essential Tools and Fabric Selection
The first step in any successful Dresden Plate Block – Tutorial is choosing the right materials to ensure a high-quality finish. To start, you will need a variety of cotton quilting fabrics; many people prefer a “scrappy” look using different prints for each petal. For a cohesive design, try to balance warm and cool tones or stick to a specific color family to make the central “plate” stand out against your background fabric.
In addition to fabric, you will need a specialized Dresden Plate ruler or a template, which usually comes in 18 or 20-degree angles. This quilting template is what allows you to cut consistent wedges that fit together into a perfect circle. Without a precise ruler, the blades may not align correctly, leading to a center that is too bulky or a block that won’t lay flat.
You will also need a rotary cutter, a self-healing cutting mat, and high-quality cotton thread. Using a neutral thread color is often best for the internal seams so that the stitching doesn’t distract from your fabric patterns. Precision is key during the cutting phase, as even a slight deviation in the width of your quilt wedges can cause issues during the assembly stage.
For the center of your Dresden Plate, you will need a small amount of fusible web or a circle template for the “hub.” This central circle hides the raw edges where all the petals meet and provides a focal point for the design. Many quilters choose a contrasting solid fabric for the center to provide a visual “rest” for the eye amidst the busy patterns of the blades.
Preparation also involves having a reliable steam iron and a pressing mat nearby. In this Dresden Plate Block – Tutorial, we emphasize that pressing is just as important as sewing. You will be pressing many small seams, and a good iron helps to crisp up the fabric edges, making the final appliqué step much easier and more professional in appearance.
Finally, consider using a bit of best press or fabric starch. Starching your fabric before cutting the wedges helps to stabilize the bias edges, which are prone to stretching. Since the wedges are cut at an angle, the fabric becomes delicate, and a little extra stiffness goes a long way in maintaining the geometric integrity of your quilt block.
2. Cutting and Preparing the Dresden Blades
Once your tools are ready, the core of the Dresden Plate Block – Tutorial involves cutting the “blades” or petals. You will typically need 20 wedges if you are using an 18-degree ruler. Carefully align your ruler on a strip of fabric, ensuring you are maximizing the yardage while keeping the grainline in mind. If you are using directional prints, be mindful of how the pattern will look once the wedges are sewn together.
After cutting your wedges, the next step is to create the pointed top for each blade. Fold each wedge in half lengthwise, with right sides together, and sew a straight line across the top (the wider end). Use a short stitch length to ensure the seam doesn’t pull apart when you turn it right side out. This is a repetitive but meditative part of the quilting process.
Once sewn, you will need to trim the corner of the seam allowance to reduce bulk. Use your fabric scissors to clip the corner near the fold, being careful not to cut the stitches. This step is crucial for achieving the sharp points that define a classic Dresden Plate Block. A dull point can make the entire block look “blunted” and less professional.
Now comes the “turning” phase of the Dresden Plate Block – Tutorial. Turn the top of each wedge right side out, using a point turner or a blunt knitting needle to gently push the corner into a crisp point. Once turned, use your iron to press the seam so that it is centered on the back of the blade. This creates a perfectly symmetrical quilted petal.
Repeat this process for all 20 blades until you have a beautiful pile of prepared petals. At this stage, it is helpful to lay them out on a design wall or a flat table to decide on the final arrangement. This allows you to see if two similar fabrics are touching and adjust the visual balance of your Dresden Plate before you start the permanent sewing.
Consistency is your best friend during this stage of the Dresden Plate Block – Tutorial. If your seam allowance varies by even an eighth of an inch on each blade, the error will multiply by 20, and your plate will not lie flat. Take your time with the ironing and turning, as this foundation determines the success of the entire quilt block project.
3. Assembling the Plate and Squaring the Center
With all your blades prepared, it is time to join them into the circular “plate” shape. In this Dresden Plate Block – Tutorial, we recommend sewing the blades together in pairs first, then in groups of four, and finally joining the halves. This “unit construction” method helps to manage the fabric bulk and ensures that your seams align perfectly at the outer edges.
Use a precise 1/4 inch seam allowance for joining the sides of the wedges. As you sew from the bottom (the narrow end) toward the top (the pointed end), make sure the edges of the petals are perfectly flush. Backstitch at the beginning and end of each seam to keep the circular motif secure during handling and the subsequent quilting steps.
After the blades are joined, you will have a hole in the center where all the raw edges meet. This is perfectly normal and is the reason why every Dresden Plate Block – Tutorial includes a central circle. Before adding the circle, press all the side seams in the same direction—clockwise or counter-clockwise—to reduce the “hump” in the middle of your sewn block.
To create the center circle, you can use a template-free method or a traditional turned-edge appliqué technique. Many modern quilters use a circle of fusible interfacing sewn to the fabric circle, then turned right side out through a small slit. This creates a perfect, finished-edge circle that can be easily positioned over the center of the Dresden sunburst.
Once your center circle is prepared, center it carefully over the hole of your joined blades. You can use fabric glue or pins to hold it in place. The circle should be large enough to cover all the raw edges of the wedges but small enough to leave plenty of the fabric petals visible. This is the heart of your Dresden Plate Block.
The final step of assembly in this Dresden Plate Block – Tutorial is to secure the center circle using a topstitch or a decorative blanket stitch. You can do this by hand for a traditional look or use a sewing machine for speed. This step “locks” all the wedges together and prepares the plate to be mounted onto your background square.
4. Appliquéing the Plate and Finishing Touches
The final phase of our Dresden Plate Block – Tutorial involves attaching your finished plate to a background fabric square. Typically, a 12.5-inch square is used for a standard-sized plate. Fold the background square into quarters and press lightly to find the exact center; this ensures your Dresden Plate is perfectly positioned and not skewed to one side.
You can attach the plate using a variety of appliqué techniques. A popular choice is the blind hem stitch on a machine, which mimics the look of hand-stitching. Alternatively, a tiny zigzag stitch or a straight topstitch around the outer edges of the points and the inner circle will provide a clean, modern finish to your handmade quilt block.
During the appliqué process, it is vital to keep the fabric flat. Sometimes, the circular shape can “drift” or stretch as you sew. Using a walking foot on your sewing machine can help feed the layers of fabric evenly, preventing puckers. This attention to detail is what separates a beginner’s effort from an expert quilter’s masterpiece.
Once the plate is secured, you may choose to trim away the background fabric from behind the plate to reduce bulk, especially if you plan on doing a lot of dense quilting later. However, many quilters leave it intact for extra stability. In this Dresden Plate Block – Tutorial, we suggest doing what feels most comfortable for your specific quilting style.
Now is the time to add any embroidery or decorative touches. Some quilters like to add “stems” to turn the plate into a giant flower, while others prefer to keep it as a clean, geometric Dresden motif. Your creativity is the only limit here! Check for any loose threads and give the entire block one final, gentle press with the iron.
Congratulations, you have completed the Dresden Plate Block – Tutorial! You now have a stunning, finished block ready to be joined with others into a full Dresden quilt. Whether you choose to make a monochromatic set or a wild, colorful collection, the skills you’ve learned here—precision cutting, turning points, and curved assembly—will serve you in many future sewing projects.
FAQ – Frequently Asked Questions
1. Why won’t my Dresden Plate lay flat?
This is usually caused by an inconsistent seam allowance. If your seams are even a tiny bit too wide, the circle will “bowl” upward. If they are too narrow, the circle will be wavy. Re-measuring your 1/4 inch seam is the best fix for this common quilting issue.
2. How many blades should I cut for a full circle?
It depends on the angle of your ruler. For a standard 18-degree ruler, you need 20 blades. For a 20-degree ruler, you need 18 blades. Always check the markings on your specific Dresden Plate template before cutting your fabric.
3. Can I make a Dresden Plate with rounded tops instead of points?
Absolutely! To make rounded petals, you would use a circular template for the top of the wedge instead of sewing a straight line. The process of turning and pressing remains similar, but it gives the Dresden Block a softer, more floral appearance.
4. What size background square should I use?
Most standard Dresden Plates fit well on a 12.5-inch square, which will finish at 12 inches once sewn into a quilt. If your plate is particularly large, you may need to upsize your background fabric to a 14-inch or 15-inch square to allow for seam allowances.
5. Is the Dresden Plate Block suitable for beginners?
While it has many steps, it is considered a “confident beginner” project. As long as you can sew a straight line and follow the Dresden Plate Block – Tutorial steps for turning the points, you can achieve great results. It’s a fantastic way to practice precision sewing.
6. Do I have to use a special ruler?
While a Dresden Plate ruler makes the process much faster and more accurate, you can find printable paper templates online. Just ensure that the scale is correct when printing so that your wedges fit together into a perfect 360-degree circle.
Conclusion
In this Dresden Plate Block – Tutorial, we have journeyed through the intricate and rewarding process of creating a classic piece of quilting history.
We started with the importance of fabric selection and the necessity of precise cutting tools. We then mastered the art of sewing and turning the blades to create those iconic sharp points, followed by the careful assembly of the circular plate and its focal center. Finally, we discussed the appliqué techniques needed to secure your work to a background, ensuring a flat and professional finish.