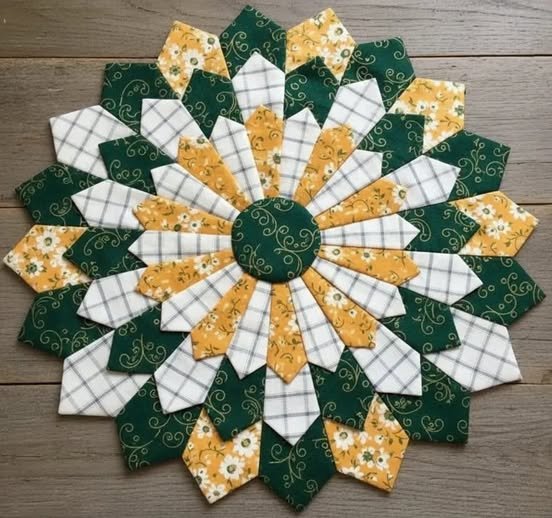
The Dresden Plate – Quilt – Pattern is one of the most beloved and visually captivating designs in quilting. Its circular, radiating petals create a beautiful floral effect that can be soft and vintage or bold and modern, depending on your fabric choices. Because of its versatility, many quilters consider the Dresden Plate – Quilt – Pattern a must-learn block that opens endless creative possibilities.
This iconic pattern originated in the early 20th century, inspired by decorative plates and porcelain patterns from Dresden, Germany. Its charming, scalloped shape made it an instant favorite among quilters who enjoyed intricate designs and playful color combinations. Today, the Dresden Plate – Quilt – Pattern continues to inspire both beginners and experienced quilters, thanks to its balance of simplicity and elegance.
Working with the Dresden Plate format helps quilters improve their appliqué skills, curve work, and fabric coordination. Whether you want to create a full quilt, a table topper, a pillow, or a framed textile piece, the Dresden Plate – Quilt – Pattern adapts beautifully to all kinds of projects. Before learning how to construct your own Dresden Plate block, let’s explore the essential steps that make the process both enjoyable and rewarding.
1. Choosing Fabrics and Preparing Your Dresden Plate – Quilt – Pattern
Fabric selection is one of the most important steps when creating the Dresden Plate – Quilt – Pattern. Because each petal acts as a standalone shape, the pattern allows you to mix colors, prints, and textures to create visual harmony or playful contrast. You can choose fabrics from a single collection for a coordinated look or opt for a scrappy, eclectic style using remnants from past projects.
When choosing fabrics, cotton quilting fabric remains the best option due to its consistent texture and ease of cutting and sewing. Bright prints offer a cheerful look, while pastel or muted tones create a more vintage feel. Solids can make each petal stand out clearly, especially when you want a cleaner, more modern interpretation of the Dresden Plate – Quilt – Pattern.
Before cutting your pieces, pressing your fabrics is essential. Wrinkles and folds can distort your petals, leading to uneven edges later on. Precise pressing ensures that each wedge is cut neatly and provides the exact shape needed for smooth assembly. This step may seem simple, but it greatly impacts the final appearance of your Dresden Plate.
Using a Dresden ruler or template helps you cut identical wedges for your block. Templates come in different sizes, allowing you to create small, medium, or large Dresden Plates. The number of wedges in your design typically depends on the size of your ruler. Templates help maintain consistency and accuracy, two key ingredients in a beautiful Dresden Plate – Quilt – Pattern.
When cutting the wedges, make sure that your rotary cutter blade is sharp. A clean cut prevents fraying and helps maintain crisp edges. Cutting multiple layers at once can speed up the process, but always ensure that your fabric layers lie flat and aligned to avoid uneven pieces.
Before moving to the sewing stage, organize your wedges in the order you want them to appear. This makes the assembly process smoother and prevents accidental mismatching of your chosen colors or prints. Good organization leads to a more polished and cohesive Dresden Plate – Quilt – Pattern.
2. Sewing and Shaping the Dresden Petals
To begin assembling your Dresden Plate – Quilt – Pattern, start by folding each wedge in half lengthwise with the right sides together. Stitch across the top, forming a point once the wedge is turned right side out. This technique creates the iconic petal shape that gives Dresden Plates their charming, scalloped edge.
After sewing, carefully turn the top point right side out. You may use a turning tool or a blunt instrument such as a chopstick to shape the tip. Press each petal firmly to keep the folds crisp and the point sharp. Neat points make your finished block look especially professional and balanced.
Once your petals are turned and pressed, begin joining them along their long sides. Stitch the wedges together with accurate ¼-inch seams so that the circle forms evenly. A well-aligned seam helps ensure the full Dresden Plate lies flat and symmetrical. This is one of the most important qualities of a polished Dresden Plate – Quilt – Pattern.
As the circle grows, continue pressing the seams either open or to one side. Pressing keeps the petals from bunching and helps the plate lie smoothly against the background fabric. Take your time with this step, as proper pressing dramatically improves the quality of the final block.
After all the wedges are sewn together, you’ll have a complete Dresden Plate shape. Some designs include a circle in the center to cover the join point. This center piece can be appliquéd by hand or machine. You can also choose between a flat circle or a dimensional, stuffed one, depending on the finish you prefer.
Finally, prepare your background fabric. This should be cut larger than the Dresden Plate, giving you flexibility when positioning the design. Center the Dresden Plate on the fabric and secure it using pins or fabric glue before beginning the appliqué step. At this stage, your Dresden Plate – Quilt – Pattern begins to truly take shape.
3. Appliqué Techniques and Finishing the Dresden Plate
Appliqué is the method used to attach the Dresden Plate to your background fabric. You can choose between hand appliqué, machine appliqué, or raw-edge appliqué. Each method brings a different look to your project, and the best choice depends on your desired style and skill level.
Hand appliqué offers a soft, traditional finish. Using small, nearly invisible stitches, you can attach the plate to the fabric with precision. This timeless method gives the Dresden Plate – Quilt – Pattern a classic, heirloom-quality appearance. Although it requires patience, many quilters find hand appliqué relaxing and rewarding.
Machine appliqué is a faster option that still produces beautiful results. Using a zigzag or blanket stitch, you can secure the Dresden Plate firmly to the background. This method works especially well for modern quilts or for quilters who prefer strength and durability in their finished projects.
Raw-edge appliqué involves securing the plate with straight stitching along the outer edges. Over time, the edges soften and fray slightly, creating a rustic, textured look. This method is popular for contemporary interpretations of the Dresden Plate – Quilt – Pattern and adds an artistic flair to your project.
Once your appliqué is complete, press the block carefully. Smooth, even pressing helps flatten any raised seams and keeps the block looking professional. At this stage, you can also trim the background to your desired size or combine multiple Dresden Plates into a larger quilt design.
If you’re creating a full quilt, consider the type of quilting you want for the finished piece. Straight-line quilting highlights the geometry of the petals, while free-motion quilting adds delicate texture around the curves. Either method complements the Dresden Plate – Quilt – Pattern beautifully.
After quilting, finish your project with binding. Choose a binding fabric that complements your plate and background colors. The binding frames your work, giving it a clean, polished final appearance.
4. Creative Variations and Modern Uses of the Dresden Plate – Quilt – Pattern
One of the great joys of working with the Dresden Plate – Quilt – Pattern is the endless number of creative variations. By changing the size of the petals, the number of wedges, or the center circle, you can create countless unique designs that express your personal style.
Experimenting with color is one of the easiest ways to transform the Dresden Plate. Use a monochromatic palette for a minimalist look, or combine bright, bold colors for a lively and modern interpretation. Fabrics with gradients or ombré prints can create breathtaking effects as the petals transition from one shade to another.
Many quilters enjoy creating “offset” Dresden Plates. Instead of centering the circle, they place it slightly to the side, creating a dynamic and contemporary visual flow. This modern twist works especially well in wall hangings, pillows, and quilted artwork.
Mini Dresden Plates are another fun variation. These tiny versions are perfect for adding decorative accents to clothing, bags, bookmarks, ornaments, and handmade gifts. Because they require small scraps of fabric, they’re also a great way to use leftover pieces from previous quilting projects.
Layered Dresden Plates offer even more creative freedom. By stacking two or more plates of different sizes, you can build a 3D floral effect that adds depth and texture. This enhancement adds a luxurious, artistic touch to the Dresden Plate – Quilt – Pattern and makes the finished project stand out.
Finally, modern quilters often play with negative space around the Dresden Plate. Leaving large areas of the background visible emphasizes the shape of the plate and creates a dramatic, contemporary finish. This method blends tradition with modern design beautifully.
FAQ – Dresden Plate – Quilt – Pattern
1. Is the Dresden Plate pattern beginner-friendly?
Yes. With patience and good templates, beginners can learn it easily.
2. Do I need a special ruler for Dresden Plates?
Using a Dresden ruler helps, but printable templates work well too.
3. What is the typical number of petals in a Dresden Plate?
Most plates use 12, 16, or 20 petals depending on the ruler size.
4. Can I sew Dresden Plates by machine?
Absolutely. Machine sewing is common and produces strong, neat seams.
5. How do I keep the circle smooth?
Press carefully and trim any uneven edges before appliquéing.
6. What projects can I make with this pattern?
Quilts, pillows, table toppers, bags, wall art, clothing accents, and more.
Conclusion
Creating the Dresden Plate – Quilt – Pattern is a rewarding experience that blends tradition, artistry, and craftsmanship.
From choosing fabrics to sewing petals, appliqué techniques, and modern variations, every stage allows you to express your creativity while building valuable quilting skills.