If you’ve ever struggled with spills or messy drips from cups, bottles, or watering cans, a Drip Catcher Sewing – Pattern might just be your new favorite sewing project. Practical, easy to make, and perfect for beginners and experienced crafters alike, this project is both functional and fun.
Whether you want to protect surfaces, keep your plants mess-free, or reduce kitchen cleanup, this clever little item can make a big difference.The beauty of the Drip Catcher Sewing – Pattern lies in its simplicity.
With just a few pieces of fabric and basic sewing skills, you can create a reusable and washable drip catcher that attaches easily to containers, drinkware, or tools. It absorbs excess moisture before it has a chance to hit your counter, table, or floor.
In this article, we’ll explore the benefits of sewing your own drip catcher, the materials you’ll need, a step-by-step guide to making one, and creative ideas to customize your design. We’ll also answer some of the most common questions people have about the Drip Catcher Sewing – Pattern. Whether you’re crafting for personal use, gifts, or to sell at markets, this is a rewarding and useful project to add to your sewing list.
1. Why Choose a Drip Catcher Sewing – Pattern?
The primary reason to use a Drip Catcher Sewing – Pattern is for practicality. From baby bottles to water pitchers, many everyday items are prone to dripping. These drips can leave behind watermarks, encourage mildew, or simply create annoying messes that need constant wiping. A drip catcher helps by catching the moisture at the source.
Another benefit is sustainability. Instead of using paper towels or disposable pads, your fabric drip catcher is reusable and eco-friendly. You can toss it in the wash after use and keep using it for months, reducing waste and saving money over time.
Customization is a major bonus. Want a drip catcher that matches your kitchen decor? Prefer fun, seasonal prints? Sewing your own allows you to choose the fabric, color, shape, and even the absorbent layers. You can create a whole set for different occasions or family members.
This pattern is also beginner-friendly, making it an ideal sewing project for those just learning to work with layers and curves. It involves straight stitching, optional topstitching, and simple closures like snaps or Velcro.
If you’re interested in gift-making or selling handmade products, a drip catcher is a unique and marketable item. Package them in sets, include care instructions, and you’ve got an easy-to-produce product with everyday value.
Lastly, these items are multi-functional. Use them under potted plants, inside refrigerators, on countertops, or even under pet bowls. Once you see how well it works, you’ll want to make one for every room in the house.
2. Materials and Tools for Your Drip Catcher Sewing – Pattern
Before starting your Drip Catcher Sewing – Pattern, gather your supplies to ensure a smooth workflow. This project doesn’t require specialty tools, which makes it accessible for most crafters.
The first thing you’ll need is fabric. Use cotton or flannel for the outer layer—they’re soft, absorbent, and easy to sew. You can choose fun prints, solids, or even upcycled fabric from old clothes or linens.
For the inner layer, select an absorbent material like microfiber cloth, terry cloth, or bamboo fleece. These layers are key for catching moisture and preventing leaks. You can even use layers of felt for extra structure.
To make your drip catcher even more effective, consider adding a waterproof barrier like PUL (polyurethane laminate) between the inner and outer layers. This step is optional but great if you want to stop moisture from reaching surfaces completely.
Basic sewing tools are all you need: scissors or a rotary cutter, measuring tape, sewing pins or clips, and a sewing machine. A fabric marking pen or tailor’s chalk will help with precise cutting and placement.
For closure options, prepare Velcro strips, snaps, or elastic bands. These help secure the drip catcher around bottles or pitchers, depending on your design preference. If you prefer a simple coaster-style drip catcher, you can skip this step.
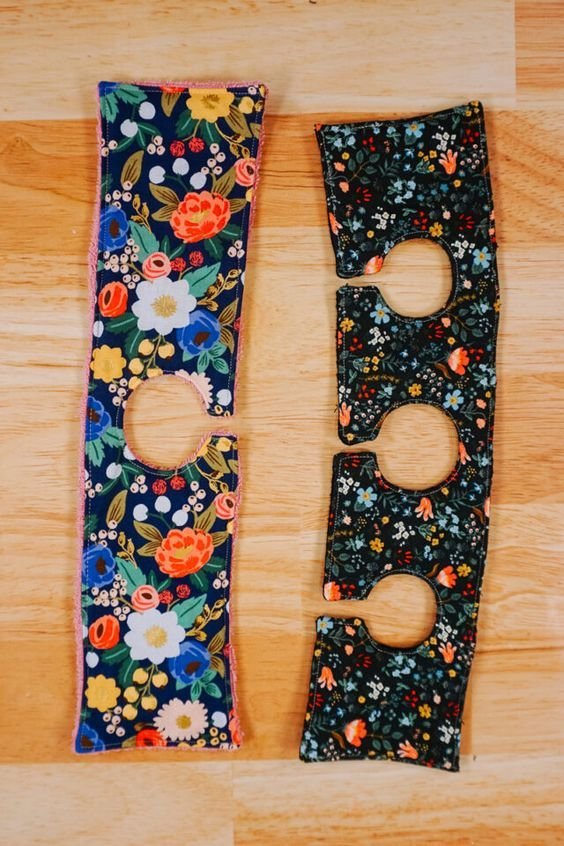
Finally, download or sketch your Drip Catcher Sewing – Pattern. Circular or teardrop shapes work best, but you can experiment with squares or custom designs too. Make sure your template is symmetrical and properly sized for the intended use.
3. How to Sew a Drip Catcher – Step-by-Step Guide
Now that you’ve prepped your materials, it’s time to sew your first drip catcher using the Drip Catcher Sewing – Pattern. Follow these simple steps and you’ll be done in no time.
Start by tracing and cutting out your pattern pieces. You’ll need one piece for the front fabric, one for the back fabric, and one or two layers of absorbent or waterproof material, depending on your design.
Layer the pieces in the correct order: outer fabric (right side up), absorbent layer(s), and backing fabric (right side down). Pin or clip the layers together, aligning the edges neatly.
Sew around the edges with a ¼-inch seam allowance, leaving a small opening (about 2 inches) for turning the piece right side out. Be careful around curves—go slowly for smooth lines.
After stitching, trim any excess fabric around the edges and clip curves to reduce bulk. This helps the drip catcher lay flat when turned. Turn it right side out through the opening and gently push out the edges with a blunt tool.
Topstitch around the entire edge. This not only closes the turning gap but also secures the layers and gives the drip catcher a clean, professional finish. If you’re adding a closure (like Velcro or a snap), sew it in place now.
Your Drip Catcher Sewing – Pattern project is now complete! Test it by wrapping it around a water bottle or placing it under a plant to catch drips. You’ll love how such a simple project can be so effective.
4. Creative Ways to Use and Customize Your Drip Catcher
Once you’ve mastered the basic Drip Catcher Sewing – Pattern, there’s so much room to play and personalize your creations. Whether you’re making one for fun or function, these ideas will inspire you to keep crafting.
Try different shapes for various purposes. Circles work great for cups and jars, while oval or rectangular versions may suit plant pots or long containers. Use themed templates—like hearts or stars—for festive flair.
Get bold with fabric choices. Match your kitchen colors, use holiday prints, or even make themed sets for different rooms. Cotton prints, flannel, or recycled denim can all give your drip catcher a different vibe.
Incorporate embroidery or appliqué for a more decorative look. Stitch fun quotes, family names, or floral designs on the top layer. These details make each drip catcher feel unique and can add extra value if you’re gifting or selling them.
Add a loop or tab for easy hanging when not in use. This small addition makes the drip catcher more convenient and prevents misplacing it between uses.
Consider making a reversible design by using complementary fabrics on each side. This gives users a choice of patterns and makes the product feel like two in one.
Finally, create coordinated sets for gift baskets or product bundles. Pair your drip catcher with reusable snack bags, napkins, or coasters using the same fabrics and style. It’s a charming and practical gift idea for housewarmings or holidays.
FAQ – Drip Catcher Sewing – Pattern
Q1: What is a drip catcher used for?
A drip catcher absorbs moisture from bottles, pitchers, watering cans, or plant pots to prevent drips from reaching surfaces like countertops, shelves, or floors.
Q2: What type of fabric is best for sewing a drip catcher?
Cotton, flannel, or bamboo fabric works well for the exterior. For the interior, use microfiber, terry cloth, or bamboo fleece for maximum absorption. You can also add a waterproof layer like PUL.
Q3: Can I machine wash my drip catcher?
Yes, most drip catchers made with cotton and microfiber are machine washable. Use a gentle cycle and air-dry or tumble dry low to maintain the shape.
Q4: Is the Drip Catcher Sewing – Pattern suitable for beginners?
Absolutely! The project uses basic stitches and simple layering techniques, making it perfect for beginner sewists looking to build confidence.
Q5: Can I make these for sale?
Yes, many makers sell drip catchers at craft fairs or online marketplaces. Just be sure to use quality materials and include care instructions for buyers.
Q6: Do I need a waterproof layer inside the drip catcher?
Not necessarily, but it does enhance functionality. If you want to prevent any liquid from leaking through, consider using PUL or similar waterproof fabric.
Conclusion
Creating your own Drip Catcher Sewing – Pattern is a rewarding way to combine creativity with practicality. From protecting your countertops to offering sustainable alternatives to paper towels, drip catchers are a fantastic sewing project for any skill level.
In this guide, we covered the benefits of making your own drip catcher, the materials you’ll need, how to