Starting your quilting journey can be both exciting and a little overwhelming. If you’re new to the craft and looking for something visually striking yet manageable, the Easy 3D Burst Quilt Block For Beginners – Pattern is the perfect place to begin.
This pattern introduces a dynamic three-dimensional design that adds depth and texture to your quilt, yet it remains simple enough for anyone new to sewing and patchwork.
The 3D burst block is an excellent way to make your quilts look advanced without requiring expert-level skills.
With just a few basic techniques and some thoughtful color choices, this quilt block can give your entire quilt a vibrant, modern aesthetic. Plus, the satisfaction of seeing your fabric “pop” off the surface is incredibly rewarding.
In this article, you’ll learn how to create an Easy 3D Burst Quilt Block, what materials you’ll need, how to assemble the pieces, and ways to customize the block to suit your style. Whether you’re making a baby quilt, a wall hanging, or just experimenting with new quilting skills, this pattern is fun, fast, and full of creative potential.
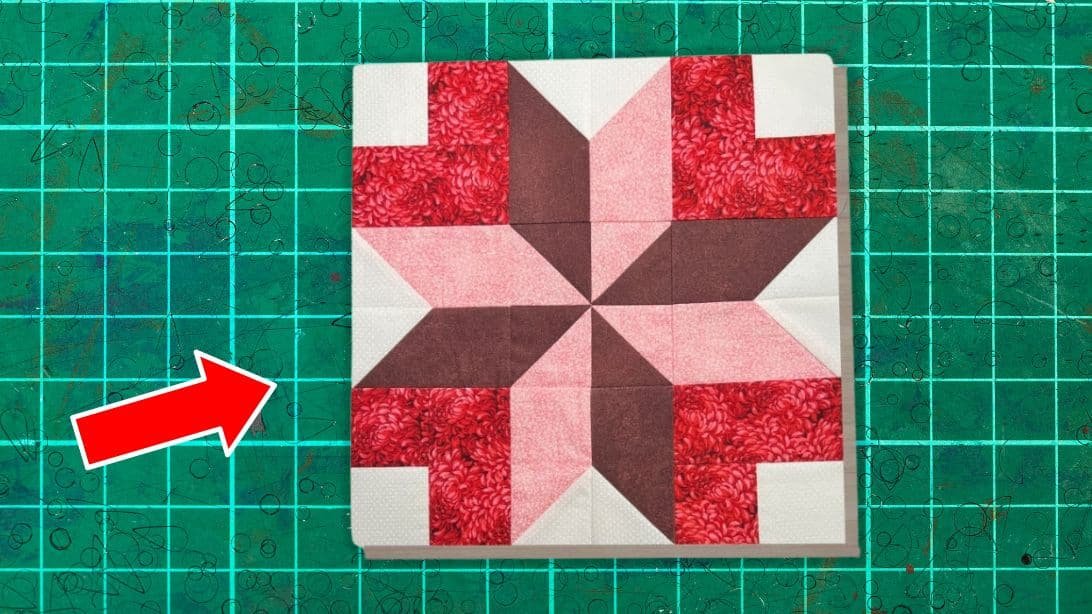
1. Understanding the 3D Burst Quilt Block Structure
To successfully create the Easy 3D Burst Quilt Block For Beginners – Pattern, it’s important to understand the basic structure and how the illusion of dimension is achieved. This pattern gives your quilt a lively, almost kinetic energy, thanks to the overlapping fabric layers.
The block is usually square in shape, and the 3D effect comes from folded fabric pieces sewn into the seams. These folds form triangles or “bursts” that rise off the quilt top, giving it that signature dimensional look. You don’t need to use special materials—standard cotton fabrics work just fine.
Each “burst” section typically starts as a square folded into a triangle. These triangles are then nested into other fabric layers to create the illusion of movement. The angle and color placement make the pieces appear to leap from the quilt’s surface.
The key to achieving the burst effect is fabric contrast. Using bold colors or high-contrast tones helps emphasize the 3D aspect. For example, placing a bright triangle against a dark background makes the triangle stand out more clearly.
You can stick with a symmetrical layout for a cleaner, modern aesthetic or go for a scrappy look with different colors and prints. Either way, the result is visually engaging and textured, even though it’s flat and easy to sew.
What’s especially beginner-friendly about this block is that it doesn’t require complicated measuring or advanced piecing. Once you get the hang of the folding and placement, each block comes together quickly, and you can easily make an entire quilt with just this design.
2. Materials and Tools You’ll Need
Before starting your Easy 3D Burst Quilt Block For Beginners – Pattern, make sure you have the right supplies. These are simple, affordable materials, most of which you may already have in your sewing kit or can be picked up from any craft store.
Start with quilting cotton fabric. You’ll need at least three different fabrics: one for the background, one for the bursts (folded triangles), and one for accents or borders. Choose colors that provide contrast to highlight the 3D effect.
You’ll also need a rotary cutter, self-healing cutting mat, and a quilting ruler. Accurate cuts are key to making sure your blocks line up well and that your burst angles remain sharp and symmetrical.
Basic sewing tools include a sewing machine with a 1/4″ presser foot, sharp scissors, pins or clips, and an iron. The iron is especially important—you’ll be pressing your fabric folds to set the triangle shapes in place before stitching.
You’ll also need thread in a neutral or matching tone. For beginners, a light gray or beige thread usually blends well with most fabrics and hides minor imperfections.
If you’re planning to make multiple blocks and sew them into a quilt, have some batting and backing fabric ready. This isn’t needed for a single block but is essential if you’re building a full quilt or a wall hanging.
Optional but helpful tools include fabric marking pens, starch spray for crisp folds, and basting spray or pins if you plan to quilt your finished piece. Keep your space organized, and you’ll find the process flows more smoothly.
3. Step-by-Step Instructions to Sew the 3D Burst Block
Once you have your materials, you’re ready to begin stitching your Easy 3D Burst Quilt Block For Beginners – Pattern. These easy steps will help you bring the 3D design to life.
Begin by cutting your fabric. For a 12″x12″ block, cut your background into one square of 12.5″x12.5″ (this allows for seam allowance), and cut your “burst” fabrics into squares of about 4” each. Fold each small square diagonally to form a triangle and press with an iron.
Next, place the folded triangles on top of the background square. Position them so that the raw edges align with the edges of the background square. These folds will be sewn into the seams as you assemble the block.
Pin each triangle in place securely. It helps to lay out the entire block before sewing to see how the burst effect will look. If you’re making multiple blocks, try a few different layouts to experiment with color balance and shape.
Begin sewing the edges of the background square with the triangles attached. Use a 1/4″ seam allowance. Sew slowly over thicker areas where folds overlap to avoid needle breakage. Press the seams as you go to keep everything neat and flat.
After attaching the bursts, you can optionally topstitch along the folded edges to secure them more firmly and add extra texture. This also keeps the folds from lifting too much with washing or wear.
Finish the block by trimming the edges if needed to square everything up. Your block should now be 12″x12″ or your intended size, with a bold, three-dimensional design that’s sure to impress—even if it was simple to create!
4. Customization Ideas and Project Inspirations
The real fun with the Easy 3D Burst Quilt Block For Beginners – Pattern starts when you begin experimenting with variations. This pattern is incredibly versatile and can be adapted to suit almost any style or occasion.
One popular customization is using ombre or gradient fabrics. Arrange the burst pieces from dark to light (or vice versa) to create a radiating light effect that draws the eye inward. It’s a beautiful twist on the standard layout.
For a modern twist, try monochrome designs using different shades of a single color. This keeps things minimalist while still showcasing the texture and depth of the 3D elements.
Add personality with themed fabrics—great for baby quilts, seasonal decor, or memory quilts. Imagine a 3D burst quilt made with baby animals, Christmas prints, or vintage florals.
You can even turn a single block into its own mini-project. Make a quilted pillow, mug rug, or table topper using just one or two blocks. These are perfect for gifts and don’t require a full quilt commitment.
To make a full-sized quilt, simply repeat the block in rows and columns. Sashing between blocks adds definition, or you can sew them edge to edge for a continuous burst effect across the whole quilt.
Finally, consider adding borders, hand embroidery, or even beads or buttons for decorative flair. The possibilities are endless, and each version you create adds to your skills and creativity.
FAQ – Easy 3D Burst Quilt Block For Beginners – Pattern
Q1: Is the 3D burst quilt block really suitable for beginners?
Yes! It uses basic folding and straight-line sewing. With clear instructions, it’s a great introduction to dynamic quilting techniques.
Q2: What size should my burst fabric squares be?
Typically 4” squares folded into triangles work well for a 12” block, but you can scale up or down depending on your design.
Q3: Do I need to use interfacing or stabilizers?
Not usually. Quilting cotton holds its shape well when folded. However, a light starch spray can help maintain crisp edges.
Q4: How do I wash a quilt with 3D blocks?
Use a gentle machine wash or hand wash, and air dry flat. Topstitching edges helps keep the 3D pieces in place during laundering.
Q5: Can I mix 3D blocks with flat quilt blocks?
Absolutely. Mixing blocks adds interest. Just make sure the final block sizes match up for a smooth quilt top.
Q6: What’s the easiest way to lay out the blocks?
A design wall or large table helps. Take a photo of the layout before sewing so you can reference your design during assembly.
Conclusion
The Easy 3D Burst Quilt Block For Beginners – Pattern is the ideal project for quilters who want a bold look with minimal stress. With simple folds, smart color choices, and a straightforward assembly process, you can achieve a design that looks advanced but is accessible to everyone.
From material prep to creative customizations, this pattern teaches valuable skills while delivering striking visual results. It’s perfect for trying something new or for building your confidence with sewing and quilting techniques.
We’d love to hear your honest feedback and suggestions! Have you tried this block? What colors or themes did you use? Leave a comment to share your experience and inspire other beginner quilters in
our community!