Easy Christmas Stocking Tutorial – Pattern projects are among the most heartwarming and enjoyable crafts to make during the holiday season. Beginning with a Easy Christmas Stocking Tutorial – Pattern not only helps you create beautiful stockings for your family but also allows you to personalize each one with unique fabrics, trims, and embellishments. Whether you’re crafting stockings for children, adults, pets, or simply decorating your home with a festive touch, this step-by-step approach makes the process both simple and fun.
Using a Easy Christmas Stocking Tutorial – Pattern ensures that even beginners can create professional-looking results. Patterns offer clear outlines, cutting instructions, and assembly guidance that remove the guesswork from sewing. At the same time, they leave plenty of room for creativity—letting you design classic or modern styles, choose bold or traditional fabrics, and add special decorative details. This makes stocking-making a wonderful project for holiday lovers, sewing enthusiasts, and crafters of all skill levels.
Handmade stockings carry sentimental value and often become cherished family keepsakes. They can be made as thoughtful holiday gifts, festive décor pieces, or part of a coordinated Christmas decorating theme. With the help of this article, you will learn how to understand the pattern, choose the best materials, sew the stocking with ease, and explore imaginative ideas to personalize your creations. A detailed FAQ and a closing section are included to help you get the most out of your crafting experience.
1. Understanding the Easy Christmas Stocking Tutorial – Pattern
A Easy Christmas Stocking Tutorial – Pattern usually includes a stocking outline, cutting diagrams, and step-by-step directions to guide you through sewing. Understanding how the pattern works is the foundation of a smooth and enjoyable crafting experience, especially if this is your first time making a stocking.
The pattern typically consists of two main stocking shapes—one for the front and one for the back. It may also include a cuff pattern, lining pieces, and optional elements such as hanging loops, appliqué templates, or decorative trims. Carefully reviewing the pattern before cutting your fabric helps ensure accurate assembly later.
Patterns often indicate grainlines, fold lines, and seam allowances. Paying attention to these markings is essential for maintaining the stocking’s shape and ensuring the fabric stretches correctly. Seam allowances, in particular, help create smooth curves around the stocking’s heel and toe areas.
Many Easy Christmas Stocking Tutorial – Pattern sets offer multiple sizes. This flexibility allows you to create mini stockings for ornaments or gift packaging, standard sizes for home décor, or oversized stockings for dramatic statement pieces. Understanding the size options helps you decide which design best suits your purpose.
The pattern instructions usually explain how to sew the lining and outer fabric together. This process creates a clean, polished interior so that the stocking looks professional both inside and out. Taking time to understand this step ensures a neat final result.
Finally, reading through the entire tutorial before starting helps you visualize the process. This reduces mistakes, saves time, and increases confidence. Once you fully grasp the pattern, you are ready to begin selecting the materials that bring your stocking to life.
2. Choosing the Best Materials for a Christmas Stocking
The materials you choose greatly influence the final look and feel of your Easy Christmas Stocking Tutorial – Pattern project. Christmas stockings are versatile and can be made from a wide range of fabrics depending on your style and skill level.
Cotton fabrics are among the most popular options for stocking exteriors. They are easy to sew, widely available, and come in countless holiday prints, including snowflakes, Santas, plaids, and winter scenes. Cotton is ideal for beginners because it handles well and produces crisp, clean seams.
For a more luxurious stocking, many crafters choose fabrics like velvet, faux fur, chenille, or brocade. These materials create elegant, high-end designs perfect for formal holiday décor. Although they require a bit more care when sewing, the final look is worth the effort.
Lining fabric is another essential component. Cotton or lightweight polyester makes excellent lining material because it is smooth, comfortable to sew, and holds the stocking’s shape well. The lining also adds structural strength and helps the stocking hang neatly.
Interfacing may be included in your materials if you want the stocking to have more body. Adding interfacing between the fabric layers gives the stocking firmness and prevents sagging, especially if it will hold heavier items.
Decorative trims are where creativity shines. You can add ribbon, lace, pom-poms, sequins, embroidery, snowflake appliqués, or personalized monograms. These small details elevate your Easy Christmas Stocking Tutorial – Pattern into a meaningful, custom Christmas keepsake.
Finally, choosing a sturdy loop for hanging is essential. Whether you use ribbon, fabric strips, or braided cord, the loop must be strong enough to hold the stocking when filled. A well-constructed hanging loop ensures your stocking will last for many holiday seasons.
3. Sewing and Assembling the Christmas Stocking
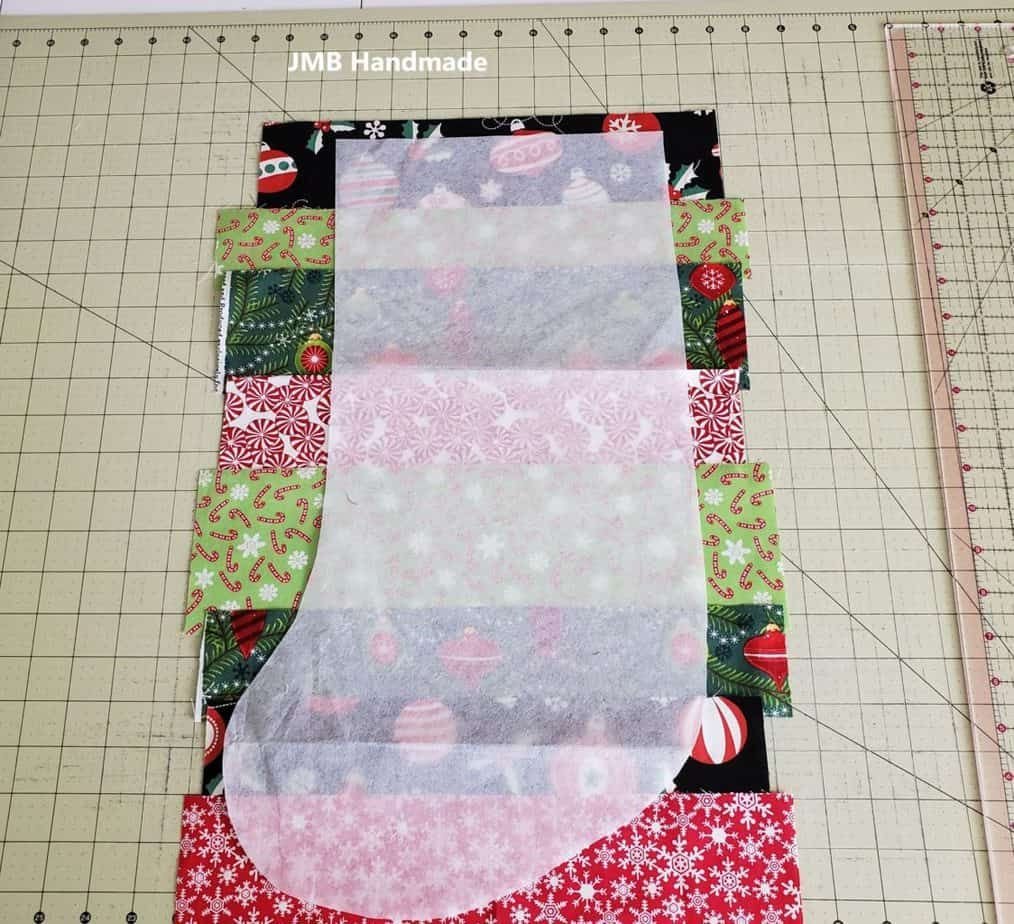
Sewing a stocking using the Easy Christmas Stocking Tutorial – Pattern is straightforward once you follow the steps carefully. Begin by cutting out your fabric pieces—front, back, cuff, loop, and lining—following the pattern outlines precisely. Accurate cutting helps ensure that all pieces align correctly.
Next, sew the outer stocking pieces together, usually with right sides facing each other. Sew around the edges, leaving the top open. For stockings with curved edges, use a shorter stitch length and clip the curves after sewing to help the stocking turn smoothly.
Repeat the process for the lining pieces. The lining is assembled similarly but is often left with a small opening at the bottom so you can turn the stocking right-side out later. Patterns typically guide you on where to leave this opening.
If your design includes a cuff, sew it separately and prepare it by folding it in half with the right side facing outward. The cuff is usually placed inside the stocking before both lining and outer layers are joined together at the top edge.
Joining the layers is one of the most important steps. Insert the lining into the outer stocking with right sides facing, align all edges, and sew around the top opening. This creates a seamless finish and ensures your stocking looks polished.
Once sewn, turn the stocking right-side out through the opening in the lining. After closing that opening with a small stitch, press the stocking lightly and attach the hanging loop. Your Easy Christmas Stocking Tutorial – Pattern project is now complete—beautiful, functional, and ready to hang.
4. Creative Ways to Personalize Christmas Stockings
A Easy Christmas Stocking Tutorial – Pattern gives you a strong foundation, but personalization is where your creativity truly shines. One of the most common ways to personalize a stocking is by adding a name. Embroidered or iron-on names make each stocking unique and meaningful.
Color themes can also make your stockings stand out. For example, a rustic farmhouse Christmas theme might use neutrals and plaid fabrics, while a whimsical theme could include bright reds, greens, and cartoon Christmas characters. Choosing a color palette helps tie your décor together.
You can add appliqué shapes such as stars, reindeer, snowmen, or Christmas trees. These can be sewn onto the stocking front or attached with fusible adhesive for a cleaner, easier application. Appliqués add dimension and charm to the design.
Mixing textures is another great idea. A velvet body paired with a faux fur cuff creates a luxurious stocking, while quilted cotton gives a more traditional, cozy feel. Texture adds visual interest and enhances the stocking’s style.
If you enjoy quilting, consider creating a patchwork stocking. Combining small pieces of different fabrics lets you create a one-of-a-kind design. Patchwork stockings are especially meaningful when made from leftover fabric scraps from past projects.
Finally, themed stockings are always a hit. You can create stockings inspired by pets, hobbies, or each family member’s personality. A Easy Christmas Stocking Tutorial – Pattern is flexible enough to adapt to any creative idea you dream up.
FAQ About the Easy Christmas Stocking Tutorial – Pattern
1. Is the Easy Christmas Stocking Tutorial – Pattern suitable for beginners?
Yes, most stocking patterns are beginner-friendly and include simple steps.
2. What fabrics work best for Christmas stockings?
Cotton, velvet, faux fur, and brocade are popular choices depending on your desired style.
3. Do I need a lining for my stocking?
Lining gives the stocking structure and a polished interior, so it is recommended.
4. Can I personalize the stocking with names?
Absolutely—embroidery, iron-on vinyl, or fabric letters work wonderfully.
5. Should I use interfacing?
Interfacing adds firmness and helps the stocking hold its shape.
6. Can the pattern be resized?
Yes, many tutorials allow resizing for mini, standard, or oversized stockings.
7. Are stockings washable?
Yes, depending on the materials, though delicate fabrics require gentle care.
8. What closure is needed?
No closure is needed; the stocking remains open at the top for filling.
9. Can I hand-sew the stocking?
Yes, but a sewing machine produces stronger, more durable seams.
10. Can I sell stockings made using this pattern?
Yes, unless the specific pattern restricts commercial use. Always check usage rights.
Conclusion
Creating a Easy Christmas Stocking Tutorial – Pattern project is a joyful and rewarding way to celebrate the holiday season.
Throughout this article, you learned how to understand the pattern, choose materials, sew the stocking, and personalize it creatively. With the right guidance and a bit of imagination, your handmade stockings can become treasured family traditions.