English Paper Piecing (EPP) is a traditional quilting method that has been around for centuries.
It is known for its ability to create intricate and beautiful quilt designs. If you’re new to quilting or just curious about the art of English Paper Piecing, this English Paper Piecing Tutorial will guide you through the process, from selecting the right pattern to piecing together the fabric.
Whether you’re working on your first quilt or looking to refine your skills, this tutorial will provide a detailed approach to help you achieve success.
When it comes to quilting, one of the most popular techniques is English Paper Piecing. This method involves hand-sewing fabric pieces onto paper templates, which help maintain the shape and precision of each piece. The process is slow and meticulous but incredibly rewarding. The designs you can create with EPP range from simple geometric shapes to complex, intricate patterns that require patience and attention to detail.
In this article, we’ll walk you through the steps needed to start your own EPP project. From understanding the pattern options to mastering the hand-stitching techniques, we will cover everything you need to know to succeed in this rewarding craft. So grab your fabric and needles, and let’s dive into this English Paper Piecing Tutorial – Pattern.
1. Understanding the Basics of English Paper Piecing
English Paper Piecing is all about creating geometric shapes by hand-sewing fabric onto paper templates. The templates, typically made of paper or cardstock, provide structure and help you maintain the precision needed to achieve perfect seams. One of the key benefits of this method is the ability to work on your quilt by hand, which makes it ideal for quilters who enjoy portable and relaxing projects.
To get started, you will need a few basic supplies. These include fabric, paper templates, a needle, thread, scissors, and a rotary cutter. You can either purchase pre-cut paper templates or make your own by printing out patterns from various quilting websites. Once you have your templates, it’s time to cut your fabric and start piecing together your quilt.
The beauty of English Paper Piecing lies in the versatility of the patterns you can create. Popular designs include hexagons, diamonds, and even intricate star shapes. When choosing a pattern, keep in mind your skill level and the amount of time you want to invest. Some patterns are simple and easy for beginners, while others may require more advanced skills.
2. Selecting the Perfect Pattern for Your Project
Choosing the right English Paper Piecing pattern is an essential step in starting your quilt project. The pattern will determine the overall design and shape of your quilt, so it’s important to pick one that suits your style and skill level. If you’re a beginner, it’s best to start with simple shapes, such as hexagons or squares, as these will allow you to get a feel for the process without feeling overwhelmed.
For those with more experience, there are intricate patterns like the Grandmother’s Flower Garden or the intricate designs of stars, diamonds, and medallions. These patterns often require a bit more time and patience but result in stunning, detailed quilts. The key is to choose a design that excites you and motivates you to stay committed to the project.
Once you’ve chosen your pattern, it’s time to gather your materials. You can either create your own templates or purchase pre-made ones, depending on your preference. Additionally, consider the colors and fabrics you want to use. Fabric choice is vital in ensuring your quilt looks cohesive and visually appealing. Opt for fabrics that complement each other, and don’t be afraid to mix different prints and textures.
Finally, keep in mind that your pattern can be as simple or as complicated as you wish. If you’re working on a large quilt, consider breaking it down into smaller sections so you can focus on one portion at a time. This will make the process more manageable and prevent you from feeling overwhelmed by the project.
3. Preparing Your Fabric and Templates
Once you’ve selected your English Paper Piecing pattern, it’s time to prepare your fabric and templates for stitching. Start by cutting your fabric into the required shapes. Ensure that each piece is slightly larger than the paper template, leaving enough fabric around the edges to fold over the template when sewing.
To make the process more efficient, use a rotary cutter for precise fabric cuts. It’s important to be consistent in your fabric cutting, as uneven pieces can lead to mistakes down the road. Once you have all your fabric pieces cut, it’s time to prepare your templates.
You can either buy pre-cut templates or create your own by printing a pattern on card stock or heavyweight paper. Trace the pattern onto the paper, then cut it out carefully. Some quilters prefer to use glue basting to secure the fabric to the paper templates, while others opt for a needle and thread method. Whichever technique you choose, make sure the fabric is securely attached to the paper so that it doesn’t shift while you sew.
Before you start stitching, take a moment to arrange your fabric pieces on a flat surface to see how they will fit together. This step helps ensure that the design flows and gives you an opportunity to make any last-minute adjustments before you begin sewing.
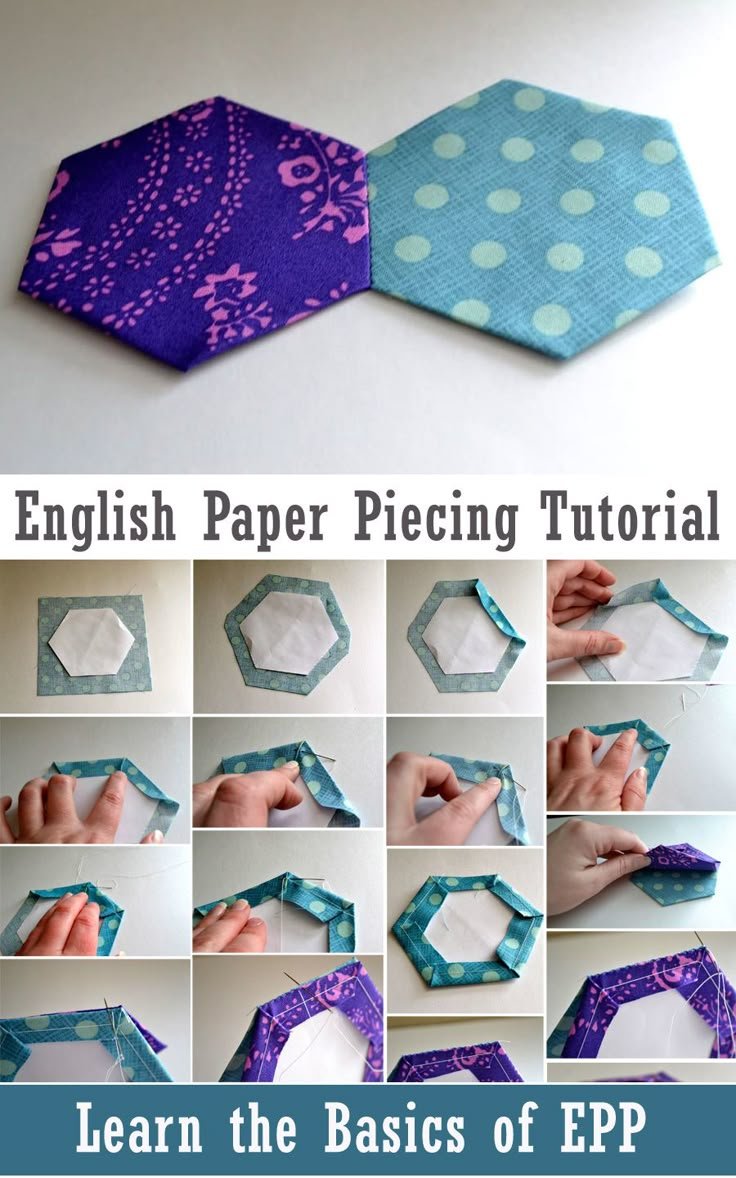
4. Mastering the English Paper Piecing Stitching Technique
The core of English Paper Piecing lies in mastering the stitching technique. This process involves hand-sewing the fabric pieces onto the paper templates. The stitching is done using a small, even running stitch, ensuring that the pieces are held together securely.
Start by folding the fabric over the paper template, aligning the edges neatly. Using a needle and thread, begin stitching along the edges of the fabric, securing it tightly to the paper. Make sure your stitches are small and uniform, as this will ensure that the quilt holds together well.
Some quilters use the “whip stitch” method, which involves taking small stitches through the folded fabric and catching a tiny bit of the paper template. This technique is ideal for beginners, as it’s easy to learn and provides strong results. However, more experienced quilters may choose a more advanced technique, like the “overcast stitch,” which creates a more invisible stitch line.
As you stitch, take your time and make sure the pieces are aligned properly. It’s important to avoid rushing, as the precision of your stitching will affect the final appearance of your quilt. If you make a mistake, simply remove the stitches and try again.
When all your pieces are stitched together, you can remove the paper templates by gently pulling them out. This step will leave you with a beautiful, intricate quilt that showcases your hard work and dedication.
FAQ – English Paper Piecing
1. What is English Paper Piecing (EPP)?
English Paper Piecing is a quilting technique where fabric is hand-sewn onto paper templates to create intricate patterns. The templates provide structure and help maintain precision as the fabric is sewn together.
2. Do I need special tools for English Paper Piecing?
While there are specialized tools like rotary cutters and pre-cut templates, you can use basic sewing supplies such as fabric, scissors, a needle, and thread. Some quilters prefer to use glue for basting the fabric to the paper templates.
3. How long does it take to complete an English Paper Piecing project?
The time it takes to complete an EPP project depends on the complexity of the pattern and the size of the quilt. Simple projects may take a few days to finish, while intricate designs can take weeks or even months.
4. Can I use machine stitching instead of hand stitching?
While machine stitching is faster, English Paper Piecing is traditionally done by hand. Hand-stitching allows for more control and precision, making it ideal for intricate designs.
5. What is the best fabric to use for English Paper Piecing?
Cotton is the most commonly used fabric for EPP, as it’s easy to handle and comes in a variety of prints and colors. You can experiment with different types of fabric, but be sure to choose one that’s durable and easy to work with.
Conclusion
In this English Paper Piecing Tutorial, we have explored the essential steps to create stunning quilts using this traditional quilting technique. From choosing the right pattern to mastering the stitching technique, you now have the tools and knowledge to start your own EPP project. Remember, practice makes perfect, so don’t get discouraged if it takes time to master the craft.
We encourage you to share your thoughts and experiences in the comments below. Your honest feedback and suggestions will help us continue to provide valuable content for fellow quilters. Happy stitching!