Creating a Fabric Bottle Holder – Pattern is one of the most practical and enjoyable projects for anyone looking to combine sustainability with personal style. Whether you are heading out for a long walk in the park, commuting to the office, or sending your children off to school, having a custom-made carrier for your water bottle makes staying hydrated much more convenient. By following a dedicated Fabric Bottle Holder – Pattern, you can move away from disposable plastic bags or uncomfortable handheld carrying methods and embrace a textile solution that is both durable and aesthetically pleasing.
The beauty of working with a Fabric Bottle Holder – Pattern lies in its incredible versatility and the ability to customize every single detail to fit your specific needs. You can choose heavy-duty canvases for rugged outdoor use, or perhaps a bright, quilted cotton for a more fashionable everyday accessory. Because bottles come in so many different shapes and sizes—from slim reusable flasks to wide insulated tumblers—having a reliable Fabric Bottle Holder – Pattern allows you to adjust the dimensions perfectly, ensuring a snug fit that prevents your bottle from slipping out or rattling while you move.
In this comprehensive guide, we are going to explore the essential elements of crafting a high-quality Fabric Bottle Holder using a professional-grade Pattern. We will break down the two main components of this project: the Fabric Bottle Holder, which refers to the finished textile sleeve designed to hold and protect your beverage container, and the Pattern, which is the technical template or blueprint used to cut and assemble the fabric pieces. By understanding the relationship between the material choice and the geometric layout, you will be able to create a professional-looking accessory that rivals any store-bought version.
1. Choosing the Right Materials for Your Fabric Bottle Holder
Selecting the proper materials is the first step in ensuring your Fabric Bottle Holder – Pattern results in a long-lasting product. For the exterior, many sewers prefer using duck canvas, denim, or outdoor performance fabrics because they provide the necessary rigidity and abrasion resistance. Since a water bottle can be heavy when full, the base fabric of your Fabric Bottle Holder needs to be strong enough to support the weight without stretching out of shape over time.
For the interior lining, it is highly recommended to use a water-resistant fabric or a laminated cotton. This is a crucial tip for any Fabric Bottle Holder – Pattern because condensation from cold drinks can easily soak through regular cotton, making the holder damp and uncomfortable to carry. Using a PUL (polyurethane laminate) or a simple nylon lining ensures that any moisture stays contained and can be easily wiped away, keeping the exterior of your Fabric Bottle Holder looking clean and dry.
Insulation is another factor to consider when preparing your Fabric Bottle Holder – Pattern. If you want to keep your drinks cold for longer periods, you should incorporate a layer of insulated batting (like Insul-Bright) between the outer fabric and the lining. This thermal layer reflects heat away from the bottle, significantly improving the functionality of your Fabric Bottle Holder, especially during the hot summer months or long car trips.
The hardware you choose for your Fabric Bottle Holder – Pattern can elevate the project from a simple pouch to a professional gear item. You will likely need swivel hooks, D-rings, and adjustable sliders for the strap. Using high-quality metal hardware instead of plastic can make your Fabric Bottle Holder feel more premium and ensure that the strap doesn’t snap under the pressure of a large, stainless steel water bottle filled to the brim.
Don’t forget about the interfacing when following your Fabric Bottle Holder – Pattern. If you are using lighter-weight decorative cottons for the exterior, applying a fusible fleece or a medium-weight woven interfacing to the back of the fabric is essential. This gives the Fabric Bottle Holder a soft, cushioned feel and helps it stand upright on its own even when the bottle is removed, making it much easier to slide the container back inside.
Finally, consider the thread and stitching techniques required for a sturdy Fabric Bottle Holder – Pattern. Use a strong polyester thread rather than 100% cotton thread, as polyester has a bit more “give” and is more resistant to the friction and tension associated with carrying a heavy bottle. Double-stitching the areas where the straps attach to the Fabric Bottle Holder body is a professional touch that ensures your handmade creation will withstand years of daily use.
2. Understanding the Geometric Logic of the Pattern
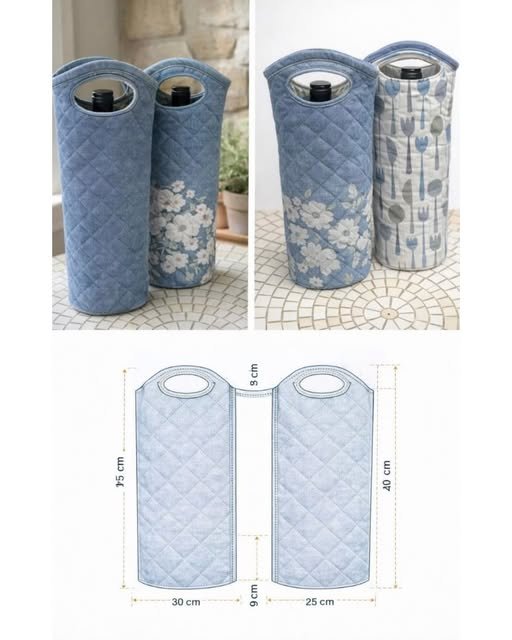
When you look at a Fabric Bottle Holder – Pattern, you will notice it usually consists of three main pieces: a large rectangle for the body, a circle for the base, and a long strip for the strap. The “body” piece of the Pattern must be wide enough to wrap around your bottle with a bit of “ease” and a seam allowance. If the Pattern is too tight, you will struggle to get the bottle in; if it is too loose, the container will wobble and feel unstable.
To calculate the perfect dimensions for your Fabric Bottle Holder – Pattern, you can use basic geometry. The width of your main fabric rectangle should be the circumference of your bottle plus about one inch for the seam allowance and ease. The height is determined by how much of the bottle you want to cover. Most people prefer the Fabric Bottle Holder to reach just below the neck of the bottle so that drinking is easy without having to remove the sleeve every time.
The circular base is often the most intimidating part of a Fabric Bottle Holder – Pattern for beginners. To get this right, you can trace the bottom of your bottle onto paper and add a half-inch seam allowance all the way around. When sewing the circular base to the rectangular body of the Fabric Bottle Holder, it is helpful to “quarter” both pieces using pins to ensure the fabric is distributed evenly, preventing puckers or uneven edges at the bottom of the holder.
A versatile Fabric Bottle Holder – Pattern often includes options for different strap lengths. You might want a short handle for carrying by hand or a long, crossbody strap for hands-free convenience. When drafting the strap portion of your Pattern, remember that the fabric will be folded several times for strength, so the initial cut needs to be four times wider than the desired finished width of the strap.
Many modern versions of the Fabric Bottle Holder – Pattern also feature a drawstring closure at the top. This involves adding a “casing” to the upper edge where a cord or ribbon can be threaded through. This feature is excellent for securing bottles of slightly different heights and adds an extra layer of protection, ensuring the bottle stays firmly inside the Fabric Bottle Holder even if it gets turned upside down in a car or gym bag.
Lastly, always create a paper mockup of your Fabric Bottle Holder – Pattern before cutting into your expensive fabric. By taping the paper pieces together, you can physically test if your bottle fits into the shape. This extra step in the Pattern phase allows you to make adjustments to the height or diameter, saving you from wasting material and ensuring that the final Fabric Bottle Holder is a perfect match for your favorite hydration flask.
3. Step-by-Step Construction of the Fabric Bottle Holder
The assembly process of a Fabric Bottle Holder – Pattern begins with preparing your fabric pieces by applying the necessary interfacing and insulation. Once your pieces are stabilized, you start by sewing the short ends of your main body rectangle together, right sides facing, to create a tube. This is the core structure of your Fabric Bottle Holder, and it’s where you will first see the project really start to take its cylindrical shape.
Next, you will attach the circular base to the bottom of the tube you just created. This is the most technical part of the Fabric Bottle Holder – Pattern. Take your time to pin the circle to the tube carefully, matching the edges exactly. Using a walking foot on your sewing machine can be incredibly helpful here, as it helps move the multiple layers of fabric and interfacing through the machine evenly, resulting in a smooth, professional seam at the bottom of the Fabric Bottle Holder.
Once the outer shell is assembled, you repeat the process for the lining of your Fabric Bottle Holder – Pattern. However, when sewing the side seam of the lining, it is important to leave a 3-to-4-inch opening at the bottom or side. This “turning hole” is essential because it allows you to pull the entire Fabric Bottle Holder right-side out after you have sewn the top edges of the exterior and lining together.
The strap assembly is another rewarding part of the Fabric Bottle Holder – Pattern. Fold your long fabric strip in half, then fold the edges inward toward the center crease and press firmly with an iron. Topstitching down both sides of the strap not only looks great but adds significant structural integrity. Attach the strap ends or the D-ring tabs to the top of the Fabric Bottle Holder exterior before you join it with the lining to ensure the raw edges are hidden inside.
Joining the top edges is the “moment of truth” in the Fabric Bottle Holder – Pattern. You will slide the exterior piece inside the lining (or vice versa), making sure the right sides are touching. Sew all the way around the top circular rim. After sewing, reach through the opening you left in the lining and carefully pull the Fabric Bottle Holder through. Suddenly, all the raw seams are tucked away inside, and your project looks nearly finished.
The final touch for any high-quality Fabric Bottle Holder – Pattern is the topstitching around the upper rim. This step flattens the seam and prevents the lining from “rolling” outward. Finally, sew the opening in the lining closed, either by machine or with a hidden ladder stitch by hand. Slide your bottle into its new Fabric Bottle Holder, adjust the strap, and you are ready to go with a custom accessory that is as functional as it is beautiful.
4. Maintenance and Creative Variations for Your Bottle Holder
Once you have mastered the basic Fabric Bottle Holder – Pattern, the possibilities for customization are endless. You can add external pockets to the body of the holder to carry your phone, keys, or a small wallet. Including a mesh pocket on the side is a popular modification to the standard Pattern that allows you to carry a snack or a charging cable alongside your water bottle, making the Fabric Bottle Holder a true multi-purpose accessory.
Maintaining your Fabric Bottle Holder is relatively simple if you chose your materials wisely. Most handmade fabric holders are machine washable, but it is best to use a cold, gentle cycle and air dry them to preserve the shape and the effectiveness of the insulation. If you used metal hardware or delicate fabrics in your Fabric Bottle Holder – Pattern, consider placing the holder inside a mesh laundry bag before washing to prevent damage to the machine or the accessory.
For those who enjoy different crafts, you can combine techniques by using a quilted Fabric Bottle Holder – Pattern. Using “crumb quilting” or “foundation paper piecing” for the main body panel is a fantastic way to use up small fabric scraps while creating a unique, one-of-a-kind design. This approach adds extra padding to the Fabric Bottle Holder, providing even more protection for glass bottles or fragile ceramic containers.
If you are making these as gifts, you can adapt the Fabric Bottle Holder – Pattern to fit different lifestyles. For a hiker, use earthy tones and add a carabiner clip so they can attach the holder to a backpack. For a child, use bright, whimsical prints and ensure the strap has a “breakaway” safety feature. Personalizing the Fabric Bottle Holder with heat-transfer vinyl or embroidery adds a professional, thoughtful touch that friends and family will truly appreciate.
Sustainability is a major benefit of using a Fabric Bottle Holder – Pattern. By creating a durable, reusable carrier, you are encouraging the use of refillable bottles and reducing the need for single-use plastic. You can even take this a step further by using recycled textiles, such as an old pair of jeans or a vintage tablecloth, to construct your Fabric Bottle Holder, giving new life to materials that might otherwise have been discarded.
Finally, remember that your Fabric Bottle Holder – Pattern is a tool that can be refined over time. Every time you make one, you might find a way to improve the strap placement or the pocket size. Don’t be afraid to experiment with different sizes; a mini version of the Fabric Bottle Holder is perfect for small juice bottles, while an extra-large version can accommodate 64-ounce growlers. Your creativity is the only limit when it comes to designing the perfect textile solution for your hydration needs.
Frequently Asked Questions (FAQ)
Can I make a Fabric Bottle Holder without a sewing machine?
While a sewing machine makes the process much faster and ensures the seams are strong enough to hold a heavy bottle, you can certainly hand-sew a Fabric Bottle Holder – Pattern. You should use a backstitch for the main structural seams and the base to ensure the holder doesn’t fall apart under the weight of the water.
How do I make the holder fit different sized bottles?
The easiest way to make a Fabric Bottle Holder – Pattern adjustable is to use a slightly wider body and a drawstring closure at the top. This allows the fabric to “cinch” around the neck of smaller bottles while still being able to expand for wider containers. You can also use elasticated side panels for a more flexible fit.
What is the best fabric for a rugged, outdoor Fabric Bottle Holder?
For heavy outdoor use, Cordura or heavy canvas are the best choices. These fabrics are highly resistant to tearing and fading. If you use a Pattern designed for these thicker materials, make sure your sewing machine can handle multiple layers of heavy fabric, and use a specialized “denim” or “heavy-duty” needle.
Is it possible to add a shoulder pad to the strap?
Yes! You can easily modify your Fabric Bottle Holder – Pattern to include a padded section for the strap. This is highly recommended if you are carrying a large, heavy bottle over long distances, as it prevents the strap from digging into your shoulder. Just sew a small, quilted rectangle and slide it onto the strap before attaching the hardware.
How much fabric do I need for a standard Fabric Bottle Holder?
Generally, you can make a standard Fabric Bottle Holder with less than a half-yard of fabric. This makes it an excellent “fat quarter” project. If you are using a contrast lining and a different fabric for the strap, you only need small scraps for the body and base, making the Fabric Bottle Holder – Pattern very budget-friendly.
Can I use this pattern for glass bottles?
Absolutely. If you are using your Fabric Bottle Holder for glass, you should increase the amount of padding in your Pattern. Using a thick fusible fleece or a double layer of batting will provide the shock absorption needed to protect the glass from accidental bumps or drops during your daily activities.
Conclusion
In conclusion, mastering the Fabric Bottle Holder – Pattern is a rewarding journey that blends practical utility with creative expression. Throughout this article, we have explored the importance of selecting durable, water-resistant materials, the geometric principles behind a well-fitting Pattern, and the step-by-step assembly techniques required to produce a professional-grade Fabric Bottle Holder.
Whether you are focusing on insulation to keep your drinks cold or adding pockets for extra storage, the skills learned here allow you to create a customized accessory that supports a healthy, eco-friendly lifestyle.