Creating Fabric Butterfly Hair Clips- Pattern projects is one of the most rewarding ways to dive into the world of DIY accessories, blending textile artistry with practical fashion. These charming hair pieces have seen a massive resurgence in recent years, moving from nostalgic 90s aesthetics to sophisticated, handcrafted statements used in weddings, casual outings, and high-fashion editorials. By mastering a Fabric Butterfly Hair Clips- Pattern, you gain the ability to customize your wardrobe with specific colors and textures that store-bought items simply cannot replicate.
The beauty of working with a dedicated Fabric Butterfly Hair Clips- Pattern lies in its versatility; you can use everything from scrap cotton and elegant silk to structured organza or felt. This project is perfect for beginners because it introduces fundamental sewing techniques like the running stitch, gathering, and edge finishing without requiring a massive investment in machinery. For the seasoned crafter, these clips offer a canvas for intricate embroidery, beading, and layering techniques that elevate a simple hair accessory into a piece of wearable art.
When you start looking for the perfect Fabric Butterfly Hair Clips- Pattern, you are not just looking for a shape; you are looking for a blueprint for creativity. Whether you prefer a realistic monarch butterfly design or a whimsical, stylized version, the pattern acts as the skeleton for your vision. In this comprehensive guide, we will explore the essential materials, the step-by-step construction process, and the professional finishing touches needed to create high-quality Fabric Butterfly Hair Clips that look like they came straight from a boutique.
1 Understanding the Fabric Butterfly Hair Clips- Pattern Essentials
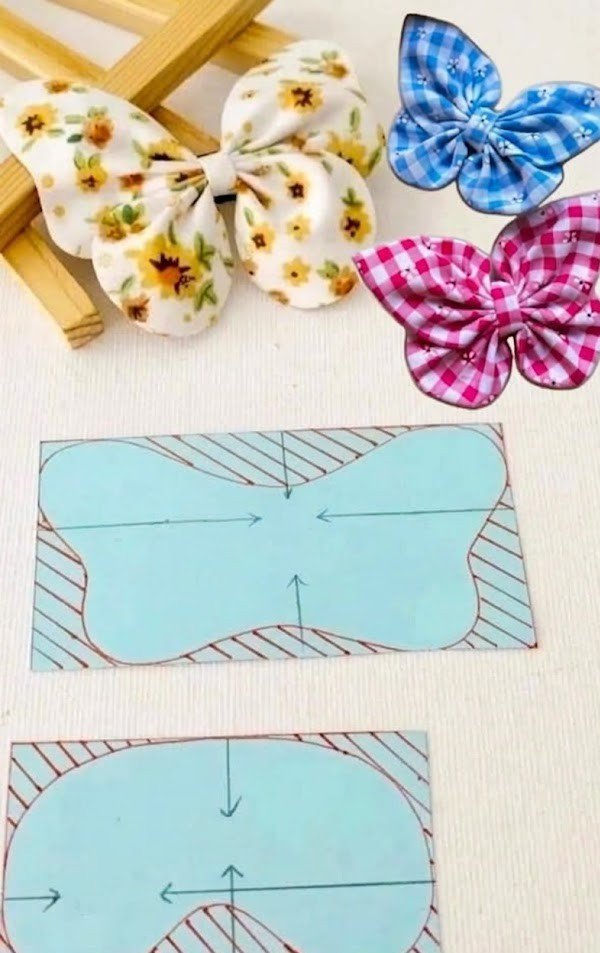
The foundation of any successful accessory starts with a precise Fabric Butterfly Hair Clips- Pattern. This term refers to the template or stencil used to trace the wing shapes onto your chosen material. A good pattern usually consists of two main parts: the upper wings (which are generally larger and more rounded) and the lower wings (which are often more elongated or pointed). Having a physical or digital pattern ensures that your butterflies are symmetrical and consistent, which is vital if you are making a matching set.
Selecting the right material is the next step once you have your Fabric Butterfly Hair Clips- Pattern ready. Lightweight fabrics like chiffon or tulle provide a delicate, ethereal look, while sturdier fabrics like denim or canvas offer a more modern, structural vibe. If you use thin fabrics, you might need to apply a fusible interfacing to the back of the cloth. This adds stiffness, preventing the wings from drooping and ensuring the pattern maintains its intended silhouette even after hours of wear.
The cutting process is where your Fabric Butterfly Hair Clips- Pattern truly comes to life. It is highly recommended to use sharp fabric shears or a rotary cutter for clean lines. If your pattern involves very intricate curves, small embroidery scissors can help you navigate tight corners without fraying the edges. Remember to account for a small seam allowance if you plan on sewing two layers together and turning them right-side out, or cut exactly on the line if you prefer a raw-edge aesthetic.
Another crucial element of the Fabric Butterfly Hair Clips- Pattern is the central body. While the wings provide the color and impact, the body holds the structure together. You can create a fabric body by rolling a small strip of matching material, or you can use wired chenille stems, large beads, or even metallic thread to mimic the butterfly’s anatomy. The way you attach the wings to the body determines the “flight” angle of the butterfly, giving it a three-dimensional appearance.
For those interested in SEO for craft blogs, using the term Fabric Butterfly Hair Clips- Pattern helps reach an audience looking for specific DIY instructions. When search engines crawl your content, they look for clarity and relevance. By explaining that the pattern is the vital first step in the assembly line, you provide value to the reader. It also helps to mention that these patterns can be scaled up or down depending on whether you want a tiny clip for a toddler or a giant statement piece for a gala.
Lastly, don’t forget the hardware aspect of your Fabric Butterfly Hair Clips- Pattern. You need to decide whether you will use alligator clips, snap clips, or french barrettes. The size of the clip should correspond to the size of your fabric butterfly. A clip that is too large will peek out from behind the wings, while one that is too small might not hold the weight of the fabric. Most crafters prefer alligator clips with teeth because they provide a secure grip on various hair types.
2 Preparing Your Workspace and Materials for the Pattern
Before you begin cutting your Fabric Butterfly Hair Clips- Pattern, you must organize your workspace to ensure a smooth creative flow. You will need a flat surface, preferably a self-healing cutting mat, which protects your table and provides measurement grids. Gather your fabric scraps, matching threads, sewing needles, and fabric glue. Having all your tools within reach prevents interruptions and allows you to focus on the delicate details of the butterfly wing construction.
Ironing your fabric is a step you cannot skip when working with a Fabric Butterfly Hair Clips- Pattern. Any wrinkles or folds in the cloth will distort the shape of the wings once they are cut. Use a steam iron to flatten the material completely. If you are using synthetic fabrics, be sure to use a low heat setting to avoid melting the fibers. A crisp piece of fabric ensures that the pattern transfer is accurate and that the finished clip looks professional and polished.
The transfer method is how you get the Fabric Butterfly Hair Clips- Pattern onto the cloth. You can use tailor’s chalk, a heat-erasable pen, or a water-soluble marker. For dark fabrics, a white chalk pencil works best. Carefully trace around your template, making sure not to shift the paper. If you are making multiple clips, try to nestle the shapes close together on the fabric to minimize waste, a practice known in the industry as efficient layout.
If your Fabric Butterfly Hair Clips- Pattern calls for a “no-sew” approach, you will rely heavily on textile adhesives. High-quality fabric glue or a hot glue gun can be used to bond layers together or to attach the wings to the metal clip. However, for a more durable result, especially if the clips are for children, hand-stitching is superior. A simple whipstitch around the edges can add a decorative element while reinforcing the fabric against daily wear and tear.
To make your Fabric Butterfly Hair Clips- Pattern stand out, consider adding embellishments. This is the stage where you can sew on sequins, small pearls, or rhine-stones. These details should be added to the wing pieces after they are cut but before they are fully assembled onto the clip. Adding weight to the wings via beads can change how they hang, so always test the balance. Oversized glitter or fabric paint can also be used to define the “veins” of the butterfly wings.
Safety is also a factor when preparing your Fabric Butterfly Hair Clips- Pattern project. If you are using a lighter to heat-seal the edges of synthetic fabrics (like ribbon or polyester), work in a well-ventilated area. This technique prevents fraying by slightly melting the edge of the fabric, creating a permanent bond. This is a common trick used in boutique-style hair bow making to ensure the longevity of the accessory, making your handmade items last much longer.
3 Step-by-Step Construction of the Fabric Butterfly
Now it is time to assemble the Fabric Butterfly Hair Clips- Pattern. Start by taking your two wing sections (the top and bottom) and placing them together. If you are using the folding method, you will pleat the center of the fabric pieces to create that iconic “scrunch” that makes the wings pop out. Use a strong upholstery thread or dental floss to wrap around the center tightly. This creates the “waist” of the butterfly and allows the wings to flare out naturally.
Once the wings are secured, you can focus on the body of your Fabric Butterfly Hair Clips- Pattern. Wrap a contrasting piece of fabric or a velvet ribbon around the cinched center. This covers your thread and adds a realistic touch. For the antennae, you can use thin jewelry wire or stiffened cord. Fold the wire in half, loop it around the body, and twist the ends. Small beads placed on the tips of the wire can act as the “knobs” on the antennae, adding a cute factor.
The next phase involves attaching the fabric construction to the hardware. Apply a generous amount of industrial-strength glue (like E6000) to the top of the alligator clip. Press the center of your Fabric Butterfly Hair Clips- Pattern assembly onto the clip and hold it for at least thirty seconds. For extra security, some crafters like to “sandwich” the clip by gluing a small piece of felt on the underside of the clip, over the fabric, to ensure it never slides off.
Symmetry is key when finishing the Fabric Butterfly Hair Clips- Pattern. Look at your butterfly from the front and the sides. Are the wings even? If one side looks slightly larger, you can perform a micro-trim to balance them out. If you used a stiffening spray, now is the time to give the wings one last spritz. This helps the butterfly maintain its “flight” shape even when it’s being tossed around in a purse or worn in windy weather.
Let’s talk about the color theory involved in your Fabric Butterfly Hair Clips- Pattern. Using complementary colors—like a yellow butterfly with purple accents—makes the accessory pop against the hair. If you are designing for a specific season, like spring, use pastel shades like mint, lavender, and peach. For autumn, deep jewel tones like emerald, burgundy, and mustard yellow are perfect. The versatility of the pattern allows you to adapt to any trend or personal preference.
The final touch in the Fabric Butterfly Hair Clips- Pattern process is the quality check. Gently tug on the wings and the antennae to make sure everything is bonded tightly. Open and close the clip several times to ensure that no glue has seeped into the hinge, which would make the clip unusable. Once you are satisfied, you have successfully transformed a simple piece of cloth and a pattern into a beautiful, functional piece of jewelry for the hair.
4 Scaling Your Fabric Butterfly Business and Marketing
If you have mastered the Fabric Butterfly Hair Clips- Pattern, you might consider selling your creations. To turn this hobby into a business, you need to focus on branding and presentation. Packaging your clips on a custom cardstock backing with your logo makes them look professional. You can also create “collections” based on your patterns, such as a “Vintage Lace Collection” or a “Bright Neon Series,” which encourages customers to buy more than one.
In the digital world, SEO (Search Engine Optimization) is your best friend. When listing your products online, use the keyword Fabric Butterfly Hair Clips- Pattern in your titles and descriptions. Explain to your customers that each piece is handcrafted using a unique pattern, which adds value and justifies a higher price point than mass-produced plastic clips. High-quality photography showing the clips in use—perhaps on a model or a hairstyling head—is essential for converting browsers into buyers.
Social media platforms like Pinterest and Instagram are perfect for showing off your Fabric Butterfly Hair Clips- Pattern. Create short “Process Videos” or “Reels” showing how you go from a flat piece of fabric to a 3D butterfly. This “behind-the-scenes” content builds trust with your audience. Use hashtags like #DIYHairAccessories, #ButterflyPattern, and #HandmadeStyle to reach people interested in unique, artisanal products.
To keep your business fresh, you should constantly iterate on your Fabric Butterfly Hair Clips- Pattern. Try experimenting with different sizes—maybe a “Giant Butterfly” for a photo shoot or “Miniature Butterflies” for a subtle everyday look. You can also offer customization, where customers choose the fabric to match a specific dress. This personalized service is something big retailers can’t offer, giving your small business a significant competitive advantage.
Networking with other crafters can also help you refine your Fabric Butterfly Hair Clips- Pattern. Join online forums or local craft fairs to see what techniques others are using. Sometimes, a small tweak to your pattern—like changing the curve of the wing or adding a layer of lace—can completely transform the final product. Feedback from real users is the best way to improve your design and ensure your clips are comfortable to wear all day long.
Finally, always stay updated on Google Adsense policies if you are running a blog about your crafts. Ensure your content remains original, helpful, and free of copyright-infringement issues. By providing a genuinely useful guide on the Fabric Butterfly Hair Clips- Pattern, you attract organic traffic and build a loyal readership. Teaching others how to create is a powerful way to establish yourself as an expert in the DIY fashion niche.
FAQ: Frequently Asked Questions
What is the best fabric for a Fabric Butterfly Hair Clips- Pattern?
The best fabric depends on the look you want. For a stiff, durable butterfly, felt or heavy cotton is best. For a soft, realistic look, use silk, organza, or chiffon. If you use thin fabrics, remember to use a stiffening agent.
Can I make these without a sewing machine?
Yes! The Fabric Butterfly Hair Clips- Pattern is very friendly for hand-sewing. You only need basic stitches like the running stitch or backstitch. Many people actually prefer hand-sewing for these clips because the pieces are small and delicate.
How do I stop the edges of the fabric from fraying?
You can use fray check liquid, a small amount of clear nail polish, or heat-seal the edges with a lighter if the fabric is synthetic. Another option is using pinking shears to cut the fabric, which creates a decorative zig-zag edge that resists fraying.
What size should my Fabric Butterfly Hair Clips- Pattern be?
A standard size is usually between 2 to 3 inches in width. However, you can scale the pattern up for a statement piece or down to 1 inch for tiny “hair gems.” Just make sure your clip size matches the butterfly size.
Are these clips safe for toddlers?
Yes, but you must ensure all small parts like beads or sequins are sewn on very securely, not just glued. For very young children, it is safer to make a “soft” version of the Fabric Butterfly Hair Clips- Pattern using only fabric and thread, avoiding wire or small decorations.
How do I clean my fabric butterfly clips?
Since they are made of fabric and glue, they shouldn’t be submerged in water. Spot clean them with a damp cloth and a tiny bit of mild soap. If they lose their shape, you can gently reshape them with your fingers and a light mist of hairspray.
Conclusion
In this article, we have explored the wonderful world of the Fabric Butterfly Hair Clips- Pattern, covering everything from the initial template design to the final marketing strategies. We’ve learned that the choice of fabric, the precision of the cut, and the quality of the hardware are all essential components in creating a high-end accessory. Whether you are crafting for yourself, as a gift, or to start a small business, mastering the butterfly pattern opens up a world of creative possibilities.
The process of making Fabric Butterfly Hair Clips is a journey of patience and detail. By following the steps outlined—preparing your workspace, meticulously cutting your Fabric Butterfly Hair Clips- Pattern, and carefully assembling the wings—you ensure a result that is both beautiful and durable. Remember that every butterfly you make is a reflection of your unique style, so don’t be afraid to experiment with bold colors, textures, and embellishments.