Creating a beautiful Fabric Butterfly – Pattern is one of the most delightful ways to bring a touch of nature’s elegance into your home through the art of sewing. Whether you are an experienced quilter or a complete beginner looking for a weekend project, working with a Fabric Butterfly – Pattern allows for endless creativity and the chance to use up those colorful fabric scraps you have been saving. These charming textile creations can be used as hair accessories, wall decor, or even as 3D embellishments for quilts and clothing, making the Fabric Butterfly – Pattern a versatile staple in any crafter’s digital or physical library.
In this comprehensive guide, we will explore the intricate details of selecting the right materials and following a professional Fabric Butterfly – Pattern to achieve a realistic and high-quality result. The term Fabric Butterfly refers to the finished three-dimensional or flat textile art piece that mimics the delicate wings and body of a real butterfly, while the Pattern refers to the essential blueprint, template, or set of instructions used to cut and assemble the fabric pieces correctly. By mastering the Fabric Butterfly – Pattern, you can create a whole kaleidoscope of colorful insects that never fade and bring joy to anyone who sees them.
As we dive into the technical and artistic aspects of this craft, you will learn how to optimize your workflow for the best results. A well-designed Fabric Butterfly – Pattern ensures that the proportions of the upper and lower wings are balanced and that the final product has the structural integrity to hold its shape. We will discuss the importance of fabric weight, the role of stabilizers, and the decorative techniques that turn a simple piece of cloth into a stunning Fabric Butterfly. Using a Pattern is the best way to ensure consistency, especially if you plan on making multiple butterflies for a larger decorative installation or as handmade gifts for friends and family.
1. Choosing the Right Materials for Your Fabric Butterfly – Pattern
When you begin working on a Fabric Butterfly – Pattern, the choice of textile is the most important decision you will make. Light-to-medium weight woven cottons are the most popular choice because they hold a crease well and are easy to manipulate during the folding or sewing process. Using high-quality cotton ensures that your Fabric Butterfly looks crisp and professional, while also being durable enough to handle the stitching required by the Pattern.
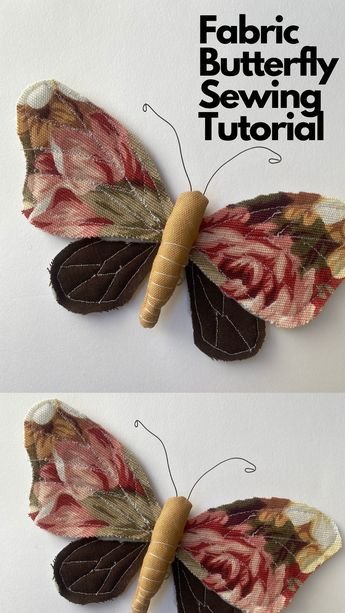
Beyond the main wings, you should consider the visual impact of your Fabric Butterfly – Pattern by selecting contrasting fabrics for the front and back. Since butterflies in nature often have different colors or patterns on the underside of their wings, choosing two different but complementary prints can add a layer of realism to your Fabric Butterfly. Scraps of floral, polka dot, or even solid batiks work wonderfully when following a standard Fabric Butterfly – Pattern.
Structure is another key component to consider when translating a Pattern into a physical object. If you want your Fabric Butterfly to have stiff wings that stand up on their own, you may need to apply a thin layer of fusible interfacing to the wrong side of your fabric. This step, often recommended in a professional Fabric Butterfly – Pattern, prevents the wings from drooping and gives the final piece a much more polished and intentional look.
For the body of the butterfly, many crafters like to deviate slightly from the basic Fabric Butterfly – Pattern by using different materials like wooden beads, embroidery floss, or even small rolls of felt. These additions give your Fabric Butterfly a sense of depth and character. When you follow the Pattern correctly, the body acts as the central anchor that holds the wings in place, so choosing sturdy materials for this section is vital for the longevity of your craft.
Don’t forget the importance of your sewing tools when tackling a Fabric Butterfly – Pattern. Sharp fabric scissors or a rotary cutter are essential for getting the clean, precise edges that the Pattern demands. If your cuts are jagged or inaccurate, the wings of your Fabric Butterfly may end up asymmetrical, which can detract from the overall beauty of the finished project. A fine-point fabric marker is also helpful for tracing the Pattern onto your material.
Finally, consider the thread you use to assemble your Fabric Butterfly – Pattern. A strong polyester or cotton thread in a matching or invisible color will ensure that your seams are secure without being distracting. Some Fabric Butterfly designs require hand-stitching for the final details, so having a set of sharp hand-sewing needles nearby will make the closing steps of the Pattern much smoother and more enjoyable for the maker.
2. Understanding the Geometry and Layout of the Pattern
The layout of a Fabric Butterfly – Pattern is usually designed to maximize fabric efficiency while ensuring the “grain” of the fabric aligns with the wings. Most patterns will consist of two distinct shapes: a larger pair for the top wings and a slightly smaller, more rounded pair for the bottom wings. Understanding how these pieces interact within the Fabric Butterfly – Pattern is the secret to creating a balanced silhouette that looks like it could take flight at any moment.
When you look at a digital or paper Fabric Butterfly – Pattern, pay close attention to the “fold lines” and “seam allowances.” A fold line indicates where the fabric should be doubled over before cutting, which helps in creating perfectly symmetrical wings for your Fabric Butterfly. Seam allowances are the extra bits of fabric (usually 1/4 inch) that will be hidden inside the seams once you start sewing the Pattern pieces together.
One interesting variation is the “origami style” Fabric Butterfly – Pattern. Instead of cutting out multiple wing shapes, this method uses a single rectangle or square of fabric that is folded and stitched in a specific sequence to create the butterfly shape. This type of Pattern is excellent for those who enjoy precision folding and want to create a Fabric Butterfly that has a unique, geometric aesthetic without the need for complex curved sewing.
If you are designing your own Fabric Butterfly – Pattern, it is helpful to draw inspiration from real butterfly species like the Monarch or the Swallowtail. Each species has a unique wing shape, and capturing these nuances in your Pattern can make your Fabric Butterfly collection look more authentic. You can scale the Pattern up or down on a printer to create different sizes, ranging from tiny pins to large wall hangings.
A professional Fabric Butterfly – Pattern will also include markings for where to attach the antennae and the body. These points are strategically placed to ensure the weight of the wings is distributed evenly. If the wings are attached too far forward or back on the Fabric Butterfly, it may tilt awkwardly when hung up. Following the alignment guides on the Pattern ensures that your creation remains perfectly poised.
Lastly, always do a test run with scrap fabric when trying a new Fabric Butterfly – Pattern. This allows you to understand the construction logic without wasting your favorite “fancier” fabrics. Once you have mastered the sequence of the Pattern, you will find that you can produce a Fabric Butterfly in a relatively short amount of time, making it a great “production” project for craft fairs or party favors.
3. Mastering the Sewing and Assembly Process
The assembly of a Fabric Butterfly – Pattern usually begins with sewing the wing sections right-sides together. This “stitch and turn” method is a fundamental sewing technique that hides the raw edges inside the wing, giving your Fabric Butterfly a clean and professional finish. It is important to leave a small opening, as indicated in the Pattern, to turn the wings right-side out after sewing the perimeter.
Once the wings are turned, the Fabric Butterfly – Pattern often instructs you to “topstitch” around the edges. This serves two purposes: it closes the turning gap and adds a decorative, defined border to the wings. You can use a contrasting thread color for the topstitching to make the details of your Fabric Butterfly pop, or stick with a matching thread for a more subtle and elegant look that follows the Pattern lines.
Gathering the center of the wings is the magical moment where the flat fabric transforms into a Fabric Butterfly. Following the Pattern, you will usually run a basting stitch through the middle of the wing assembly and pull the thread tight. This creates the beautiful “scrunch” that defines the butterfly’s shape. Ensuring this gather is centered is crucial for the symmetry of your Fabric Butterfly – Pattern results.
The body of the butterfly is typically the next step in the Fabric Butterfly – Pattern. Some patterns suggest sewing a small fabric tube, stuffing it lightly, and then hand-stitching it over the center gather. This hides the thread used for gathering and gives the Fabric Butterfly a more three-dimensional, life-like appearance. Precision during this step ensures the body is straight and firmly attached to the wings.
Adding antennae is a small detail that makes a huge difference in the final Fabric Butterfly – Pattern. You can use waxed cord, thin wire, or even knotted embroidery floss. The Pattern will usually show you exactly where to tuck these into the head area of the body. Once the antennae are in place, your Fabric Butterfly will suddenly have a personality and a sense of direction, completing the transformation from fabric to art.
Finally, the Fabric Butterfly – Pattern might include instructions for adding a backing. If you intend to use the butterfly as a brooch, you will need to sew a pin-back onto the rear. If it is for a quilt, the Pattern might suggest leave the back flat for easier appliqué. Regardless of the final use, the versatility of the Fabric Butterfly means it can be adapted to almost any textile project you can imagine.
4. Tips for Customizing and Enhancing Your Pattern
One of the best things about a Fabric Butterfly – Pattern is how easily it can be customized with embellishments. Once you have the basic structure sewn, you can add sequins, beads, or “fabric paint” to mimic the intricate spots and lines found on real wings. These additions can turn a simple Fabric Butterfly into a shimmering piece of wearable art that looks much more complex than the original Pattern might suggest.
Experimenting with different fabric textures can also breathe new life into an old Fabric Butterfly – Pattern. Try using silk or organza for the top layer of the wings to create a translucent effect. Layering sheer fabrics over opaque cottons within the Pattern framework adds a sense of depth and movement to the Fabric Butterfly, making it look especially delicate and high-end.
For those who enjoy embroidery, a Fabric Butterfly – Pattern provides the perfect “canvas” for decorative stitching. You can use a satin stitch to fill in wing segments or a stem stitch to outline the wing veins. Integrating hand-embroidery into your Fabric Butterfly project makes each piece entirely unique, even if you are using the same Pattern for every single one you make.
If you want to create a larger-than-life Fabric Butterfly, you can modify the Pattern to include “quilt batting” or foam. This gives the butterfly a soft, squishy feel, which is perfect for nursery decor or pillows. When working with thicker materials, remember to increase your seam allowances on the Fabric Butterfly – Pattern slightly to account for the extra bulk during the turning process.
Seasonal variations are another fun way to use your Fabric Butterfly – Pattern. Use warm oranges and browns for autumn-themed decor, or bright neons for a summer-themed garden party. You can even use metallic fabrics or lace for a festive, holiday-themed Fabric Butterfly. The Pattern remains the same, but the choice of color and texture completely changes the vibe of the finished work.
Finally, consider the presentation of your finished Fabric Butterfly – Pattern projects. Grouping them in a shadow box or mounting them on flexible wires to “hover” over a floral arrangement can create a stunning visual display. Because you took the time to follow a high-quality Fabric Butterfly – Pattern, your creations will have the structural integrity to be displayed in a variety of creative ways for years to come.
Frequently Asked Questions (FAQ)
What is the best fabric for a Fabric Butterfly?
The most recommended fabric for following a Fabric Butterfly – Pattern is 100% quilting cotton. It is easy to sew, comes in thousands of prints, and holds its shape well when pressed with an iron. For more delicate butterflies, silk or lightweight linen can also be used effectively.
Do I need a sewing machine to use a Fabric Butterfly – Pattern?
While a sewing machine makes the process faster, especially for the long seams, you can certainly sew a Fabric Butterfly by hand. In fact, many people prefer hand-sewing for smaller versions of the Pattern because it allows for greater control over the tight curves and small details.
How do I make the wings of the butterfly stand up?
To ensure the wings of your Fabric Butterfly don’t flop, you should use a “fusible stabilizer” or “interfacing.” This is an extra layer of material that bonds to your fabric with heat. Following the Fabric Butterfly – Pattern and adding this layer will give the wings the stiffness they need to stay upright.
Can I wash a Fabric Butterfly?
If you used standard cotton and high-quality thread, your Fabric Butterfly should be washable. However, if you added delicate embellishments like beads, sequins, or wire antennae, it is best to spot clean the item only. Always check the care instructions for the specific materials you used alongside the Pattern.
Is this pattern suitable for children to try?
Yes! A simplified Fabric Butterfly – Pattern is a fantastic project for teaching children basic sewing skills. Using felt is a great modification for kids, as it doesn’t fray and is easy to stitch through with a blunt needle, making their first Fabric Butterfly a successful and fun experience.
How can I resize the pattern?
Resizing a Fabric Butterfly – Pattern is easy with a photocopier or printer settings. Simply change the “scale” percentage (e.g., to 50% for a mini version or 200% for a large one). Just remember that if you go very small, the sewing becomes more intricate, and if you go very large, you may need much stiffer interfacing.
Conclusion
In conclusion, mastering the Fabric Butterfly – Pattern is a rewarding journey that blends technical sewing skills with pure artistic expression. Throughout this article, we have explored how to select the perfect fabrics, the importance of using interfacing for structure, and the step-by-step methods for assembling the wings and body of your Fabric Butterfly.
We also discussed how the Pattern acts as your essential guide to ensuring symmetry and professional results. Whether you are making these for gifts, home decor, or to enhance your other sewing projects, the Fabric Butterfly – Pattern provides a foundation for endless creativity.