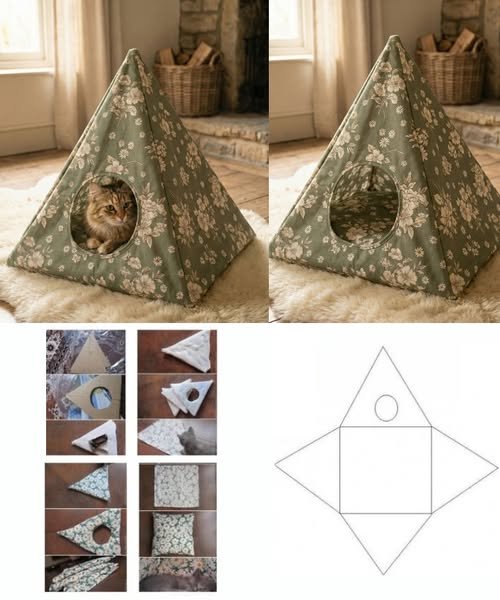
Fabric Cat Bed – Pattern projects are a wonderful way to blend creativity with comfort for your beloved pet. The moment you begin working with the Fabric Cat Bed – Pattern, you step into a crafting experience that is not only enjoyable but also purposeful. Cats adore cozy spaces, and creating a handmade bed allows you to give them a soft, warm, and personalized spot they’ll return to every day. Whether you’re an experienced sewist or a curious beginner, this pattern offers endless opportunities for customization and success.
One of the greatest benefits of making your own cat bed is the freedom to choose every detail: the fabrics, colors, size, and level of padding. With the Fabric Cat Bed – Pattern, you can match the bed perfectly to your home décor or create a fun space that reflects your cat’s personality. Unlike store-bought options, handmade beds can be more durable, washable, and designed exactly to your pet’s needs. Crafting for pets has become extremely popular, and this project is an excellent way to start.
Additionally, sewing pet accessories such as this bed strengthens the bond between you and your furry companion. Cats feel comfort in familiar smells and textures, so your handcrafted piece becomes more than just a bed—it becomes a safe haven. With the Fabric Cat Bed – Pattern, you can gift your cat a beautiful resting space that blends love, craftsmanship, and thoughtful design. Below, you’ll find everything needed to create the perfect bed, from fabric selection to final assembly.
1. Choosing the Right Fabrics and Materials
Selecting the proper materials is key to making a long-lasting and comfortable Fabric Cat Bed – Pattern. Cats tend to knead, scratch, and curl into their beds, so choosing durable fabrics ensures your creation holds up over time. Heavy cotton, canvas, fleece, or upholstery fabric are all excellent choices. Soft fabrics provide warmth, while sturdier materials offer strong resistance to scratching.
Another vital component is the filling. High-quality polyester fiberfill works well because it remains fluffy even after washing. Foam inserts or memory foam pieces can also be used to give extra support, especially for older cats that may benefit from additional cushioning. The right filling makes the bed feel luxurious and inviting.
The bottom of the bed should ideally have a non-slip fabric. A simple non-skid mat material or textured upholstery fabric prevents the bed from sliding on smooth floors. Cats often jump into their beds with energy, so a secure base helps prevent accidents and ensures stability.
Thread quality is equally essential. Strong polyester thread is recommended when working with thick or textured fabrics. Matching thread colors create a clean look, while contrasting threads can be used intentionally for decorative stitching. Reinforcing seams is a great idea, especially around edges or areas where cats may tug or knead.
Tools you will need include a rotary cutter or scissors, fabric pins or clips, a sewing machine, a ruler, and an iron. Most steps in the Fabric Cat Bed – Pattern are straightforward, and having the right tools ensures smooth assembly and precise measurements. Preparing everything in advance streamlines your sewing session and helps you stay organized.
Finally, prewashing and ironing your fabrics is highly recommended. Cats have sensitive skin and noses, so removing factory chemicals and ensuring the fabric won’t shrink later keeps the bed safe, soft, and clean for your feline friend.
2. Cutting and Preparing the Pieces
Once your materials are selected, cutting the pieces according to the Fabric Cat Bed – Pattern is the next step. Accuracy in this stage is essential because clean, even cuts make sewing the bed much easier. Lay your fabric on a flat surface and smooth out any wrinkles before marking your pattern.
Most cat beds include a circular or oval base with padded side walls. Use fabric chalk or a washable fabric marker to outline the shapes. A measuring tape or quilting ruler helps keep edges symmetrical. If you prefer a square or rectangular bed, adjust the pattern dimensions accordingly—this is one of the beautiful flexibilities of making your own item.
Cut two identical pieces for the bed base: one for the top and one for the underside. For the side walls, cut long straps of fabric that will form the rounded or boxed edges. Make sure to add seam allowances to all pieces to ensure proper fit when assembled.
Once the main pieces are cut, prepare the lining or inner layer if your pattern includes one. Linings add durability and make the bed easier to wash. You can also cut an inner cushion piece that fits inside the bed. This cushion can be removable, allowing for quick cleaning whenever needed.
Before sewing, pin or clip the fabric pieces lightly together to test alignment. The Fabric Cat Bed – Pattern should look balanced when laid out flat. If any sides seem uneven, trim them before moving forward. This helps maintain a sleek, professional result.
Ironing the pieces after cutting helps keep edges sharp and reduces sewing difficulties. Smooth fabric glides through the sewing machine more easily, ensuring straight seams and consistent stitching throughout the project.
3. Assembly and Stitching the Cat Bed
With your pieces cut and prepared, it’s time to assemble the Fabric Cat Bed – Pattern. Begin with the side wall pieces by sewing them into a loop. This forms the frame of your bed. Use a straight stitch and reinforce the seam with an extra row of stitching for durability.
Next, attach the side wall loop to the base fabric. Since the base is typically circular or oval, pinning the pieces carefully makes sewing easier. Work slowly and adjust the fabric frequently to keep the edges aligned. Sew around the entire perimeter, leaving a small opening if you plan to insert filling later.
After attaching the outer fabric, repeat the process with any lining pieces, depending on your design. The lining should mimic the shape of the outer bed so they fit together neatly. Once both pieces are complete, turn them right side out and press gently with your iron.
Now it’s time to add the filling. Whether using polyester fiberfill, foam, or a combination, distribute it evenly. Ensure the filling is plush but not overly stuffed—your cat should sink comfortably into the bed. Pay extra attention to the side walls, as they should be firm enough to stand upright.
After filling, close the opening with a hidden stitch or a tight machine stitch. A hidden ladder stitch provides a seamless look and keeps stuffing secure. Reinforce as necessary to ensure longevity.
If your pattern includes a removable cushion, assemble and fill it in the same way. Place it inside the bed and give everything a final shape with your hands. At this stage, the Fabric Cat Bed – Pattern starts to take its final form and look cozy and inviting.
4. Customization, Decoration, and Final Touches
One of the most exciting aspects of using the Fabric Cat Bed – Pattern is the possibility for personalization. You can tailor every detail to your cat’s habits, preferences, and your home décor style. Choose prints featuring fish, paw prints, stripes, florals, or any playful design you love.
Adding decorative stitching along the edges can elevate the bed’s appearance. Simple topstitching around the rim not only looks professional but also helps reinforce seams. If you enjoy embroidery, consider adding your cat’s name or a small design on the side or cushion.
For cats who love burrowing, modify the pattern to include a small blanket or hooded section. This creates a “cave bed” that feels extra warm and secure. For older cats, consider adding orthopedic foam to help relieve pressure on their joints.
Non-slip backing is another valuable customization. If your cat tends to push or slide beds around the house, adding a textured base keeps everything in place. This is especially helpful for hardwood floors or tiles.
You can also create seasonal versions of the Fabric Cat Bed – Pattern, such as holiday-themed or summer-lightweight beds. Cats appreciate variety, and rotating their beds occasionally prevents wear and tear while giving them something new to explore.
Finally, consider making matching accessories like toys or small pillows to complement the bed. These small touches enrich your cat’s environment and make the entire project feel complete and stylish.
FAQ – Fabric Cat Bed – Pattern
1. Is the Fabric Cat Bed – Pattern suitable for beginners?
Yes, it is beginner-friendly and offers simple steps that anyone can follow.
2. What fabric is best for a cat bed?
Durable fabrics like cotton canvas, fleece, or upholstery fabric work best.
3. Can the cat bed be washed?
Yes, especially if you use washable fabrics and removable inner cushions.
4. How much filling should I use?
Use enough to make it soft and supportive, but avoid overstuffing.
5. Can I make the bed bigger or smaller?
Absolutely—the pattern is flexible, allowing easy resizing.
6. Do cats really use handmade beds?
Most cats love soft, familiar-smelling places, making handmade beds very appealing.
Conclusion
Creating a Fabric Cat Bed – Pattern is a rewarding project that blends practicality with creativity.
From selecting cozy fabrics to adding thoughtful custom touches, every step contributes to a beautiful, functional piece your cat will adore.I hope this guide has inspired you to start your own handmade pet bed.