Creating a Fabric chicken garland – Pattern is a delightful way to infuse your home with a touch of rustic charm and handmade warmth. Whether you are decorating a farmhouse-style kitchen, preparing for a festive Easter celebration, or simply looking for a whimsical nursery accent, a fabric chicken garland offers a unique aesthetic that store-bought decorations simply cannot match. By following a well-designed pattern, you can transform simple scraps of fabric into a flock of colorful, charming characters that bring a smile to everyone who sees them.
The beauty of a Fabric chicken garland – Pattern lies in its versatility and the creative freedom it provides to the maker. This project is perfect for using up your fabric stash, allowing you to mix and match different prints, textures, and colors to create a diverse and eye-colored display. A pattern ensures that each fabric chicken maintains a consistent shape and size, which is essential for the overall balance of the garland when it is eventually hung on a mantle, shelf, or wall.
Engaging with a Fabric chicken garland – Pattern is also an excellent entry point for those new to soft sculpture or decorative sewing. The geometric simplicity of a chicken shape makes it an approachable project, yet it offers enough room for advanced techniques like embroidery, applique, and beading. As you progress through the pattern, you will learn how to manage small curves, handle delicate stuffings, and assemble multiple components into a cohesive, professional-looking fabric garland that looks stunning in any setting.
1. Selecting Materials for Your Fabric chicken garland – Pattern
The success of your Fabric chicken garland – Pattern begins with choosing the right materials to bring your vision to life. For a classic look, cotton calico or linen are excellent choices for the main body of the fabric chicken, as they hold their shape well and come in endless patterns. If you prefer a more cozy, primitive feel, consider using wool felt or flannel, which add a soft texture to the garland.
When working with a Fabric chicken garland – Pattern, the interfacing you choose can make a significant difference in the final result. Using a light fusible interfacing on the back of thinner fabrics helps prevent the stuffing from looking “lumpy” and ensures the chicken maintains its crisp silhouette. This is particularly important if you want your garland to look polished and high-quality for years to come.
The “garland” aspect of the Fabric chicken garland – Pattern requires a sturdy stringing material to hold the weight of the fabric birds. Jute twine, baker’s twine, or even a thin satin ribbon can be used depending on the style you are aiming for. A rustic fabric chicken looks wonderful on natural twine, while a modern, bright version might pop against a neon-colored cord.
Don’t forget the small details that bring the Fabric chicken garland – Pattern to life, such as the comb and beak. Most patterns suggest using felt for these parts because it doesn’t fray, making it easy to cut small, intricate shapes. You can use a bright red felt for the comb to provide that classic farmyard contrast against your main fabric choice.
Stuffing is another vital component of the fabric chicken construction. High-quality polyester fiberfill is the standard choice for a lightweight finish, but some crafters prefer adding a bit of dried lavender or plastic pellets at the bottom of each bird. This adds weight and a lovely scent to your Fabric chicken garland – Pattern, making it a sensory experience as well as a visual one.
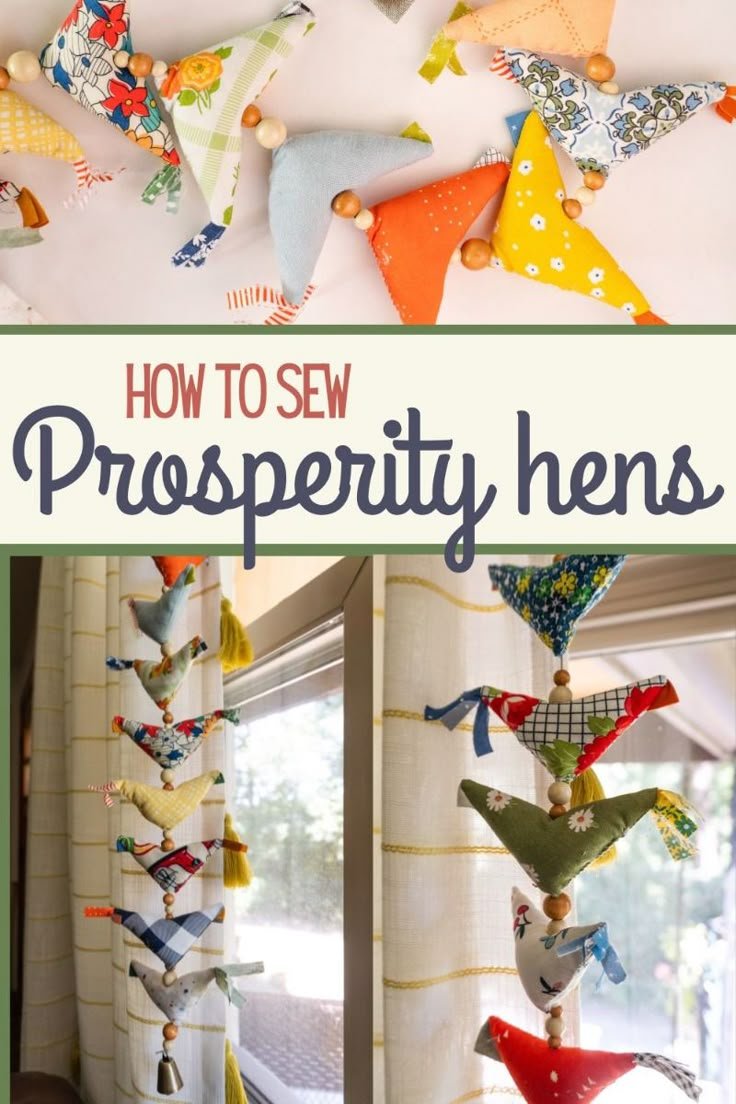
Finally, consider the hardware needed for hanging. Small wooden beads placed between each fabric chicken on the garland can act as spacers and add an extra layer of visual interest. These beads can be left natural or painted to match the colors found in your pattern, tying the whole decorative piece together perfectly.
2. Preparing and Cutting the Fabric chicken garland – Pattern
Before you touch your sewing machine, the first step is the preparation of the Fabric chicken garland – Pattern pieces. You should print or trace your pattern onto sturdy cardstock if you plan on making multiple garlands, as this makes tracing onto the fabric much more accurate. Accuracy at this stage ensures that every chicken in your flock looks like it belongs to the same family.
When laying out your pattern on the fabric, pay close attention to the grainline. Cutting on the straight grain ensures that your fabric chicken won’t twist or warp once it is stuffed. If your fabric has a directional print, such as stripes or little flowers, make sure the pattern is oriented so the design looks intentional on the finished garland.
The Fabric chicken garland – Pattern usually consists of two main body pieces, a comb, a beak, and sometimes separate wing pieces. Using sharp fabric shears or a small rotary cutter is essential for getting clean edges on these small parts. Clean cuts make the sewing process much smoother, especially when navigating the tight curves around the chicken’s tail and head.
If you are a beginner, it can be helpful to mark the seam allowance directly onto the fabric using a heat-erasable pen. This gives you a clear path to follow while sewing, which is vital for maintaining the specific proportions of the Fabric chicken garland – Pattern. Even a small deviation can change the “personality” of your fabric chicken, making it look more or less plump than intended.
For those looking to save time, you can “batch cut” the pattern by layering several pieces of fabric together. However, only do this if you are confident in your cutting skills, as shifting layers can lead to inconsistent shapes. A consistent Fabric chicken garland – Pattern is what separates a professional-looking decoration from a messy DIY project.
Once all your pieces are cut, organize them into small piles for each individual chicken. This keeps your workspace tidy and ensures you don’t accidentally sew a blue beak onto a red fabric chicken unless that is your specific design choice! Preparation is the foundation of a stress-free crafting session with any garland project.
3. Sewing and Assembling the Fabric Chicken
Now comes the exciting part: bringing the Fabric chicken garland – Pattern to life with your sewing machine or a needle and thread. Start by attaching the small details like the beak and comb to one of the body pieces. Most patterns recommend basting these in place first so they don’t shift when you sew the two main body halves together.
When sewing the perimeter of the fabric chicken, remember to leave a small opening—usually at the bottom—for turning and stuffing. Use a short stitch length (around 2.0mm) to ensure the seams are strong enough to withstand the pressure of the stuffing. This is a crucial tip for any Fabric chicken garland – Pattern to prevent the seams from popping open later.
After sewing, it is important to clip the curves. Use your scissors to make small snips into the seam allowance around the head and tail, being careful not to cut the stitches. This allows the fabric to lay flat and smooth once turned right side out, giving your fabric chicken a professional, rounded appearance rather than a jagged one.
Turn the fabric right side out and use a turning tool or a blunt chopstick to push out the seams gently. Once the shape is fully turned, give it a quick press with an iron. This step is often skipped by impatient crafters, but it makes a world of difference in the final look of your Fabric chicken garland – Pattern by sharpening the edges before the stuffing goes in.
Fill each chicken with small pinches of stuffing at a time. Start with the extremities, like the beak area and the tail, and then fill the body. You want the fabric chicken to be firm but not so overstuffed that the seams start to pull. The goal is a cute, plump bird that hangs nicely on the garland without being too heavy.
The final assembly step is closing the opening. A ladder stitch (also known as an invisible stitch) is the best method for this, as it hides the thread completely. Once all your chickens are closed, they are ready to be attached to the main cord of your Fabric chicken garland – Pattern, completing the transformation from scraps to decor.
4. Finalizing and Hanging Your Fabric Chicken Garland
The last stage of the Fabric chicken garland – Pattern is deciding how to space and secure your birds. You can either sew the fabric chickens directly onto the twine or use small wooden clothespins for a more versatile, changeable look. Most people prefer to thread the twine through the top of the chicken’s back or comb using a large darning needle.
To keep the birds from sliding into the center of the garland, you can tie a small knot on either side of each fabric chicken. Alternatively, placing a decorative bead or a ribbon bow between each bird acts as a physical barrier and adds to the charm. This structural step ensures your Fabric chicken garland – Pattern remains evenly distributed when hung.
Consider the environment where your fabric garland will live. If it’s going in a kitchen, you might want to use a fabric protector spray to keep it from absorbing cooking odors or grease. If it’s for a child’s room, ensure that any beads or small parts are securely attached and out of reach of tiny hands, as safety is just as important as the pattern itself.
Lighting can also enhance your Fabric chicken garland – Pattern. Some creative makers weave a string of LED fairy lights through the garland, making the colorful fabric glow in the evening. This creates a cozy, magical atmosphere in any room and highlights the textures of the materials you chose.
The length of your garland should be determined by where you intend to hang it. A standard mantle usually requires a garland that is about 5 to 6 feet long, while a small window might only need 3 feet. The Fabric chicken garland – Pattern is easily adjustable; simply add or remove birds until you reach the perfect length for your space.
Once your Fabric chicken garland – Pattern is complete, take a moment to fluff the birds and adjust their positions. Step back and admire the whimsical flock you’ve created! Whether you keep it for yourself or give it as a heartfelt handmade gift, this project is a wonderful testament to your creativity and skill in the world of fabric arts.
FAQ: Common Questions about the Fabric Chicken Garland Pattern
Can I make this project without a sewing machine?
Yes, the Fabric chicken garland – Pattern is small enough to be easily sewn by hand. Using a backstitch for the main seams will provide the strength needed for stuffing, and it can be a very relaxing “slow sewing” project to do while watching TV or traveling.
How many chickens do I need for a standard-sized garland?
For a 5-foot garland, most crafters find that 7 to 9 fabric chickens look best. This allows for about 6 to 8 inches of space between each bird, which prevents the garland from looking too crowded while still making a significant visual impact.
What is the best way to clean my fabric chicken garland?
Since these are stuffed items with small details, they are not suitable for the washing machine. We recommend light dusting with a microfiber cloth or using a vacuum attachment on a low setting. For stains, spot clean carefully with a damp cloth and mild soap.
What size should each chicken be?
In a typical Fabric chicken garland – Pattern, each chicken is usually between 4 and 5 inches wide. This size is large enough to show off the fabric prints but small and lightweight enough to hang easily without sagging the twine.
Is this pattern suitable for children to try?
With adult supervision, this is a great project for children ages 8 and up. It teaches basic cutting, sewing, and stuffing skills. Using felt is especially good for kids because it is easier to handle and doesn’t fray like woven fabric might.
Can I add legs to my fabric chickens?
While many garland patterns keep the birds legless for a cleaner look, you can certainly add legs! Using pieces of yellow yarn, suede cord, or even wire covered in twine can add a hilarious and cute personality to your fabric chicken garland.
Conclusion
Creating a Fabric chicken garland – Pattern is a wonderful journey into the world of handmade home decor. Throughout this article, we have covered everything from selecting the perfect fabric and interfacing to the final steps of assembling and hanging your whimsical flock.
We learned how a consistent pattern ensures a professional result and how small details like beads, twine, and embroidery can personalize the project to fit any home style. This project is not only a great way to use up your scrap fabric but also a way to create a lasting piece of art that brings joy and character to your living space.