Creating a Fabric Flower- Pattern is one of the most rewarding projects for any sewing enthusiast, offering a blend of creative expression and practical utility. Whether you are looking to embellish a plain sun hat, add flair to a denim jacket, or create a permanent bouquet for your home, mastering the art of the fabric flower is a fantastic skill to have. In this guide, we will explore the essential techniques and materials needed to bring these textile blooms to life with ease and professional results.
The beauty of working with a Fabric Flower- Pattern lies in its incredible versatility and the ability to upcycle scraps of material that would otherwise go to waste. You don’t need an expensive sewing machine or high-end tools to start; most of these designs can be completed with a simple needle, thread, and a bit of patience. By focusing on handmade floral accents, you can personalize your wardrobe and home decor in a way that mass-produced items simply cannot match.
In the following sections, we will dive deep into the world of DIY textile flowers, covering everything from selecting the right petal templates to finishing your creations with stunning centers. We have optimized this guide to help you understand the nuances of sewing patterns for flowers, ensuring that your finished products are durable, beautiful, and uniquely yours. Let’s get started on your journey to becoming a master of the Fabric Flower- Pattern.
1 Understanding the Fabric Flower- Pattern Essentials
A Fabric Flower- Pattern serves as the blueprint for your entire project, acting as a guide for cutting shapes and assembling layers. Without a solid pattern design, it is easy for your flower to look lopsided or lose its structural integrity over time. Most patterns include specific petal shapes, ranging from rounded roses to pointed lilies, which dictate the final aesthetic of the bloom.
When you look for a Fabric Flower- Pattern, you are essentially looking for a set of instructions that explain how to manipulate flat fabric into a three-dimensional form. This often involves gathering techniques, where you sew along the edge of a strip of cloth and pull the thread to create ruffles. These ruffles eventually form the “heart” of the flower, giving it volume and a realistic appearance.
The term Fabric Flower- Pattern also encompasses the variety of sizes you might want to create for different applications. For instance, a small, delicate floral pattern might be perfect for a hair clip, while a larger, more robust version would be better suited as a brooch for a winter coat. Knowing how to scale your templates is a key part of the process.
To achieve the best results, your pattern should account for the “give” or stretch of the material you are using. If you are using a stiff cotton fabric, your pattern might need more layers to look full. Conversely, if you are using a soft silk or organza, the pattern might rely more on the natural drape of the material to create a soft, romantic look.
Another vital aspect of the Fabric Flower- Pattern is the “seam allowance” or the space you leave between the edge of the fabric and your stitches. If you cut exactly on the line of a printable flower template, you must ensure your stitching doesn’t make the flower too small or distorted. Consistency is the secret to a professional-grade handmade bloom.
Finally, always remember that a Fabric Flower- Pattern is a starting point, not a strict rulebook. Feel free to mix and match different petal styles or combine two different patterns to create a hybrid flower. The goal of using a sewing pattern is to provide structure while leaving plenty of room for your personal creative flair to shine through.
2 Selecting Materials for Your Fabric Flower- Pattern
Choosing the right material is just as important as the Fabric Flower- Pattern itself because the fabric determines how the flower holds its shape. Popular choices include felt, satin, chiffon, and linen, each offering a different texture and level of difficulty. For beginners, felt is often recommended because it doesn’t fray, making it easy to follow any floral template accurately.
If you are using a Fabric Flower- Pattern intended for a delicate look, organza and silk are your best bets. These fabrics allow for “singing” the edges—a technique where you lightly melt the fabric edges with a flame to prevent fraying and create a natural curl. This method adds a level of realism to your DIY fabric roses that is hard to achieve with heavier cloths.
For those who prefer a rustic or vintage vibe, recycled denim or burlap can be used with a Fabric Flower- Pattern. These materials are sturdier and provide a great contrast when used on soft items like pillows or curtains. However, keep in mind that thicker fabrics might require a heavy-duty needle and more force when pulling your gathering stitches tight.
Don’t forget the importance of interfacing or fabric stiffener when working with a Fabric Flower- Pattern. If your fabric is too floppy, the petals might sag, losing the beautiful shape defined by your sewing guide. Applying a light mist of stiffener or iron-on backing can give your handmade flowers the “body” they need to stand up and look vibrant.
The thread you choose to complement your Fabric Flower- Pattern should be strong and color-matched to the fabric. Upholstery thread or buttonhole twist is excellent for projects that require a lot of tension, such as yoyo flowers or tightly wound rosettes. Using a weak thread can lead to the flower unravelling, which is the last thing you want after all your hard work.
Lastly, consider the “center” of your flower as part of your material list. While the Fabric Flower- Pattern focuses on the petals, the center can be finished with buttons, beads, pearls, or even a contrasting scrap of fabric. These small details pull the whole flower design together and hide the stitching where all the petals meet.
3 Step-by-Step Assembly of the Fabric Flower- Pattern
The first step in executing your Fabric Flower- Pattern is the preparation of the fabric. You should always wash and iron your material (unless using felt) to ensure there is no shrinkage later on. Once prepped, lay your flower template onto the fabric and trace it carefully using a fabric marker or tailor’s chalk to ensure your cuts are precise.
Once you have cut out the pieces according to the Fabric Flower- Pattern, it is time to prepare the edges. If you aren’t using the “heat-seal” method, you might consider using pinking shears to create a decorative serrated edge or applying a small amount of fray check glue. This ensures that your textile flower remains intact even with frequent handling or washing.
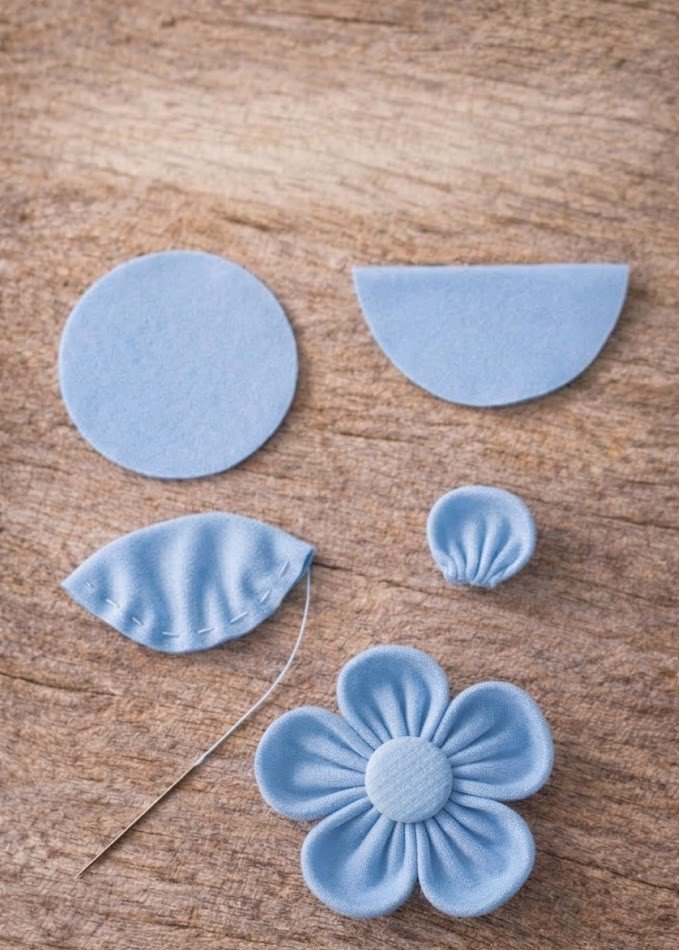
Now comes the sewing phase, which is the heart of the Fabric Flower- Pattern. Most patterns will instruct you to use a running stitch along the bottom edge of the petal shapes. When you pull this thread, the fabric will bunch up, creating the ruffled base of the petal. This is where the magic happens, as the flat shape starts to take on a floral dimension.
Arrange your gathered petals in a circle, following the layers specified in your Fabric Flower- Pattern. Usually, you start with the largest petals on the outside and work your way inward with smaller ones. Use a few tack stitches to secure each layer to a small circular base made of felt, which provides a stable foundation for the entire fabric blossom.
As you reach the center of the Fabric Flower- Pattern, you may need to roll a small strip of fabric to create a “bud” effect. This fills the gap in the middle and gives the flower a focal point. If your sewing pattern calls for a flat flower, this is the perfect time to sew on a decorative button or a cluster of seed beads to finish the look.
The final step in completing your Fabric Flower- Pattern is the “fluffing” process. Gently pull and shape the petals to give them a natural, organic flow. If you used a stiffened fabric, you can even bend the petals slightly to mimic the way a real flower opens in the sun. Your handmade fabric flower is now ready to be attached to a headband, bag, or gift wrap!
4 Advanced Tips for Optimizing Your Fabric Flower- Pattern
To take your Fabric Flower- Pattern to the next level, consider experimenting with fabric dye or fabric markers. You can add “veins” to the petals or create an ombre effect by dipping the edges of the fabric into a lighter or darker shade. This adds a layer of sophistication that makes your DIY flowers look like high-end boutique accessories.
Another advanced technique involves mixing textures within a single Fabric Flower- Pattern. Try using a layer of lace between layers of cotton, or adding a few loops of satin ribbon to act as “leaves.” The contrast between matte and shiny or smooth and rough surfaces makes the flower pattern much more visually interesting and professional.
If you find that your Fabric Flower- Pattern is looking a bit flat, try adding a layer of tulle or netting underneath the main petals. This adds instant volume without adding much weight, making it ideal for wedding hairpieces or bridal bouquets. The extra “lift” makes the floral design pop and catch the light beautifully.
For those who want to create a large volume of flowers, consider making a permanent template out of cardboard or plastic. Instead of tracing the Fabric Flower- Pattern every time, you can use a rotary cutter and a cutting mat to slice through multiple layers of fabric at once. This significantly speeds up the production of your handmade floral crafts.
Think about the “functionality” of your Fabric Flower- Pattern. If you plan to wash the item the flower is attached to, make sure the flower is removable. You can do this by sewing a safety pin or a snap fastener to the back of the felt base. This way, the fabric flower stays pristine while the garment gets cleaned.
Finally, don’t be afraid to go “off-pattern.” Once you understand the basics of a Fabric Flower- Pattern, try changing the number of petals or the way you fold the fabric. Some of the most beautiful textile art comes from accidental discoveries during the sewing process. Your Fabric Flower- Pattern is merely the foundation for your unique creative journey.
FAQ – Frequently Asked Questions
1. What is the best fabric for a Fabric Flower- Pattern?
The “best” fabric depends on the look you want. Felt is easiest for beginners because it doesn’t fray. Satin and Silk are best for formal or realistic flowers, while Cotton is great for casual, sturdy accessories.
2. Do I need a sewing machine to use a Fabric Flower- Pattern?
No, most fabric flowers are actually easier to make by hand. Hand sewing allows for better control when gathering petals and securing small centers, which can be tricky with a machine.
3. How do I stop the edges of my fabric flower from fraying?
You can use pinking shears, apply fray check liquid, or if using synthetic fabrics like polyester, you can carefully “singe” the edges with a lighter to melt and seal the fibers.
4. Can I wash items that have a Fabric Flower- Pattern attached?
It is usually better to make the flower removable using a pin or clip. If it must be permanent, hand-wash the item gently to avoid crushing the petal shapes or ruining the fabric stiffener.
5. How can I make my fabric flowers look more realistic?
Using multiple shades of the same color, adding bead centers, and varying the sizes of the petals according to a professional Fabric Flower- Pattern will greatly enhance the realism.
6. Where can I use these fabric flowers?
They are perfect for headbands, brooches, wedding decor, scrapbooking, and even as unique embellishments for home throw pillows.
Conclusion
In this article, we have explored the intricate and beautiful world of the Fabric Flower- Pattern. We covered the essential components of a good pattern, how to select the right materials for different styles, and provided a detailed step-by-step guide on how to assemble your very own textile blooms. By understanding the nuances of gathering, layering, and finishing, you can turn simple scraps of cloth into extraordinary pieces of art. Remember that the key to a successful Fabric Flower- Pattern lies in patience and a willingness to experiment with different textures and colors.
We hope this guide inspires you to pick up a needle and start creating! Whether you are a seasoned pro or a complete novice, there is always something new to learn in the world of DIY crafts.