Creating a Fabric guitar for children – Pattern is a delightful and rewarding DIY project that combines creativity, play, and safety.
Whether you’re crafting for your child, a classroom, or as a gift, a fabric guitar is a soft, huggable alternative to traditional toy instruments.
It’s perfect for imaginative play and introduces kids to the world of music in a gentle and colorful way.
Unlike plastic or wooden toys, a Fabric guitar for children – Pattern is soft, washable, and easy to customize. You can make it in your child’s favorite colors, add decorative elements, or even personalize it with their name. It’s also a great way to use up fabric scraps and experiment with different textures.
In this article, we’ll walk through everything you need to know about creating your own Fabric guitar for children – Pattern—from choosing materials and designing the shape to assembling the parts and adding interactive features. With four structured sections and a FAQ to wrap up, this guide is beginner-friendly and full of creative ideas for your next handmade project.
1. Materials and Fabric Selection
The foundation of a good Fabric guitar for children – Pattern starts with the right materials. Choosing safe, durable, and colorful fabrics makes the toy not only attractive but also suitable for kids of all ages.
Start by selecting cotton or cotton-blend fabrics. These are soft to the touch, breathable, and easy to work with. You can mix and match patterns—stripes, stars, music notes, or solid colors—to create a fun and vibrant design. Flannel and felt are also great choices for specific parts like the neck or soundhole.
For stuffing, use hypoallergenic polyester fiberfill, which is soft, safe, and holds its shape well. You could also recycle old pillow stuffing or use fabric scraps to stuff the guitar body if you want an eco-friendly option.
You’ll need a sewing machine for most of the assembly, but hand stitching is also acceptable for small details or if you prefer a more rustic look. Sharp fabric scissors, pins, and a rotary cutter (optional) will help you cut cleanly and precisely.
Additional materials may include buttons or Velcro (if you’re adding interactive features), embroidery floss for stitching details, and fusible interfacing to add structure to the body of the guitar.
Always pre-wash and iron your fabrics before cutting. This step ensures that any shrinking happens beforehand and that your fabric pieces lay flat for accurate pattern placement.
2. Creating the Pattern and Cutting Shapes
Once you’ve gathered your materials, the next step in your Fabric guitar for children – Pattern is creating or tracing a pattern. You can find printable templates online or freehand a simple guitar shape on paper to use as your guide.
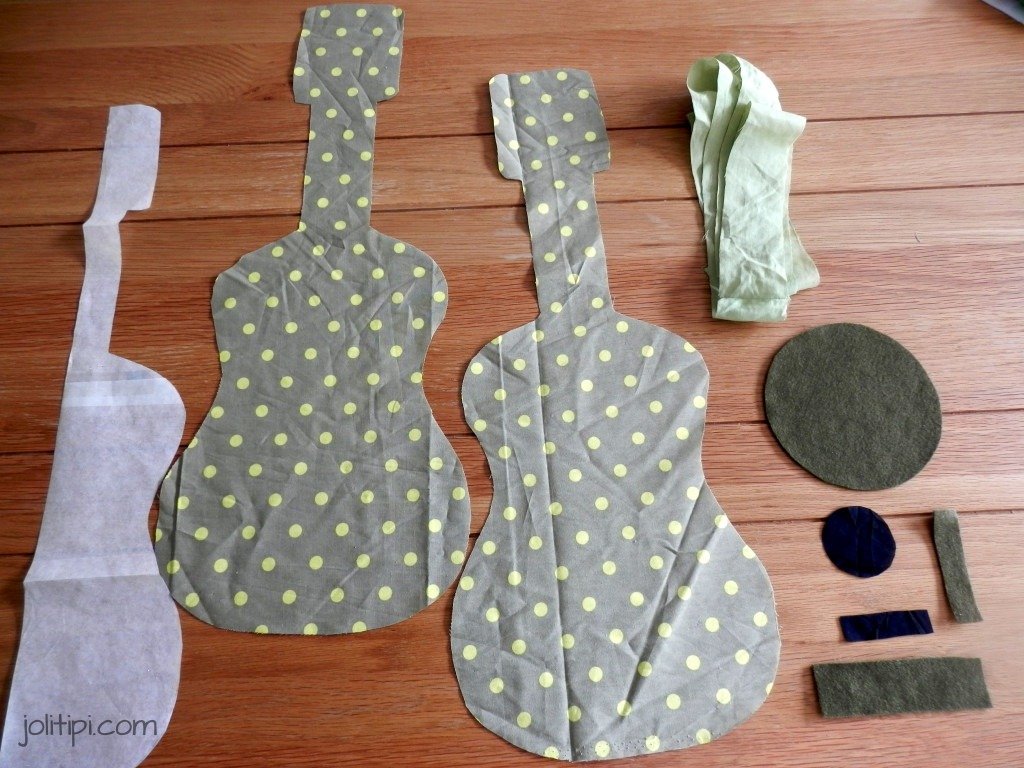
The guitar should consist of two main body pieces (front and back), a neck, a headstock, and optional details like strings, soundhole, and tuning pegs. When drafting your pattern, keep proportions child-friendly—around 18 to 24 inches in total length works well for toddlers and young kids.
Cut your fabric using the pattern pieces, ensuring you cut mirrored pieces where needed (especially for the body and neck). Use a disappearing ink fabric pen or chalk to trace outlines and stitching guides directly onto the fabric.
For added structure, iron fusible interfacing onto the back of your body and neck fabric pieces. This helps the guitar keep its shape and gives it a bit of firmness without becoming stiff.
Once all the pieces are cut, you can start working on the decorative elements. Cut out a small circle for the soundhole, rectangles or ribbons for strings, and use felt for the tuning pegs. These elements add realism to the toy and engage a child’s imagination.
Pin all the pieces in place on one of the body panels before sewing anything down. This helps you visualize the layout and make adjustments as needed before stitching.
Make sure to leave seam allowances (typically ¼ inch) when cutting and sewing your pieces. Accurate measurements help ensure your Fabric guitar for children – Pattern fits together seamlessly.
3. Sewing and Assembling the Fabric Guitar
Now it’s time to bring your Fabric guitar for children – Pattern to life by sewing the components together. This is where your toy really starts to take shape.
Begin by sewing on the decorative pieces to the front body panel. Attach the soundhole, “strings,” buttons (if safe for the age group), and any embroidery. It’s easier to do this now before the guitar is stuffed and sewn shut.
Next, sew the neck and headstock pieces together, right sides facing, and turn them inside out. Stuff them lightly so they’re soft but maintain their shape. You can add felt tuning pegs at this stage using hand stitches or fabric glue.
Join the neck to the front guitar body piece. Make sure the base of the neck is securely sandwiched between the front and back body pieces. Pin the back panel to the front, right sides together, aligning edges neatly.
Sew around the edge of the guitar body, leaving a small opening at the bottom for turning and stuffing. After stitching, trim any excess fabric from curves and clip the corners to reduce bulk.
Turn the guitar right side out through the opening. Use a blunt tool, like a chopstick or crochet hook, to gently push out the curves and corners for a clean shape.
Stuff the body evenly with fiberfill, ensuring it feels soft but firm enough to hold its shape. Once satisfied, hand-stitch the opening closed using an invisible ladder stitch or whipstitch.
4. Personalization and Play Ideas
The final touches of your Fabric guitar for children – Pattern are what make it truly unique. There are many ways to customize the look and function of your toy guitar to match your child’s personality or favorite themes.
Consider personalizing it with your child’s name embroidered or appliquéd onto the front. You can also stitch musical notes, stars, hearts, or even cartoon characters to give it a themed appearance.
Add sound elements for extra sensory engagement. A small rattle or crinkle material inside part of the guitar can make it interactive for babies and toddlers. Just ensure all additions are securely sewn in and age-appropriate.
Make matching accessories like a mini strap so your child can wear the guitar just like a real rock star. Fabric straps made from bias tape or soft elastic are safe and comfortable.
Use the guitar as an educational toy. Introduce kids to musical concepts, rhythm, and sound by pretending to strum and sing together. Even without real strings, this toy encourages imaginative musical play.
Make different sizes or shapes to represent various instruments. A ukulele-style version or even a fabric violin could be fun companion projects once you’ve mastered the basic Fabric guitar for children – Pattern.
If you’re making several, consider creating a handmade music corner in your child’s playroom. Add drums made from fabric and cardboard or a soft keyboard toy for a full set of DIY instruments.
FAQ – Frequently Asked Questions
Q: Is the Fabric guitar for children – Pattern safe for toddlers?
A: Yes, as long as you avoid small detachable parts like buttons for children under 3. Use embroidered details or securely sewn felt instead.
Q: What age is this toy best suited for?
A: The soft guitar is suitable for children from 6 months (with no small parts) up to around age 6. It’s great for imaginative and sensory play.
Q: Can I wash the fabric guitar?
A: Yes. If made from washable materials and filled with polyester fiberfill, the guitar can be spot cleaned or gently hand washed. Avoid washing if it has glued-on decorations.
Q: Can I make this pattern by hand without a sewing machine?
A: Absolutely! While it’s quicker with a machine, you can hand sew the entire project with basic stitches like backstitch and whipstitch.
Q: How long does it take to make a fabric guitar?
A: For beginners, the project might take 4–5 hours. With experience, you can complete one in 2–3 hours depending on the level of detail.
Q: Can I sell fabric guitars made from this pattern?
A: Yes, especially if it’s an original design or commercially licensed. Always credit the pattern creator if applicable and follow safety guidelines.
Conclusion
Crafting a Fabric guitar for children – Pattern is a heartwarming and creative project that brings joy to both the maker and the recipient. It’s a playful, personalized, and safe toy that can be cherished for years. With just a few materials and a bit of time, you can create something truly special that encourages music, creativity, and fun.
We hope this guide has inspired you to try making your own fabric guitar. If you’ve completed this project or plan to start, we’d love to hear from you! Please leave a sincere comment with your thoughts, experiences, or suggestions. Your feedback helps build a creative and supportive DIY community.