Fabric Toy Fish Sewing – Pattern is a delightful and creative project perfect for sewing enthusiasts of all levels. Whether you’re an experienced seamstress or just starting out, crafting your own toy fish offers a fun, eco-friendly, and customizable way to explore the art of sewing.
This simple and rewarding DIY project also makes for an excellent handmade gift for children or a decorative item for your home.The beauty of the fabric toy fish sewing – pattern lies in its versatility.
With just a few pieces of fabric, a needle and thread, and a pattern to follow, you can bring your own plush aquatic creature to life. Plus, it’s a great way to repurpose fabric scraps and practice your stitching skills, whether by hand or machine.
In this article, we’ll cover everything you need to know to start your fabric toy fish sewing – pattern journey. From choosing the right materials to assembling your fish step-by-step, we’ll guide you with clear instructions and tips for success. Let’s dive in!
1. Choosing the Right Fabric for Your Toy Fish
Selecting the appropriate fabric is the first step in creating a durable and attractive toy fish.
When working with a fabric toy fish sewing – pattern, it’s essential to consider the texture and weight of the fabric. Soft cotton or flannel is ideal for plush toys, as these materials are easy to sew and gentle to the touch. For a shinier or more decorative look, you might choose satin or polyester blends, though they can be more difficult to handle.
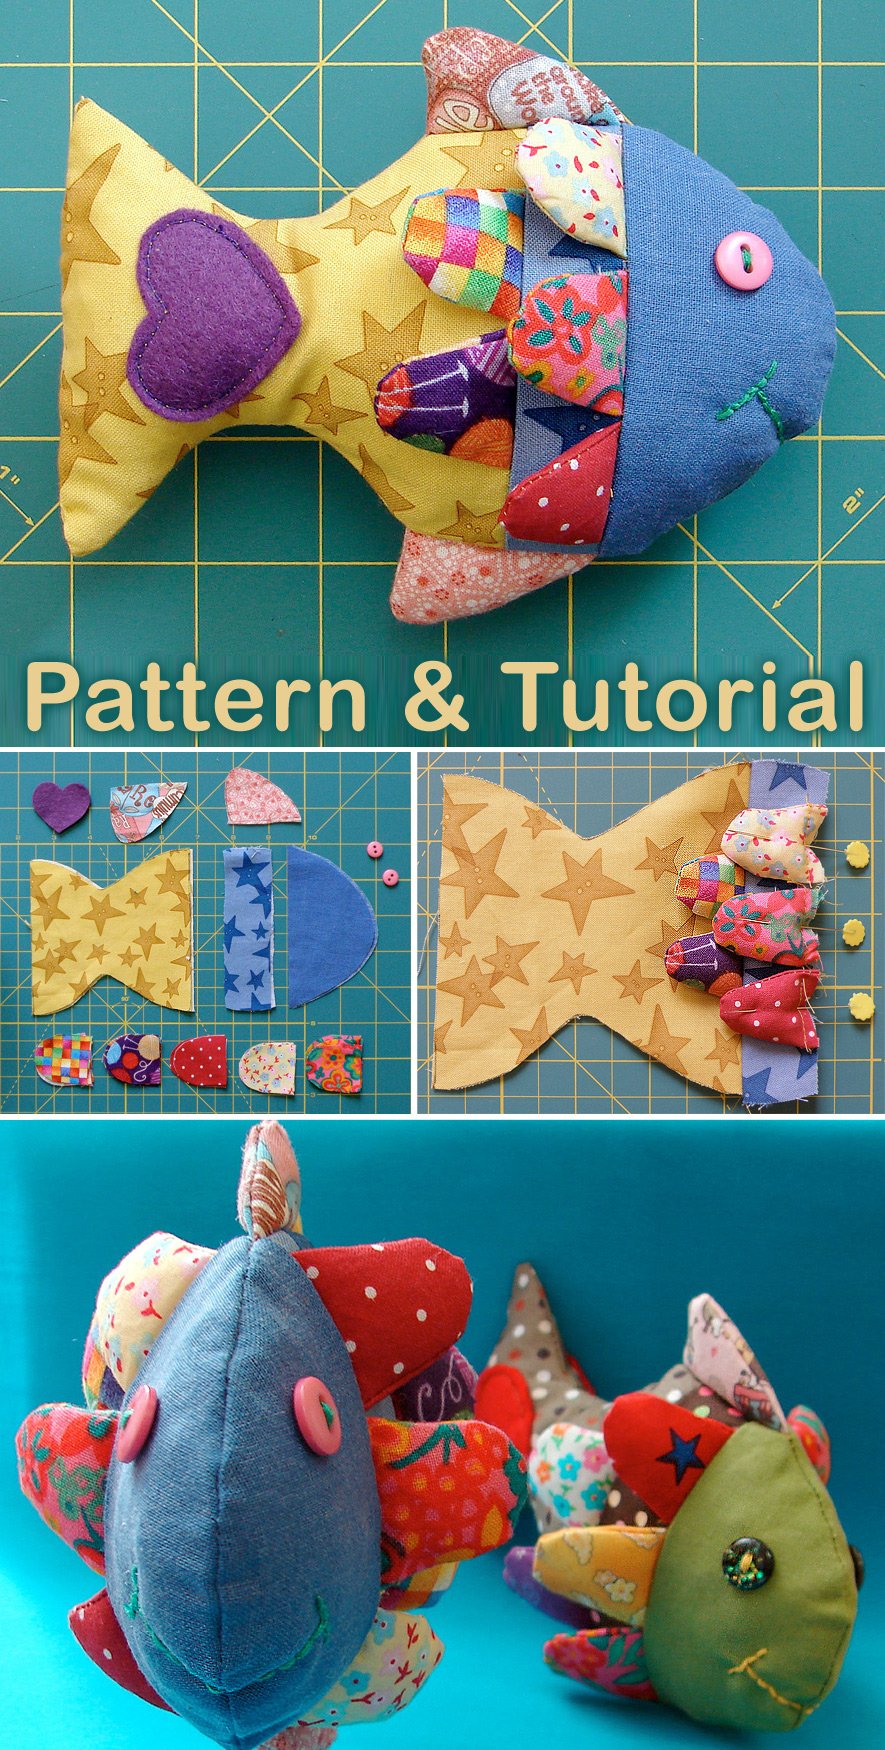
Color and pattern selection play a huge role in the final look of your toy. Bright, ocean-inspired hues like blue, green, and coral work beautifully, but don’t be afraid to get creative. Using contrasting fabrics for the fins and body can add charm and personality to your design.
Ensure that the fabric is clean and pre-washed to prevent any shrinking after the toy is sewn. Pre-washing also removes chemical residues that may be harmful, especially if the toy is intended for children.
For environmentally conscious creators, consider using upcycled fabric from old clothes, pillowcases, or fabric remnants. This approach is not only sustainable but also cost-effective.
Keep in mind the toy’s end user. If you’re sewing for a baby or toddler, stick to hypoallergenic and non-toxic materials. Avoid small embellishments that could pose a choking hazard.
Once you’ve selected your fabric, iron it well before starting to cut your pattern. A smooth surface will ensure precision in cutting and assembling your toy.
2. Creating or Downloading the Perfect Pattern
A good pattern is the foundation of any successful sewing project.
There are many ways to find a fabric toy fish sewing – pattern, including free templates online or paid versions from professional pattern makers. When choosing a downloadable pattern, make sure it’s printable to scale and includes detailed instructions.
If you’re feeling creative, you can draw your own fish shape on paper. Start with a simple body outline, then add separate shapes for the fins and tail. Remember to add seam allowances to all pieces.
Look for patterns that include different sizes or optional features, such as embroidered eyes or patchwork fins. These extras allow for greater customization and creativity in your finished toy.
Once your pattern is ready, cut it out and pin it to your fabric. Trace carefully, especially around curves, to ensure your fish comes together seamlessly.
Using tracing tools like fabric chalk or washable markers is recommended to avoid permanent marks. Be patient during this step, as accurate cutting is crucial for clean assembly.
Label each piece of your cut fabric with the part it represents (e.g., body, fin, tail). This helps avoid confusion during sewing and speeds up the process.
3. Step-by-Step Assembly Instructions
Now that your fabric pieces are ready, it’s time to bring your toy fish to life.
Start by sewing the smaller components like fins and tails. These are usually sewn right sides together, leaving one edge open for turning. After sewing, flip them inside out and press flat for a neat finish.
Pin the fins and tail to the body pieces, ensuring they’re sandwiched between the two body sides, right sides facing in. This step requires careful alignment to maintain the fish’s shape.
Sew the two body pieces together, starting from the top and working around the edges. Leave a small opening at the bottom or side so you can turn the fish inside out and insert stuffing.
After turning your fish right side out, use a chopstick or pencil to push out the corners and curves. This step helps the toy maintain a smooth and rounded form.
Stuff the fish with your choice of filling—polyester fiberfill is common, but wool or cotton batting also works well. Distribute the stuffing evenly to avoid lumps or flat spots.
Finally, close the opening with a ladder stitch or invisible stitch. Take your time here to ensure the seam is tight and hidden, especially if the toy will be handled frequently.
4. Tips for Personalization and Creative Touches
Adding a personal flair makes your fish one-of-a-kind and special.
Use embroidery floss or fabric paint to add details like scales, smiles, or names. Personalizing your fabric toy fish sewing – pattern project adds sentimental value, especially for gifts.
Consider attaching fabric appliqués or buttons for eyes. If the toy is for a young child, always sew embellishments securely or use embroidered features instead.
Experiment with textures by mixing materials—maybe use felt for the fins or a shiny fabric for the scales. This adds dimension and sensory interest to your toy.
Another fun idea is to insert a rattle or crinkle paper into the belly of the fish to make it interactive for babies. Just ensure all additions are securely sewn inside.
If you’re making a collection of toy fish, play with different sizes and shapes. A group of varied plush fish can become a charming mobile or wall decoration.
Encourage kids to participate by letting them choose fabric or help with stuffing. It’s a great way to bond and introduce young ones to sewing basics.
Frequently Asked Questions (FAQ)
Q1: What is the best fabric to use for sewing a toy fish?
A: Soft cotton, flannel, or fleece are ideal for fabric toy fish sewing – pattern projects. These fabrics are easy to sew and child-safe.
Q2: Can I hand sew a fabric toy fish, or do I need a machine?
A: Absolutely, hand sewing works just fine. It might take a bit longer, but the results can be just as charming and well-made.
Q3: Where can I find free patterns for fabric toy fish?
A: Many crafting websites and sewing blogs offer free downloadable fabric toy fish sewing – pattern templates. Always check the print scale before cutting.
Q4: What type of stuffing is best for plush toys?
A: Polyester fiberfill is commonly used, but you can also use wool, cotton scraps, or eco-friendly stuffing like bamboo fiber.
Q5: How do I make sure the toy is safe for children?
A: Use non-toxic materials, avoid small detachable parts, and double-stitch all seams. Embroider eyes instead of using buttons for babies.
Q6: Can I wash a fabric toy fish after it’s made?
A: Yes, if you use washable materials. Hand washing is safest, especially for toys with hand-stitched or delicate features.
Conclusion
Creating a fabric toy fish sewing – pattern project is a rewarding, fun, and artistic way to express your creativity through sewing. From selecting the perfect fabric to stitching every fin and detail, the process is both therapeutic and productive. You can create a toy that’s not only adorable but also meaningful, sustainable, and safe for all ages.
We hope this guide has inspired you to dive into your own plush sea creature project. Whether you’re making one fish or a whole school, the joy of sewing is in every stitch. If you found this article helpful, please leave your honest opinion and share your suggestions—your feedback helps us continue crafting better content for makers like you!