If you’re looking to add a bit of charm and creativity to your Halloween costume, a fabric witch hat for Halloween – pattern is the perfect DIY project to dive into. Not only is it fun and easy to make, but it also adds a personal touch to your celebration. Whether you’re dressing up as a classic witch, a sorceress, or just embracing the Halloween spirit, a fabric witch hat is the ideal accessory to complete your look.
Creating your own fabric witch hat for Halloween allows you to experiment with colors, fabrics, and embellishments to make a unique and striking piece. It’s a straightforward sewing project, even for beginners, and it offers endless possibilities for customization. Whether you prefer a spooky black hat or want to add some colorful accents or glitter, you can easily personalize this project to fit your style.
In this article, we’ll guide you through everything you need to know about making a fabric witch hat for Halloween – pattern, from selecting the right materials to step-by-step instructions for sewing. By the end, you’ll have a finished witch hat that’s sure to turn heads at any Halloween event.
1. Materials You’ll Need for a Fabric Witch Hat
Before you begin crafting your fabric witch hat for Halloween, it’s important to gather all the materials you’ll need. Fortunately, the supplies are quite simple and easy to find.
First, you’ll need fabric. The best choices are typically cotton, felt, or tulle for a more whimsical look. You can also use velvet or satin for a luxurious touch. Black is the classic choice for a witch hat, but feel free to experiment with colors like purple, orange, or green if you’re feeling creative.
Next, you’ll need some interfacing to give the hat structure. Medium-weight fusible interfacing works best for this project, as it adds firmness without making the fabric too stiff. This will help your hat hold its shape while still being comfortable to wear.
You’ll also need scissors, pins, a needle and thread, and a sewing machine (optional, but useful for faster stitching). For the brim of the hat, you may want to use a cardboard circle or felt to reinforce the structure. This step adds stability and helps the brim stay flat.
Lastly, don’t forget about embellishments! This could include ribbons, feathers, beads, or sequins to make your hat stand out. You could also use a hot glue gun for attaching these decorations.
Once you have all your materials, you’re ready to start sewing your fabric witch hat for Halloween!
2. Step-by-Step Instructions to Make Your Fabric Witch Hat
Making a fabric witch hat for Halloween – pattern is a simple yet rewarding process. Follow these step-by-step instructions to create your own magical hat.
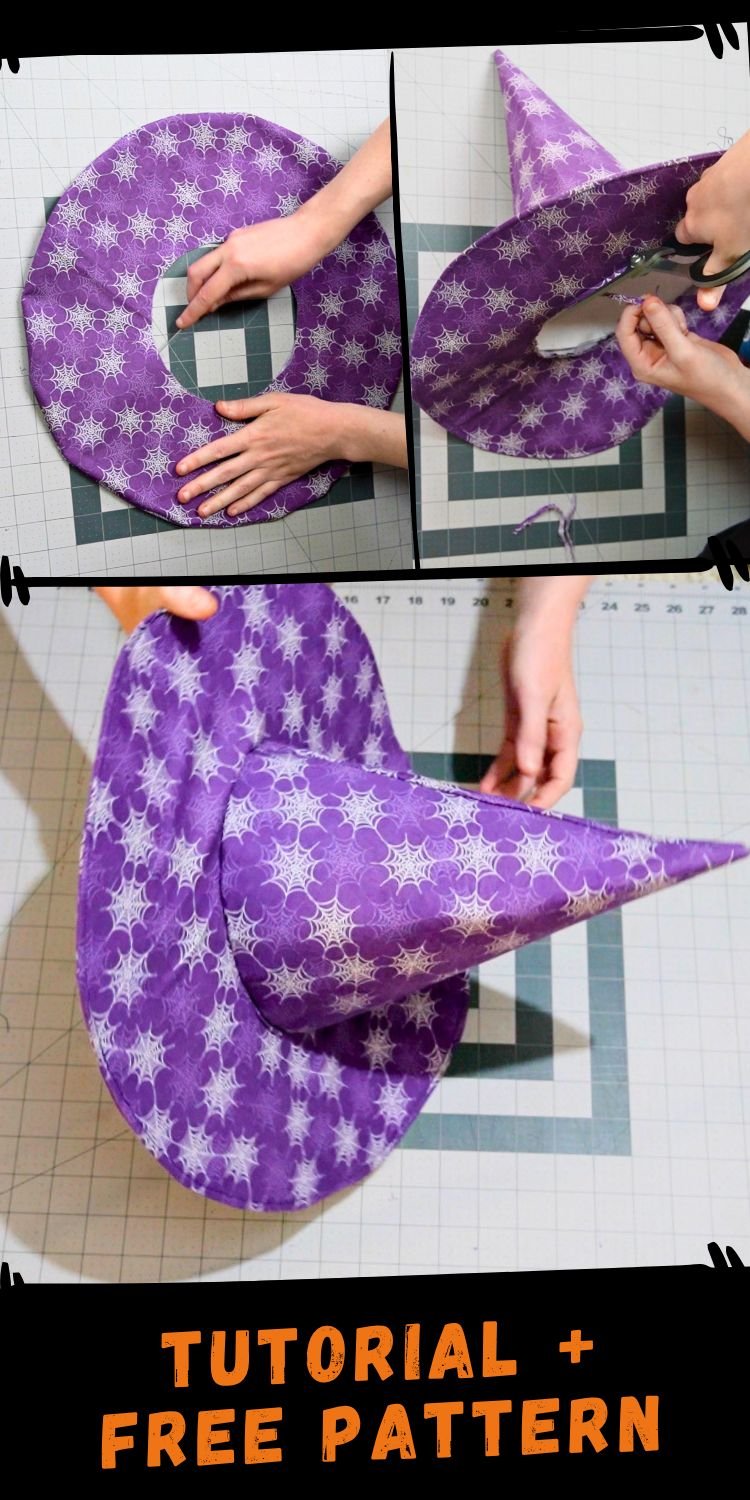
Step 1: Cut out the hat pieces
Start by cutting the fabric into the required shapes. For the cone part of the hat, you’ll need a triangle piece. The base of the triangle will determine the circumference of the hat. For the brim, cut out a circle that is wide enough to fit your head comfortably. You can adjust the size of the cone and brim based on your preferences.
Step 2: Add interfacing to the fabric
To add structure, cut out a piece of interfacing that matches the size of your fabric pieces. Iron the interfacing onto the back of your fabric according to the manufacturer’s instructions. This will give your witch hat the stiffness it needs to stand tall and hold its shape.
Step 3: Sew the cone together
With right sides together, sew along the edge of the fabric triangle to form a cone shape. Use a straight stitch and make sure to backstitch at the beginning and end to secure the seam. After sewing, turn the cone right-side out to reveal the smooth exterior.
Step 4: Attach the brim
Next, take the circle piece of fabric that you cut for the brim. If you’re using cardboard for extra support, cut a circle the same size as the fabric brim and glue or sew it to the fabric. Attach the fabric brim to the bottom of the cone by pinning it in place and sewing around the edges. Be sure to leave a small seam allowance for a clean finish.
Step 5: Add embellishments
This is where the fun part comes in! You can add decorations like ribbons, sequins, flowers, or even feathers. Sew or glue them onto the fabric, making sure they are evenly spaced and securely attached. You can also create a bow at the base of the hat for an extra touch of flair.
Step 6: Finish with the headband or elastic
To make sure your hat stays in place, you’ll need to attach an elastic or headband. Measure a piece of elastic that will comfortably fit around your head, then sew or glue the ends to the inside of the hat. You can also use a hair band or a fabric headband if preferred.
3. Customization Ideas for Your Fabric Witch Hat
One of the best parts of making your own fabric witch hat for Halloween – pattern is the opportunity to customize it. There are endless ways to make the hat uniquely yours. Here are some ideas to spark your creativity:
1. Choose Fun Fabrics
While traditional black is always classic, consider using fabric with fun patterns like cobwebs, skulls, or pumpkins. A purple or green witch hat could be a perfect choice for a more whimsical witch look. You can even mix and match fabrics for the brim and cone to create a patchwork effect.
2. Add Glow-in-the-Dark Elements
For a spooky touch, consider using glow-in-the-dark fabric or adding glow-in-the-dark paint or sequins. This makes your hat even more fun when you’re out trick-or-treating at night.
3. Create a Tattered, Vintage Look
If you prefer a distressed look, consider using tea-dyed fabric or fraying the edges of your brim and cone. Adding a vintage brooch or aged ribbon can give the hat an antique, weathered appearance.
4. Use Decorative Trims
Add lace trim around the brim or use a black velvet ribbon around the base of the cone. These small details can elevate your witch hat and make it more stylish.
5. Add a Witch’s Broom Accent
To make your costume even more complete, attach a mini broomstick or wand to the side of your witch hat. You can easily make a tiny broom out of twigs and string for that perfect finishing touch.
6. Embroider Magical Symbols
If you’re looking to add a more personal and mystical element, consider embroidering symbols like moons, stars, or pentagrams on the sides of the hat. This can give it a more magical and unique touch.
4. Troubleshooting Common Problems in Making a Fabric Witch Hat
While making a fabric witch hat for Halloween is a fun and rewarding experience, you may run into a few challenges along the way. Here are some common problems and how to solve them:
1. Hat Won’t Stay Upright
If your hat doesn’t stand up as expected, it may need more structure. Try using thicker interfacing or adding a layer of cardboard to the brim for added support.
2. The Hat Doesn’t Fit
To ensure the hat fits correctly, be sure to measure your head circumference before cutting the fabric. You can adjust the size of the cone and brim to make it fit more snugly.
3. Sewing the Brim to the Cone
If the brim doesn’t align well with the cone, try pinning it in place more carefully before sewing. You can also use a hand-stitched whipstitch to attach the brim if you’re not comfortable using a sewing machine.
4. Uneven Decoration Placement
To ensure your embellishments are evenly spaced, mark out where each item should go before attaching it. You can use a fabric pen to lightly sketch where to place beads or ribbons for perfect symmetry.
FAQ – Fabric Witch Hat for Halloween
1. How do I make my fabric witch hat look more authentic?
For a more authentic look, use black velvet fabric, add lace trim around the brim, and consider embellishing with a feather or spider decoration.
2. Can I use a sewing machine for this project?
Yes! A sewing machine will make this project faster, especially when attaching the cone to the brim and adding the elastic.
3. What type of fabric is best for a witch hat?
Cotton and felt are both great choices, but if you want a more luxurious look, velvet or satin can make your hat stand out.
4. Can I make a witch hat without a sewing machine?
Absolutely! You can hand-sew the hat using basic stitches, or even use fabric glue to attach the pieces.
5. How do I decorate my fabric witch hat?
Add embellishments like ribbons, sequins, feathers, or even glow-in-the-dark paint. Get creative with your decorations to make it unique!
6. How long will it take to make the witch hat?
The process will typically take 1-2 hours,
depending on your sewing skills and the complexity of the decorations.
Conclusion
Creating a fabric witch hat for Halloween – pattern is a fun, easy, and customizable project that lets you add a personal touch to your Halloween costume. With the materials, instructions, and customization tips shared above, you now have all the tools you need to craft the perfect witch hat. Whether you choose to keep it classic or go for a more unique look, your handmade witch hat will surely be a hit at any Halloween event.
If you enjoyed this article, please share your honest feedback in the comments section. Let us know how your witch hat turned out, and feel free to suggest any other fun Halloween projects!