If you’re looking for a charming and beginner-friendly fall craft, the Fabric Yo-Yo Pumpkins – Pattern is a delightful project that blends creativity, seasonal décor, and fabric scraps into one cute and crafty idea. These fabric pumpkins are perfect for adding a handmade touch to your autumn decorations without requiring advanced sewing skills or expensive materials.
The beauty of the Fabric Yo-Yo Pumpkins – Pattern lies in its simplicity. Using just circular fabric pieces, some gathering stitches, and stuffing, you can create adorable pumpkins that are perfect for centerpieces, garlands, or even as gifts. These soft and textured decorations add warmth and personality to your home and can be customized in endless ways.
In this article, we’ll guide you through everything you need to know about the Fabric Yo-Yo Pumpkins – Pattern, from choosing your fabric and materials to crafting, styling, and displaying your finished pumpkins. Whether you’re a seasoned maker or just getting into sewing, this pattern is a great way to celebrate the season creatively.
1. What Are Fabric Yo-Yo Pumpkins and Why Make Them?
The Fabric Yo-Yo Pumpkins – Pattern is inspired by the traditional yo-yo quilting technique, where fabric circles are gathered at the edges to form rosette-like shapes. For this fall project, the technique is modified slightly to create the rounded body of a pumpkin.
Unlike complex patchwork projects, yo-yo pumpkins are easy to make and don’t require a sewing machine. A simple running stitch and some hand sewing are all you need to bring each pumpkin to life, making it accessible to beginners and kids.
These pumpkins are a fantastic way to use up fabric scraps from other projects. Whether you choose cotton, flannel, or even velvet, the texture and print of your fabric will bring each pumpkin its own personality. Autumn prints, warm solids, and plaids are especially popular choices.
Not only are these pumpkins adorable, but they’re also eco-friendly. By repurposing leftover materials, you’re contributing to a more sustainable approach to crafting. You can also reuse stuffing from old pillows or fabric scraps for the inside.
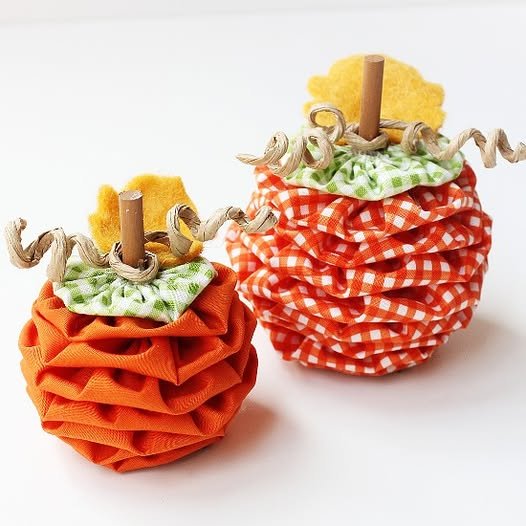
One of the best parts of making Fabric Yo-Yo Pumpkins is how customizable they are. Add buttons, cinnamon sticks, twine, or felt leaves to give your pumpkin extra character. They can be rustic, elegant, whimsical, or spooky—perfect for Halloween, Thanksgiving, or just fall in general.
These fabric pumpkins are also a great craft to make with family or in groups. Host a crafting afternoon with friends, or include your children in a fun weekend activity. With a few supplies and a little imagination, everyone can create their own unique pumpkin patch.
2. Materials and Tools for Fabric Yo-Yo Pumpkins – Pattern
To get started with the Fabric Yo-Yo Pumpkins – Pattern, you’ll need a few basic tools and materials—most of which you probably already have in your sewing kit or fabric bin. The project is affordable, making it ideal for budget-conscious crafters or quick gift ideas.
The most essential material is fabric, of course. Choose woven cotton for ease of sewing, or experiment with other textures like flannel, corduroy, or linen. Softer fabrics create more delicate folds, while thicker ones make sturdier pumpkins. Solid fall colors and autumn-themed prints work beautifully for this pattern.
You’ll also need a pair of sharp fabric scissors or a rotary cutter, a needle, strong thread (preferably in a color that matches or contrasts for visual effect), and stuffing. Polyester fiberfill works well, but you can also use shredded fabric scraps for an eco-friendly approach.
A circle template is helpful to trace perfect rounds onto your fabric. You can use a bowl, lid, or compass to make circles ranging from 4 to 10 inches in diameter. Larger circles will create fuller pumpkins, while smaller ones are perfect for mini accents or garlands.
To secure the pumpkin’s shape, a gathering stitch is used around the perimeter of the circle. You’ll need thread that won’t break easily when pulled tight. Embroidery floss or doubled-up thread is ideal for this step.
For the pumpkin stem, natural elements like cinnamon sticks or twigs work great. You can also use rolled felt, jute twine, or fabric scraps to create a stem that matches your aesthetic. A dab of hot glue helps hold everything together.
Lastly, consider adding optional embellishments like buttons, felt leaves, lace trims, or embroidery. These finishing touches make your pumpkins look polished and personal. Keep a hot glue gun on hand for quick and secure attachment of any extra décor.
3. Step-by-Step Instructions to Make Your Fabric Yo-Yo Pumpkins
Now that you’ve gathered your materials, let’s walk through how to make the Fabric Yo-Yo Pumpkins – Pattern. These steps are straightforward and can be completed in under 30 minutes for each pumpkin, depending on size and detail.
Start by tracing your circle template onto the wrong side of the fabric. Cut out the fabric circle as neatly as possible to ensure an even gather. The size of the circle will determine the size of your finished pumpkin.
Thread your needle with a long piece of strong thread and tie a knot at the end. Begin stitching around the edge of the fabric circle with a running stitch about ¼ inch from the edge. Make your stitches evenly spaced, and go all the way around the circle.
Once you’ve stitched around the entire edge, gently pull the thread to gather the fabric. This will start to form a pouch-like shape. Before you close the opening completely, stuff the inside with polyester filling or your preferred stuffing material.
Pull the thread tight to close the top opening, then secure it with a few strong stitches. Knot the thread and cut off the excess. You should now have a soft, rounded pumpkin shape with a puckered top that resembles the natural indent of a real pumpkin.
To give your pumpkin more definition, you can wrap embroidery floss or yarn around the sides from top to bottom, forming segment lines like a real pumpkin. Pull the thread tight and tie it securely at the base. This adds texture and a finished look.
Finally, attach your stem. Use hot glue to secure a cinnamon stick, twig, or rolled felt piece at the top of the pumpkin. Add felt leaves, ribbons, or other embellishments as desired. Your pumpkin is now ready to be displayed, gifted, or added to your autumn décor.
4. Creative Ways to Display and Use Fabric Yo-Yo Pumpkins
Once you’ve made a few Fabric Yo-Yo Pumpkins, the real fun begins—deciding how to display or use them in your fall decorating. These versatile fabric crafts can be used throughout your home or even given as handmade gifts.
Create a centerpiece by grouping several pumpkins of different sizes on a tray with candles, pinecones, and faux leaves. This works beautifully on dining tables, coffee tables, or sideboards to add a cozy autumn vibe.
Use small pumpkins as place settings at your Thanksgiving table. Add a name tag tied with twine around the stem, and your guests will be delighted to take home a handcrafted keepsake after the meal.
String mini pumpkins together to make a seasonal garland. Attach them to a piece of twine or ribbon using clothespins or glue, and hang the garland across a mantel, banister, or wall for instant festive charm.
For a rustic touch, tuck a few pumpkins into wreaths or floral arrangements. Their soft texture adds contrast to greenery and dried florals, and they can easily be glued or wired in place for seasonal front door décor.
If you enjoy giving handmade gifts, consider gifting a set of three pumpkins wrapped in a basket or box. Add a hand-written tag and a little sprig of dried lavender or wheat for a personal, thoughtful presentation.
You can also incorporate these pumpkins into kids’ crafts or classroom activities, especially when using felt or cotton. They’re safe, soft, and easy enough for little hands to help with, making them great for learning about fall while creating something together.
FAQ: Frequently Asked Questions About Fabric Yo-Yo Pumpkins – Pattern
Q1: What size should I cut my fabric circles?
A: The finished size of your pumpkin will be about half the diameter of your circle. For example, an 8-inch circle will create a roughly 4-inch pumpkin. You can experiment with different sizes for variety.
Q2: Do I need a sewing machine to make Fabric Yo-Yo Pumpkins?
A: No, this is a hand-sewn project. All you need is a needle, thread, and scissors. It’s perfect for beginners or anyone looking for a no-machine-required craft.
Q3: What kind of fabric works best for yo-yo pumpkins?
A: Quilting cotton, flannel, or linen work well. You can also use velvet or felt for a more luxurious look. Avoid stretchy fabrics, as they’re harder to gather evenly.
Q4: Can I wash my fabric pumpkins?
A: These pumpkins are best for decorative use and not intended for regular washing. Spot clean with a damp cloth if necessary, and avoid immersing them in water, especially if you used glue or embellishments.
Q5: How can I make the pumpkin look more realistic?
A: Add embroidery floss around the sides to create pumpkin ridges, use a twig or cinnamon stick for a natural stem, and finish with felt leaves or raffia for added detail.
Q6: Can I use these pumpkins outdoors?
A: While they look lovely on porches or patios, keep them in covered areas. Exposure to moisture or direct sunlight can
damage the fabric and stuffing.
Conclusion
The Fabric Yo-Yo Pumpkins – Pattern is a joyful, simple, and highly customizable craft that’s perfect for celebrating the fall season. With just a few basic supplies and a little time, you can create beautiful handmade pumpkins that bring warmth and charm to your home.
Whether you’re making them for your own décor, giving them as gifts, or crafting with family and friends, this pattern is a creative way to enjoy the cozy spirit of autumn. From choosing fabrics to finishing with personal touches, every step is a chance to express yourself.
We hope this guide has inspired you to try the Fabric Yo-Yo Pumpkins – Pattern for yourself. If you do, please leave a sincere opinion or suggestion below—we’d love to hear how your project turned out and what creative twists you added. Happy crafting!