If you love crafting and want to add a personal touch to your home, a flower coasters tissue – pattern project is the perfect way to do it. These small yet beautiful accessories combine artistic design with practical use, making them a wonderful addition to any coffee table, dinner setting, or even as a heartfelt handmade gift. Whether you’re experienced with sewing, crochet, or just starting out, this project can be tailored to suit all skill levels.
The concept of using tissue or fabric to create floral coasters brings an element of softness and charm that stands out. With the right pattern, you can turn simple materials into something that looks boutique-quality. You’ll not only protect your surfaces from moisture and heat, but also elevate your décor with pieces that reflect your personality and style.
This article will walk you through everything you need to know about crafting a flower coasters tissue – pattern, from gathering materials to step-by-step instructions, creative ideas, and finishing touches. We’ll also answer common questions and help you create coasters that are not only pretty, but also durable and functional.
1. Understanding the Flower Coasters Tissue – Pattern
The term flower coasters tissue – pattern refers to decorative coasters made using soft materials like cotton tissue fabric or felt, designed in the shape of flowers. These are often handcrafted and follow a reusable pattern for consistency and style.
Using tissue or thin cotton fabric gives the coasters a light and elegant feel, perfect for spring and summer table settings. The floral shape adds a decorative layer that plain coasters simply can’t achieve. It’s a delicate blend of art and function.
This project can be done with sewing, no-sew methods, or even light quilting. The versatility of the pattern means you can adapt it to suit your tools and skill level. Whether you want a flat, minimalist coaster or a textured 3D floral one, the flower coasters tissue – pattern allows for full creativity.
Many crafters choose this type of project because of its low cost. You can use fabric scraps, leftover tissue material, or even repurpose old linens. With just a small investment, you can create something beautiful and reusable.
These coasters also make great gifts. A set of four or six tied with ribbon makes a perfect present for housewarmings, bridal showers, or birthdays. Since each one is handmade, every set has a unique charm that recipients appreciate.
Perhaps most importantly, flower coasters are functional. They protect furniture while also brightening up your living space. When paired with a good pattern, they become a stylish part of your everyday life.
2. Materials and Tools You’ll Need to Get Started
To create your flower coasters tissue – pattern, the first step is choosing your fabric. Lightweight cotton or tissue fabric works best because it’s easy to sew and gives a soft, elegant look. You can also use felt for a more structured finish.
You’ll need a clear flower-shaped pattern to trace. You can find many free flower coaster tissue patterns online or design your own by sketching a simple flower with five or six petals. Print or draw this on card stock to use as a stencil.
Other essential tools include sharp scissors or a rotary cutter, pins, matching thread, a sewing machine (or a needle for hand sewing), and a fabric marker or chalk. If you’re adding a middle layer for thickness, lightweight interfacing or batting works well.
Optional decorative supplies include embroidery floss for stitching flower details, beads for embellishments, and pinking shears for a decorative edge. If you want a no-sew option, fabric glue or fusible webbing can be used instead of stitches.
It’s helpful to iron your tissue fabric before cutting. This ensures your shapes are neat and precise. Tissue fabric can be delicate, so handle it gently to avoid fraying or tearing, especially around the edges of the petals.
Once your materials are ready, set up your workspace in a clean, well-lit area. Organize your supplies so you can move through the process without stopping to search for tools. Good preparation makes crafting enjoyable and stress-free.
3. Step-by-Step Instructions for Making Flower Coasters
Begin by placing your flower pattern on the tissue fabric and tracing around it using fabric chalk. For each coaster, you’ll need two pieces—one for the front and one for the back. If you’re adding interfacing, cut one additional flower shape.
Layer your pieces so the front and back are right sides together, and the interfacing (if using) is placed underneath. Pin the layers securely, making sure the edges align. This helps ensure your coaster keeps its flower shape after stitching.
Sew around the edge of the flower using a 1/4-inch seam allowance. Leave a small opening (about 1 to 1.5 inches) unstitched so you can turn the coaster inside out. Be careful around the petal curves, and take your time to keep the shape even.
After stitching, trim the edges to reduce bulk, especially around the petal curves. You can use pinking shears or snip small notches in the seam allowance to help the coaster lay flat once turned.
Turn the coaster right-side out through the opening. Use a blunt object like a chopstick to gently push out the petals and smooth the curves. Once the shape is fully turned, press it flat with a warm iron.
To finish, stitch the opening closed with a small, neat stitch. You can also topstitch around the entire coaster to reinforce the shape and add a decorative touch. Your flower coasters tissue – pattern piece is now ready to use or gift.
4. Design Ideas and Personalization Tips
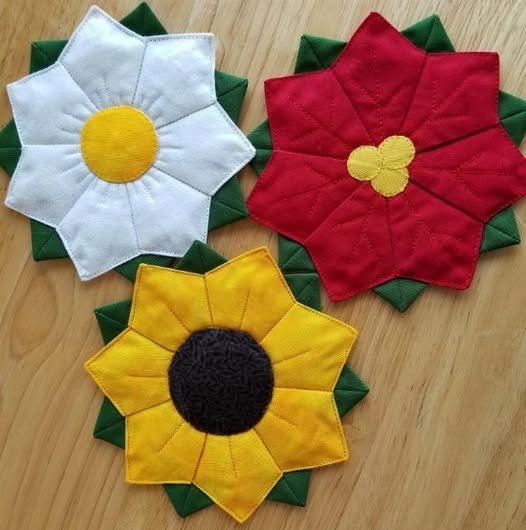
With the basic flower coasters tissue – pattern complete, there are countless ways to personalize your project. Start by experimenting with different flower styles—daisies, sunflowers, roses, or abstract floral designs all make eye-catching coasters.
Color selection plays a big role. Use pastels for spring, bold tones for summer, or rich hues for autumn. You can also combine prints and solids to create a layered, dimensional look. Matching thread colors or contrasting stitches can change the feel completely.
Add hand-stitched details such as veins on petals or a spiral center. Embroidery floss in a darker or metallic shade gives your coaster extra elegance. Beads or sequins can also be added to the center of the flower for sparkle.
If gifting, consider personal touches like initials, dates, or monograms. These details can be hand-stitched or created with iron-on letters. They make the coasters feel extra thoughtful and customized for the recipient.
You can even add scents to your coasters. A drop of lavender or citrus essential oil on the batting layer adds a refreshing aroma. Just make sure to use only a small amount so it doesn’t stain or overpower.
Finally, package your coasters beautifully. Wrap them in tissue paper, place in a small box, or tie with twine and a handwritten tag. Presentation goes a long way in making your handmade flower coasters tissue – pattern truly special.
FAQ – Frequently Asked Questions
Q1: What is the best fabric to use for flower tissue coasters?
Lightweight cotton or tissue fabric works best. Felt is another good option for structure. Choose fabrics that are easy to sew and can handle light moisture.
Q2: Do I need a sewing machine to make flower coasters?
No. While a sewing machine speeds up the process, you can hand-sew or even use fabric glue or fusible web for a no-sew option.
Q3: Can I wash the coasters?
Yes, if you use washable materials like cotton and thread. Hand wash with mild detergent and air dry to preserve the shape and details.
Q4: How do I make the petals look even?
Use a well-made pattern and trace carefully. Sewing slowly around curves and trimming the seam allowance helps maintain symmetry.
Q5: Are these coasters heat-resistant?
They offer some heat protection but are not suitable for extremely hot pans. They’re best for cups, mugs, or small dishes.
Q6: Can kids make flower coasters too?
Absolutely. With adult supervision, kids can use felt and glue for a simple version of the flower coasters tissue – pattern project.
Conclusion
Making your own flower coasters tissue – pattern is a fun, creative, and rewarding experience that combines art and purpose. These floral designs bring a fresh, handmade feel to your home and make lovely, heartfelt gifts for friends and family.
Throughout this article, we explored the meaning of this project, what materials you need, step-by-step instructions, and fun personalization tips. With just a few basic supplies and a little time, you can create something truly beautiful and functional.
We hope this guide has inspired you to start your own flower coasters tissue – pattern project. If you’ve enjoyed this tutorial or have ideas to share, please leave a sincere opinion or any suggestions below. Your feedback helps us bring more creative content to life!