The Flutter Quilt with Golden Aster – Pattern is a breathtaking design that captures the delicate movement of butterflies dancing over sun-drenched autumn wildflowers. This specific quilting project has gained immense popularity among modern makers who want to combine traditional patchwork techniques with a contemporary, botanical aesthetic. By following the Flutter Quilt with Golden Aster – Pattern, you are not just sewing pieces of fabric together; you are creating a textile narrative that celebrates the golden hues of the Chrysopsis flower and the rhythmic flutter of wings. The design relies on a clever use of negative space and vibrant yellow accents to bring a sense of light and life into any bedroom or living space.
When embarking on a project like the Flutter Quilt with Golden Aster – Pattern, the quilter is invited to explore a sophisticated palette of ochre, mustard, and gold, contrasted with the soft whites or deep navies that represent the sky. The pattern itself is meticulously drafted to ensure that even the most intricate “flutter” elements are achievable for intermediate quilters while remaining engaging for seasoned experts. What makes the Flutter Quilt with Golden Aster – Pattern truly stand out in the world of modern quilting is its ability to look organic and wild while being built on a foundation of precise geometric shapes. This balance ensures that the finished quilt is both a cozy household item and a stunning piece of wall art.
In the following sections, we will delve deep into the technical and creative requirements for successfully completing the Flutter Quilt with Golden Aster – Pattern. We will define the two core components: the Flutter Quilt with Golden Aster, which is the finished physical heirloom, and the Pattern, which serves as your indispensable guide through cutting, piecing, and finishing. Mastering this Flutter Quilt with Golden Aster – Pattern requires a blend of patience, color theory, and accurate seam allowances. Whether you are looking to brighten your own home or create a meaningful gift for a loved one, this guide will provide the insights necessary to transform a stack of fabric into a masterpiece of movement and floral brilliance.
1. Choosing Fabrics and Tools for the Flutter Quilt with Golden Aster – Pattern
Selecting the right textiles for your Flutter Quilt with Golden Aster – Pattern is the most crucial step in achieving that sun-kissed, ethereal look. To truly honor the “Golden Aster” portion of the design, look for high-quality quilting cottons in various shades of yellow, ranging from pale lemon to deep, toasted amber. These tonal variations provide depth to the flower petals within the pattern, making them appear to glow against the background fabric.
The “flutter” aspect of the Flutter Quilt with Golden Aster – Pattern is best represented by light-reflective fabrics or prints with small, directional movements. Consider using a mix of solid fabrics and subtle tone-on-tone prints to give the butterfly elements a sense of flight. When you follow the Flutter Quilt with Golden Aster – Pattern, you’ll realize that choosing a high-contrast background, such as charcoal or crisp linen, makes the golden elements vibrate with energy and visual interest.
Precision tools are non-negotiable when working on a Flutter Quilt with Golden Aster – Pattern. A high-quality rotary cutter with a fresh blade and a long acrylic ruler will ensure that your strips and triangles are cut perfectly to the dimensions specified in the pattern. Because this design involves several diagonal seams to create the wing and petal shapes, having a reliable marking pen for drawing stitch lines is essential for maintaining the symmetry of the Flutter Quilt with Golden Aster.
Thread choice also plays a significant role in the Flutter Quilt with Golden Aster – Pattern. While many quilters prefer a neutral 50wt cotton thread for piecing, you might consider a variegated yellow or gold thread for the actual quilting process. This adds an extra layer of “flutter” detail across the surface of the Flutter Quilt with Golden Aster, tying the botanical theme together with every stitch you take through the batting and backing.
Don’t forget to prepare your workspace for the Flutter Quilt with Golden Aster – Pattern by ensuring your iron is clean and ready for frequent use. Pressing is just as important as sewing in this pattern; every seam must be pressed flat to ensure the points of the butterflies and flowers align perfectly. Following the Flutter Quilt with Golden Aster – Pattern instructions on pressing directions—whether to the side or open—will prevent bulky intersections that can throw off your measurements.
Finally, consider the batting you choose for your Flutter Quilt with Golden Aster. A low-loft cotton batting will give the quilt a traditional, crinkly look after washing, which complements the organic theme of the pattern. If you want the “Golden Aster” motifs to pop and have more dimension, a wool blend batting provides excellent stitch definition, making the intricate work of your Flutter Quilt with Golden Aster – Pattern stand out even from a distance.
2. Understanding the Geometry of the Flutter Quilt with Golden Aster – Pattern
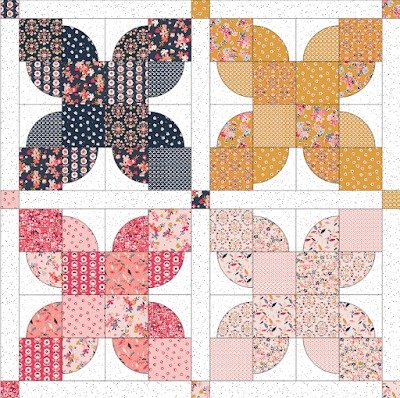
The architecture of the Flutter Quilt with Golden Aster – Pattern is based on a grid system that simplifies complex shapes into manageable units. Most of the “flutter” elements are created using Half-Square Triangles (HSTs) and Flying Geese units. By mastering these two basic building blocks, the pattern becomes much less intimidating, allowing you to focus on the beautiful color transitions that define the Flutter Quilt with Golden Aster.
In the Flutter Quilt with Golden Aster – Pattern, the “Golden Aster” block usually acts as the anchor of the design. This block utilizes a “star-burst” arrangement of diamonds or triangles to mimic the many petals of the aster flower. The pattern provides specific coordinates for placing these blocks so they look like they are blooming naturally across the surface of the quilt, rather than being stuck in a rigid, boring row.
The “flutter” movement is achieved through the clever rotation of wing-shaped units throughout the Flutter Quilt with Golden Aster – Pattern. By varying the angle of these units, the pattern creates a secondary design element that leads the eye across the quilt. This kinetic energy is what separates a standard floral quilt from the dynamic experience of a Flutter Quilt with Golden Aster, making it a favorite for those who love modern movement in their textiles.
A key technical term in the Flutter Quilt with Golden Aster – Pattern is “fussy cutting.” This involves cutting your fabric so that a specific motif—perhaps a small bee or a specific flower—is centered within a piece. While not strictly required for the pattern, fussy cutting can add “hidden” details to your Flutter Quilt with Golden Aster, rewarding those who look closely at your handiwork with delightful, unexpected surprises.
The Flutter Quilt with Golden Aster – Pattern also emphasizes the importance of the “scant quarter-inch” seam. Because there are many intersections in the butterfly wings and flower petals, even a tiny deviation in seam width can lead to lost points or mismatched corners. Following the pattern‘s advice to test your seam allowance before starting the main blocks will ensure that your Flutter Quilt with Golden Aster turns out exactly the size intended.
Lastly, the border and binding of the Flutter Quilt with Golden Aster – Pattern serve as the frame for your floral masterpiece. The pattern might suggest a “narrow” binding to keep the focus on the internal movement, or perhaps a “scrappy” binding made from the leftover golden scraps. Regardless of the choice, these final touches are what seal the edges of the Flutter Quilt with Golden Aster, ensuring it remains a durable and cherished item for generations.
3. Step-by-Step Assembly of the Flutter Quilt with Golden Aster – Pattern
The assembly of the Flutter Quilt with Golden Aster – Pattern begins with the creation of the individual units, starting with the Golden Aster centers. You will likely sew small squares to the corners of larger rectangles—a technique often called “snowballing”—to create the rounded petal shapes. By organizing your fabric by “petal tone” before you start, you can ensure a beautiful gradient that makes each flower in the Flutter Quilt with Golden Aster look unique.
Once the petals are ready, the Flutter Quilt with Golden Aster – Pattern moves on to the butterfly units. These are typically constructed in mirror-image pairs to represent the left and right wings. It is helpful to lay these out on a design wall or a flat floor as you go; this allows you to see the “flutter” taking shape and ensures you don’t accidentally sew a wing upside down, a common pitfall when following a complex pattern.
Joining the units into rows is the next phase of the Flutter Quilt with Golden Aster – Pattern. At this stage, it is vital to use plenty of pins at every intersection where the wings meet the flowers. This “pinning for success” ensures that the delicate points of the Flutter Quilt with Golden Aster remain sharp and don’t get cut off by the next seam, preserving the professional look of the pattern‘s design.
As the rows come together to form the quilt top, you will begin to see the full impact of the Flutter Quilt with Golden Aster – Pattern. The negative space between the golden blooms and the fluttering wings creates “breathing room,” which is a hallmark of modern quilt design. This stage of the pattern is incredibly rewarding, as the disparate pieces of fabric finally transform into the cohesive image of a sunlit garden in the Flutter Quilt with Golden Aster.
After the top is finished, the Flutter Quilt with Golden Aster – Pattern guides you through the “quilt sandwich” process. This involves layering your beautiful top with batting and a backing fabric—perhaps a floral print that complements the Golden Aster theme. Basting these layers together securely is essential so that they don’t shift during the quilting process, ensuring that the Flutter Quilt with Golden Aster remains flat and distortion-free.
The final assembly step in the Flutter Quilt with Golden Aster – Pattern is the quilting itself. You might choose to quilt “in the ditch” to hide the stitches, or use “free-motion quilting” to create swirling wind patterns that enhance the flutter theme. Whichever method you choose, the quilting adds the final texture and “soul” to the Flutter Quilt with Golden Aster, completing the journey from a paper pattern to a finished work of art.
4. Care and Display Tips for Your Flutter Quilt with Golden Aster
Once your Flutter Quilt with Golden Aster – Pattern is complete, knowing how to care for it will ensure its longevity. Since golden and yellow dyes can sometimes be sensitive, it is recommended to wash your Flutter Quilt with Golden Aster in cold water with a “color catcher” sheet. This prevents any of the vibrant golden hues from bleeding into the lighter background sections, keeping the pattern‘s contrast sharp and clean for years.
Displaying your Flutter Quilt with Golden Aster is a joy in itself. Because the “Golden Aster” theme is so warm, it looks particularly beautiful in rooms with plenty of natural sunlight. You can drape it over the back of a sofa to show off the “flutter” movement, or use a quilt hanger to display it on a wall where the pattern can be appreciated as a large-scale botanical illustration.
If you plan to use your Flutter Quilt with Golden Aster as a daily-use blanket, remember to rotate it occasionally. This prevents uneven wear on the fabric and protects the gold pigments from localized sun fading. Following the Flutter Quilt with Golden Aster – Pattern was a labor of love, and treating the finished quilt with respect ensures that the story of the butterflies and flowers continues to be told.
Seasonal storage for the Flutter Quilt with Golden Aster should be done with care. Instead of folding the quilt in the same place every time—which can cause permanent creases that damage the fibers—try rolling the quilt or folding it loosely with acid-free tissue paper. This preserves the structural integrity of the pattern‘s piecing and keeps the Flutter Quilt with Golden Aster looking fresh for every autumn season.
Many quilters like to add a personalized label to their Flutter Quilt with Golden Aster – Pattern project. On this label, you can record the date, the name of the pattern, and the reason you chose the “Golden Aster” theme. This provides historical context for future generations who might inherit the Flutter Quilt with Golden Aster, turning a DIY project into a documented family heirloom.
Finally, sharing your version of the Flutter Quilt with Golden Aster – Pattern with the quilting community can be incredibly fulfilling. Whether through social media or local quilt guilds, seeing how others have interpreted the pattern‘s “flutter” and “gold” elements can provide new inspiration. Every Flutter Quilt with Golden Aster is unique, reflecting the personality and skill of the maker who brought the pattern to life.
Frequently Asked Questions (FAQ)
Is the Flutter Quilt with Golden Aster – Pattern suitable for beginners?
While a total beginner might find the diagonal seams challenging, the pattern is perfect for a “confident beginner” or intermediate quilter. The key is to take your time with cutting and use a consistent seam allowance to ensure all the flutter units align.
What size is the finished Flutter Quilt with Golden Aster?
The standard pattern typically produces a “Throw” size quilt (approximately 60″ x 70″), but instructions are often included to scale the pattern up to a Queen or King size by adding more Golden Aster blocks and flutter units.
Can I use different colors for the Golden Aster?
Absolutely! While the Flutter Quilt with Golden Aster – Pattern is designed around golden tones, you could easily substitute them for purples (like New England Asters) or pinks. The “flutter” elements work beautifully with any floral color palette.
How much fabric do I need for the Flutter Quilt with Golden Aster – Pattern?
Generally, you will need about 3 to 4 yards of background fabric and a variety of fat quarters or 1/4-yard cuts for the golden petals and wings. Always refer to the specific pattern requirements before purchasing your fabric.
What is the best way to quilt the “flutter” motion?
Many quilters find that “swirls” or “loops” in the quilting design best mimic the movement of butterflies. Following the lines of the pattern with your quilting stitches can also emphasize the geometric beauty of the Golden Aster flowers.
Is this pattern available for digital download?
Most modern designers offer the Flutter Quilt with Golden Aster – Pattern as a PDF download or a printed booklet. Check with your favorite independent quilt shops or online pattern marketplaces for availability.
Conclusion
In summary, the Flutter Quilt with Golden Aster – Pattern is a sophisticated and rewarding project that brings the beauty of nature into the world of quilting. We have explored the importance of selecting vibrant golden fabrics, the technical mastery of HSTs and Flying Geese, and the careful assembly required to make the “flutter” elements come to life.
By following this pattern, you create more than just a blanket; you create a Flutter Quilt with Golden Aster that captures a moment of seasonal magic through fabric and thread. The combination of botanical inspiration and modern geometry makes this design a timeless addition to any quilter’s repertoire.