The Flying Around Quilt Block – Pattern is a timeless design loved by quilters for its dynamic movement and visual appeal. Often built around triangular shapes that give a sense of flight and rotation, this pattern is versatile, beginner-friendly, and adaptable to various quilting projects. Whether you’re making a wall hanging, a baby quilt, or a full-size bedspread, this design provides both structure and creativity in equal measure.
Incorporating the Flying Around Quilt Block – Pattern into your quilting projects allows you to experiment with color, layout, and texture. The block typically uses half-square triangles (HSTs), making it an excellent choice for practicing precision piecing. With the right combination of fabrics, this pattern can look traditional, modern, or somewhere in between—perfect for expressing your personal style.
Throughout this article, we’ll explore the history, construction, fabric selection, and creative variations of the Flying Around Quilt Block – Pattern. You’ll also find tips and answers to frequently asked questions, ensuring you’re supported at every stage of your quilting journey. Whether you’re new to quilting or a seasoned sewist, this guide is here to inspire your next masterpiece.
1. The Beauty and History of the Flying Around Quilt Block
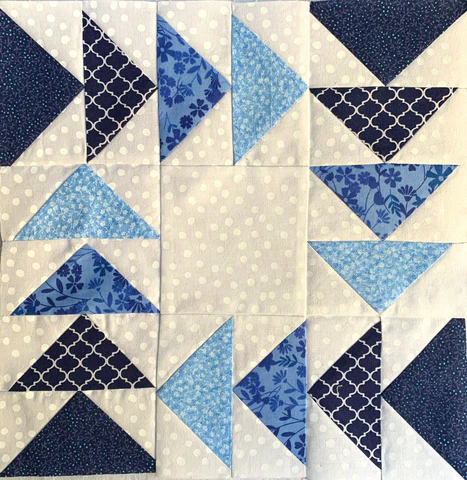
The Flying Around Quilt Block – Pattern has roots in traditional quilting, where geometric designs told stories, marked occasions, and expressed artistry in fabric form. This particular block gets its name from the way the triangles seem to move around a central axis, evoking a sense of rotation or flight.
The appeal of this block lies in its balance of simplicity and motion. Though made from basic shapes—primarily squares and triangles—the way they are arranged gives the illusion of spinning or flying. This makes it visually interesting and adds dynamic energy to any quilt top.
Historically, flying triangle patterns were used in quilts to symbolize migration, travel, or freedom. Many variations of the Flying Around Quilt Block – Pattern appeared in early American quilts and are still widely recognized in modern quilting circles today.
What makes this pattern especially popular among beginners is its structure. With repeated units and clear lines, it’s easy to follow while still offering plenty of room for experimentation. More advanced quilters also love it for the way it interacts with color and space, offering opportunities for striking contrast or subtle gradients.
The Flying Around Quilt Block – Pattern also scales beautifully. You can use smaller blocks to create intricate details or go big with bold, oversized pieces. Regardless of your approach, the design remains clean and captivating.
In essence, the flying around block is not just a design—it’s a storytelling tool. Its movement and history give quilts a sense of life and legacy, making it a cherished pattern in quilting traditions around the world.
2. Materials and Fabric Selection for the Pattern
To successfully create a Flying Around Quilt Block – Pattern, the materials you choose will play a major role in how the final quilt looks and feels. The two main elements are the fabric and the batting, and your choices here should balance both aesthetics and functionality.
Start with 100% cotton fabric, which is the go-to choice for most quilting projects. It’s easy to cut, presses well, and has the right amount of stretch and durability. Solid colors will make the shapes in the block stand out more clearly, while small-scale prints can add depth without overwhelming the design.
Choosing your color palette is where the fun begins. For a modern look, try using high-contrast colors like black and white or bold combinations like teal and coral. If you’re going for something more traditional, earthy tones or muted pastels work well with the Flying Around Quilt Block – Pattern.
You’ll also need a reliable rotary cutter, a self-healing mat, and a clear quilting ruler to ensure precise measurements. Accuracy is key when cutting your half-square triangles, as even slight deviations can throw off the symmetry of the block.
The batting, which sits between the quilt top and backing, should be lightweight and flexible. Cotton or cotton-blend batting works well for wall hangings and bed quilts alike. Make sure it’s compatible with the thickness of your quilt layers and suitable for the quilting method you plan to use.
For backing fabric, choose something that complements the colors in your quilt top. If your top is busy or colorful, a neutral backing can offer balance. For a minimalist top, a patterned backing adds surprise and character.
Lastly, before starting any sewing, starch your fabrics lightly and iron them flat. This helps prevent stretching and makes your piecing more precise. With all materials prepped, you’re ready to bring your Flying Around Quilt Block – Pattern to life.
3. Piecing and Assembling the Flying Around Quilt Block
Creating the Flying Around Quilt Block – Pattern starts with mastering the half-square triangle, or HST. This unit forms the backbone of the design, and once you understand how to construct it accurately, the rest of the block will come together easily.
To make an HST, place two squares of fabric right sides together, draw a diagonal line on the back of the lighter square, and sew 1/4 inch on both sides of the line. Cut along the drawn line to create two HSTs. Press the seams toward the darker fabric and trim to the desired size.
Once you have your HSTs ready, lay them out in the flying around configuration. Typically, this involves a central square surrounded by HSTs pointing outward or in a rotating pattern. Use a design wall or flat surface to preview the layout and adjust for color balance and symmetry.
Sew the blocks in rows, making sure to nest seams wherever possible. This means pressing adjacent seams in opposite directions so they lock together when sewn. It improves alignment and keeps your points crisp.
After sewing the rows, join them to complete the block. Take your time to match seams and points carefully, and press the entire block flat. A well-pressed block lies neatly and looks more polished in the final quilt.
Repeat this process to create multiple blocks, which you can arrange in various ways depending on your project. You might alternate blocks with plain squares for a lighter feel or rotate them for more visual movement.
Once all your blocks are assembled, sew them together to form the quilt top. Press the seams and inspect your work. The bold geometry and movement of the Flying Around Quilt Block – Pattern will already be visible, creating a stunning centerpiece for your quilt.
4. Finishing the Quilt and Creative Ideas
With your quilt top complete, the next step is to prepare the quilt sandwich. This includes the top (with your Flying Around Quilt Block – Pattern), the batting, and the backing fabric. Layer them carefully, ensuring everything is smooth and wrinkle-free.
Baste the layers together using your preferred method—safety pins, basting spray, or long hand stitches. Starting in the center and working outward helps maintain even tension and prevents shifting during quilting.
For quilting, you can keep it simple with straight-line stitching along the block seams or get creative with free-motion quilting that echoes the triangular shapes. Choose a thread color that either blends in for a subtle finish or contrasts for added flair.
Once quilting is complete, trim the edges of your quilt to square it up. Now it’s time to bind the quilt. Use bias or straight-grain binding in a fabric that complements your design. Attach it by machine or hand, depending on your preference and time.
Add a personalized label to your quilt’s back with your name, the date, and perhaps a message. This turns your creation into a keepsake and adds a personal touch that future recipients will cherish.
If you’re feeling adventurous, explore variations of the Flying Around Quilt Block – Pattern. Combine it with other traditional blocks, experiment with asymmetrical layouts, or scale the blocks up for a minimalist quilt design. The possibilities are endless and offer room for growth and creativity.
FAQ: Flying Around Quilt Block – Pattern
What size should I make the Flying Around Quilt Block?
A1: Most quilters use 12-inch finished blocks, but the pattern is scalable. Adjust the size of your squares and HSTs based on your desired quilt dimensions.
Is this pattern good for beginners?
A2: Yes, the Flying Around Quilt Block – Pattern is ideal for beginners who want to learn piecing techniques, especially half-square triangles.
Can I use pre-cuts for this pattern?
A3: Absolutely. Charm packs or layer cakes work well, especially for creating HSTs. Just be sure to trim your pieces to maintain accuracy.
How many blocks do I need for a full-size quilt?
A4: This depends on your block size. For 12-inch blocks, a 5×6 layout (30 blocks) creates a 60″x72″ quilt top—add borders if needed.
What is the best way to press seams in this pattern?
A5: Press seams open for flatter blocks or nest them to make matching points easier. Consistency is key to a neat finish.
Can I mix this pattern with other block designs?
A6: Yes! The Flying Around Quilt Block – Pattern pairs well with simpler blocks like squares or rectangles, or can be alternated with negative space for a modern look.
Conclusion
The Flying Around Quilt Block – Pattern offers a perfect balance of structure, motion, and creative freedom. Whether you’re a first-time quilter or a seasoned pro, this pattern brings energy and elegance to any project. With its rich history, simple construction, and stunning results, it’s a must-have in your quilting repertoire.
We hope this guide has helped you understand the ins and outs of the Flying Around Quilt Block – Pattern. If you’ve tried it or have thoughts and tips to share, please leave a sincere opinion or suggestion below.
Your feedback helps inspire other makers and keeps the quilting community connected. Happy quilting!