The Flying Geese Units is one of the most popular and versatile designs in quilting. Known for its distinctive triangular shapes, this pattern has been used in countless quilt designs, from traditional to modern styles.
The name “Flying Geese” is derived from the shape of the blocks, which resemble a flying V-shaped formation.
Whether you’re an experienced quilter or just starting out, learning how to make Flying Geese Units will elevate your quilting projects and add beautiful symmetry to your quilts.
In this article, we will dive deep into the process of making Flying Geese Units and explore how they can be used in various quilt designs. We will cover everything from the basics of the pattern to step-by-step instructions, tips, and tricks that will ensure your Flying Geese units are precise and perfect every time. So, whether you’re making a classic quilt or experimenting with new patterns, mastering this technique will help you create quilts that are both functional and stunning.
The Flying Geese Units – Quilt Pattern is more than just a traditional design; it’s an adaptable motif that can be customized to suit any quilting style. From adding a pop of color to using more intricate fabrics, there are endless ways to incorporate this pattern into your quilting projects. As we move forward, we will break down the essential steps to help you make beautiful Flying Geese blocks and discover new creative possibilities for your quilts.
1. Understanding the Basics of Flying Geese Units
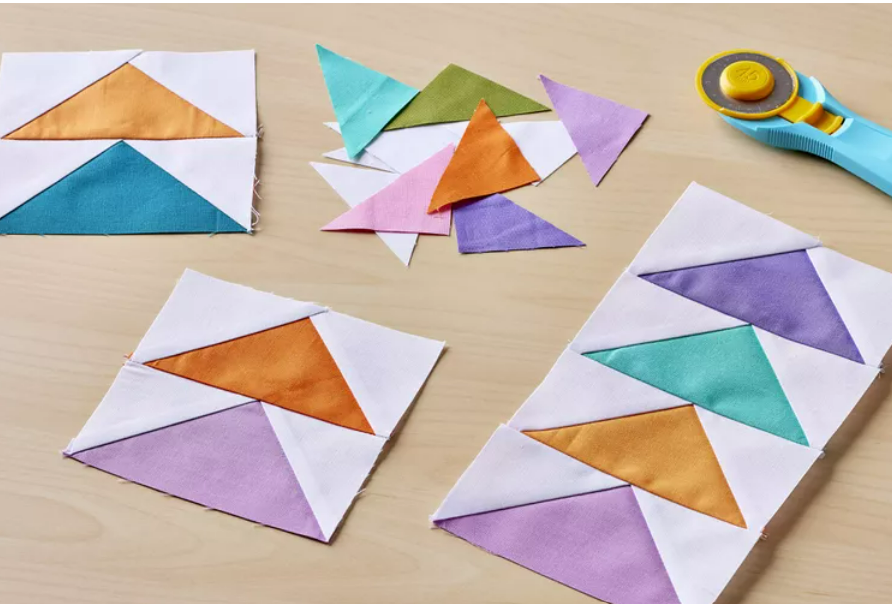
Before you begin making Flying Geese Units, it’s important to understand the basic structure of the pattern. A Flying Geese unit consists of a central rectangle with two triangles on each side, forming a V-shape. The key to creating these units is in the accurate cutting and stitching of the triangles and rectangle, which ensures that the units will fit together correctly when assembled into a quilt.
Typically, the Flying Geese unit measures 3.5 inches by 6.5 inches, but you can adjust the size based on your project. The size of the unit depends on how large you want your blocks to be and how many Flying Geese units you need to fit into your quilt design. For example, if you are making a quilt with smaller blocks, you can use smaller Flying Geese units or cut the pieces accordingly.
The Flying Geese Units – Quilt Pattern is often made by piecing together a combination of squares and rectangles. Some quilters prefer to use pre-cut fabric, such as charm packs or jelly rolls, while others cut their fabric from scratch. Both methods have their benefits, so it’s important to choose what works best for your skill level and the type of quilt you are creating.
2. The Steps to Create Flying Geese Units
Creating Flying Geese Units involves a series of precise steps to ensure that each triangle fits perfectly with the rectangle. By following a structured process, you can create flawless Flying Geese units every time. Here’s a step-by-step guide to help you master the technique:
- Prepare Your Fabric
Start by cutting the fabric pieces you will need for the Flying Geese units. You will need one rectangle for the center of the unit and two squares for the triangles. Make sure to cut your fabric pieces accurately, as even slight deviations can affect the fit of the unit. - Create the Triangles
To create the triangles for the Flying Geese Units, take the two squares and cut each one diagonally in half to create two triangles. This step is crucial because the triangles need to be perfectly shaped to form the V-shape when sewn together with the rectangle. - Sew the First Triangle to the Rectangle
Place one of the triangles on one side of the rectangle, right sides together, and sew along the edge. Make sure the triangle is centered and that the edges are aligned. After sewing, press the seam open. - Attach the Second Triangle
Take the second triangle and sew it onto the opposite side of the rectangle, again ensuring that it is centered and aligned. Press the seam open once you have sewn the second triangle in place. - Trim the Flying Geese Unit
After both triangles are attached, trim the excess fabric from the sides of the unit to ensure that it is an even size. This will help the Flying Geese unit fit perfectly with other blocks in your quilt. - Repeat the Process
Repeat these steps for the remaining Flying Geese units you need for your quilt. Make sure to check the size of each unit as you go to ensure consistency.
By following these steps, you will create beautiful Flying Geese Units that are accurate and ready to be incorporated into your quilt design.
3. Tips and Tricks for Perfect Flying Geese Units
While creating Flying Geese Units is a fairly straightforward process, there are a few tips and tricks that can help you achieve even more precise and beautiful results. These tricks can save you time and frustration, ensuring your Flying Geese units are perfect every time.
- Use a Quarter-Inch Foot for Your Sewing Machine
A quarter-inch foot helps ensure that your seams are consistently the right size. This is especially important when making Flying Geese units, as any slight discrepancy in seam allowance can throw off the fit of the triangles. - Press Seams Open
When sewing the triangles to the rectangle, press the seams open rather than to one side. This will create a flatter, smoother unit and reduce bulk at the seams, making it easier to join your Flying Geese units to other blocks. - Trim as You Go
Make sure to trim excess fabric after each step to keep your Flying Geese units even and consistent. This will help your units fit together perfectly and avoid the need for trimming once the quilt is pieced together. - Use a Flying Geese Ruler
If you want to take the guesswork out of cutting and trimming your Flying Geese units, consider using a Flying Geese ruler. These specialty rulers are designed to help you cut and trim your fabric pieces to the correct size for a precise fit. - Pre-Cut Fabric for Faster Quilting
If you are making a quilt with many Flying Geese units, pre-cut fabric can save time. You can buy pre-cut triangles or use charm packs or layer cakes to speed up the process without sacrificing the quality of your work. - Practice Makes Perfect
Don’t be discouraged if your first few Flying Geese units aren’t perfect. Like all quilting techniques, practice will help you become more confident and precise. Keep experimenting, and you’ll soon master this technique.
4. Creative Uses for Flying Geese Units in Quilt Designs
Flying Geese Units are not only a classic pattern but also a versatile one that can be used in a variety of quilt designs. Once you’ve mastered the technique, you can incorporate Flying Geese units into numerous creative layouts, from traditional to modern styles. Here are a few ideas for incorporating Flying Geese units into your quilts:
- Traditional Flying Geese Layouts
A classic way to arrange Flying Geese units is by placing them in rows, creating a zig-zag or chevron pattern. This design works well for quilts with a more traditional look and can be customized with a variety of color schemes. - Diagonal Flying Geese
For a more dynamic quilt, you can arrange the Flying Geese units diagonally across the quilt top. This design creates movement and interest, making it perfect for a modern quilt with bold colors and shapes. - Flying Geese in a Star Pattern
Another popular layout is to arrange Flying Geese units to form star shapes. By strategically placing the units, you can create stunning star blocks that can be used as the focal point of your quilt. - Scrappy Flying Geese
For a fun and eclectic look, try making Flying Geese units using a variety of fabric scraps. This creates a scrappy, improvised look that adds a lot of character to your quilt. - Mix Flying Geese with Other Blocks
Flying Geese units can be combined with other quilt blocks to create more intricate and varied designs. For example, you can mix Flying Geese with nine-patch blocks, half-square triangles, or even appliqué designs. - Flying Geese as Borders
Flying Geese units can also be used as borders to frame the center of your quilt. This adds a unique touch to the quilt and gives it a finished, polished look.
FAQ
- What is the size of a Flying Geese unit?
A standard Flying Geese unit is typically 3.5 inches by 6.5 inches, but you can adjust the size depending on your project. - Can I make Flying Geese units without special tools?
Yes! You can create Flying Geese units with basic tools like a ruler, rotary cutter, and a quarter-inch foot on your sewing machine. - What fabrics work best for Flying Geese units?
You can use a variety of fabrics, but it’s recommended to use cotton fabric, as it’s easy to work with and holds its shape well. - How do I make Flying Geese units larger or smaller?
To adjust the size of your Flying Geese units, simply increase or decrease the size of the rectangle and triangle pieces you cut. - Can I use Flying Geese in modern quilts?
Absolutely! Flying Geese units work well in both traditional and modern quilts. You can experiment with different fabrics and color schemes for a contemporary look.
Conclusion
The Flying Geese Units – Quilt Pattern is a timeless and versatile pattern that can add beauty and symmetry to any quilt design. By following the steps outlined in this article, you can create perfect Flying Geese units and incorporate them into various quilt layouts. Whether you’re working on a traditional quilt or experimenting with modern designs, this pattern offers endless possibilities for creativity.
We hope this guide has helped you understand the process of creating Flying Geese Units. Please leave a comment with your thoughts, suggestions, or any questions you may have!