Looking for a charming yet simple way to brighten up your crafts or home décor? The Folded hexagonal stars – pattern is a timeless paper or fabric folding technique that adds elegance to any creative project.
These six-pointed stars, made by folding strips of paper or fabric into geometric shapes, are perfect for holiday ornaments, quilt blocks, scrapbooks, greeting cards, or even wall hangings.
One of the best things about folded hexagonal stars is that they look complex, but are surprisingly easy to make once you understand the pattern. This craft combines mathematical precision with artistic creativity, allowing crafters to create symmetrical, stunning stars using minimal materials. It’s a calming, mindful process that appeals to both beginners and experienced makers alike.
In this article, we’ll guide you through the materials, techniques, styling options, and creative uses for the folded hexagonal stars – pattern. Whether you’re using paper, fabric, or ribbon, you’ll find helpful tips, inspiration, and answers to common questions. Let’s explore the beauty of geometry, one fold at a time!
1. Materials and Tools for Folded Hexagonal Stars – Pattern
To begin working with the folded hexagonal stars – pattern, you’ll need to gather a few simple tools and materials. These stars can be created from paper, ribbon, or fabric, depending on your preference and the intended use of the finished piece.
Paper is the most common medium for beginners. You can use origami paper, cardstock, or colored craft paper. Choose sheets that are not too thick, so they fold cleanly without cracking. Patterned or metallic paper can add a special touch to holiday or celebratory decorations.
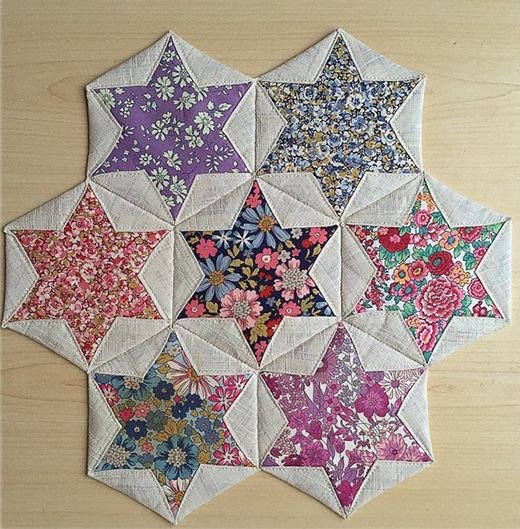
If you’re working with fabric, go for quilting cotton or starched material that holds folds well. This version is ideal for incorporating stars into sewing projects like quilts, pouches, or table runners. Pre-cut fabric strips (like jelly rolls) work perfectly.
Ribbons are another elegant option, especially for Christmas ornaments. Satin or grosgrain ribbons are great choices due to their flexibility and structure. Make sure they are at least ½ inch wide for best results.
You’ll need a ruler, pencil, and scissors to measure and cut your material. If precision is important to you, a cutting mat and rotary cutter will help create crisp, even strips.
For gluing or stabilizing your folded star, have some craft glue, a glue stick, or double-sided tape on hand. If using fabric, fabric glue or a few stitches with a needle and thread can help secure the shape.
A hot glue gun may also be useful for attaching stars to other surfaces or embellishing them with beads, sequins, or decorative trims once your folded star is complete.
2. Step-by-Step Instructions for Folding the Hexagonal Star
Now let’s walk through how to fold your very first hexagonal star using the folded hexagonal stars – pattern. This technique is easier than it looks and very satisfying once you get the hang of it.
Start by cutting six identical strips of paper or fabric. The length and width can vary depending on the size you want your star to be, but a good starting size is 1 inch wide and 6 inches long. All strips must be the same length for symmetry.
Fold each strip in half lengthwise and then crosswise to create crease marks that help with alignment. Then fold each strip into a triangle at one end, forming the start of a hexagonal petal. Repeat this with all six strips.
Now begin assembling your star. Take two folded strips and slide one into the triangle fold of the other, overlapping them slightly. This creates an interlocking structure that forms one arm of the star. Continue connecting the remaining strips in this way.
When you add the sixth and final strip, you’ll need to tuck its end into the fold of the first strip you started with. This closes the loop and creates a perfect six-pointed star. Make small adjustments to ensure symmetry and balance.
Secure the back of your star with a small drop of glue or a piece of double-sided tape to hold everything in place. If you’re working with fabric, a few small stitches can be used instead of glue.
Once complete, flatten the star gently to ensure all parts are aligned. Feel free to embellish it with tiny pearls, rhinestones, or even glitter if you’re feeling festive. Your first folded hexagonal star is now ready to shine!
3. Creative Ways to Use Folded Hexagonal Stars
The folded hexagonal stars – pattern can be used in endless creative projects. Their symmetry and aesthetic appeal make them ideal for a variety of decorative and functional purposes.
One of the most popular uses is as holiday decorations. Hang them on a Christmas tree, string them together into garlands, or attach them to gift tags for an elegant handmade touch. Paper stars are lightweight and perfect for this.
You can also use these stars in scrapbooking and card-making. Their geometric design adds depth and dimension to flat paper crafts. Use metallic paper for a dazzling effect, or textured cardstock for a rustic look.
In quilting or sewing, folded fabric stars can be used as quilt blocks, appliqué designs, or embellishments for tote bags and cushions. They add a 3D element to any textile project and are often used in Scandinavian or Amish quilting traditions.
Another popular application is wall art. Create a large starburst design by combining multiple hexagonal stars in different colors and sizes. Arrange them on a canvas or poster board to make a modern, eye-catching art piece.
Add a personal touch to party decor by using these stars in centerpieces, place cards, or table runners. They can be themed to match weddings, birthdays, or seasonal celebrations.
Teachers and parents also love using folded stars in educational crafts. They’re perfect for geometry lessons, motor skill development, or just fun rainy-day activities with kids. Easy to make and endlessly customizable!
4. Tips for Mastering the Folded Hexagonal Stars – Pattern
Although the folded hexagonal stars – pattern is accessible to beginners, a few insider tips can help you perfect your stars and add polish to your projects.
Start with basic paper before moving to fabric or ribbon. Paper is more forgiving and helps you understand the structure before moving on to more flexible or slippery materials.
Work on a flat, clean surface with good lighting. This helps keep your folds even and your angles consistent. Uneven folds can throw off the entire symmetry of the star.
If you’re making multiple stars, consider using a template or guide to ensure all strips are cut precisely the same size. This consistency is essential for a professional-looking finish.
Use light pressure when folding. Press firmly enough to make a crisp fold, but avoid creasing too hard, especially with delicate paper or fabric. Too much pressure can weaken the material.
Don’t rush the final connection step. Carefully tuck the last strip into the first and adjust the angles before gluing. This step defines the star’s shape, so it’s worth taking your time.
Store finished stars in a flat box or envelope to preserve their shape. If using them for a future project, label sizes and materials for quick identification later.
FAQ: Frequently Asked Questions
Q: What materials work best for making folded hexagonal stars?
A: Paper is easiest for beginners, but fabric and ribbon are great for more advanced or decorative versions. Choose materials that hold folds well, like origami paper or starched cotton.
Q: Can I use these stars in quilting projects?
A: Absolutely! Fabric versions of the folded hexagonal stars – pattern are often used as quilt blocks or appliqué pieces. They’re a great way to add texture and dimension to quilts.
Q: Are these stars difficult to make for beginners?
A: Not at all. While they look intricate, the folding steps are simple once practiced. Most people can complete a star in 10–15 minutes with a bit of guidance.
Q: How do I attach stars to cards, fabric, or walls?
A: Use craft glue or double-sided tape for paper stars. Fabric stars can be sewn on, and heavier materials can be attached using hot glue or fusible interfacing.
Q: What size should I cut the strips for the star?
A: A common starting size is 1 inch wide and 6 inches long, but you can scale up or down depending on your project. Just keep all strips the same size.
Q: Can I make these with children?
A: Yes! This pattern is great for school crafts or family activities. Just be sure to supervise cutting and gluing, and use child-safe tools.
Conclusion
In this guide, we’ve explored the timeless and creative Folded hexagonal stars – pattern—a versatile craft that combines geometry, creativity, and functionality. From gathering your materials and mastering the folds, to discovering endless uses and applying helpful tips, you’ve learned how to create beautiful, symmetrical stars for every occasion.
Whether you’re crafting for holiday décor, educational fun, or quilting magic, folded hexagonal stars are a joy to make and a pleasure to share. Their intricate appearance hides a surprisingly simple process, making them perfect for crafters of all skill levels.
If you found this article helpful or inspiring, please
leave a sincere opinion in the comments below and share any suggestions or ideas for how you use folded stars in your own projects. Let’s inspire each other to fold, create, and decorate with joy!